background image

41

G

GB

B

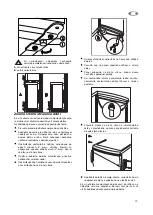
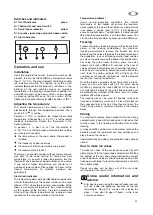
Switches and indicators

A) On/off indicator

green

B) Thermostat and on/off switch

C) Quick freeze indicator 

yellow

D) Acoustic signal stop and quick freeze switch

E) Alarm indicator 

red

Operation and use

Installation

Insert the plug into the socket. In order to switch on the
product, turn the thermostat 

(B)

to a temperature lower

than << -16°C >>. The green indicator will light up and the
red indicator will blink. The lighting up of the on/off
indicator 

(A)

means that the product is switched on.  The

blinking of the red indicator means an improper
temperature in the freezing compartment. In addition, an
intermittent sound can be heard, which can be stopped
by pressing button 

(D)

once. You can switch off the

freezer by turning the thermostat 

(B)

in position << 

>>.

Adjusting the temperature

The internal temperature of the freezer is regulated
electronically through five temperature positions and a
switch-off << 

>> setting.

Position << -16°C >> indicates the highest (least cold)
temperature, while position << -24°C >> is for the lowest
(coldest) temperature. Rotate the thermostat in the
desired position.

In general, it is best to set the thermostat to 
<< -18°C >> but, for the purpose of temperature setting,
you should also consider

the temperature of the room where the product is
installed,

the frequency of door openings,

the volume of food to be stored in the product,

the location of the product.

Therefore, you should consider all these factors and you
may have to do some testing for finding the best
temperature. If you want a lower temperature, turn the
thermostat into a position of higher number or, vice versa,
if you need a higher temperature, you should set a
position of lower number. Please allow 24 hours for the
freezer temperature to stabilize between two
adjustments.

Alarm (red) indicator

The temperature alarm indicator 

(E)

will light up when the

internal temperature of the freezer increases to a level
(above -12°C) where the long-term conservation of the
foods in not ensured. Please note that, when switching
on the freezer for the first time, the alarm indicator will
blink until the internal temperature has reached a level
required for the safe conservation of frozen food.

Temperature problem:

Under normal operating conditions, the internal
temperature of the freezer will ensure the long-term
conservation of the stored food. When such temperature
rises above a certain level (-12°C), it will trigger an
acoustic and light alarm. The light alarm is a blink red light

(E)

, while the acoustic alarm is an intermittent sound. You

can stop the acoustic alarm by pressing switch 

(D)

once.

Freezing

Prepare the various foods properly and then freeze them
always in the freezing compartment. For maximum
freezing performance remove the freezer tray and
baskets and then place the foods to be frozen directly on
the evaporator. In case of freezing smaller food volumes
you do not need to remove the freezer tray and baskets.

For using the quick freeze function, press the quick
freeze on/off switch 

(D)

for 2-3 seconds; in the case of

small and great food volumes you should do it approx. 4
and 24 hours, respectively, before you want to freeze the
fresh food. The yellow indicator 

(C)

will light up. The

compressor will operate continuously until the product
reaches the freezing temperature.

Once the food is completely frozen (it may take up to 24
hours) you can manually switch off the quick freeze
function by pressing the switch 

(D)

for 2-3 seconds. If

not switched off manually, the quick freeze function will
be automatically switched off 48 hours later. The yellow
indicator 

(C)

will also go out.

The freezing tray can be used for freezing small fruits
(raspberry, strawberry, currant, etc.). Place a thin layer of
the unpacked fruits in the tray. Once they are frozen, the
fruits can be packed, sorted and placed in the storage
boxes.

Storing

It is practical to replace frozen products into the storing
compartments (cages) after freezing has finished so that
to make room in the freezing compartment for another
freezing.

In large quantities of food are to be stored, remove the
baskets except the lowermost one from appliance and
place food on the shelves.

Intermediate freezing does not deteriorate foods already
stored.

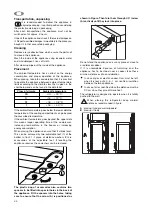
How to make ice cubes

To make ice cubes fill the enclosed ice cube tray with
water and put it to the frozen food compartment. Wetting
the bottom of the tray and setting thermostatic control
knob to maximum stage can shorten preparing time. After
finishing do not forget to reset the thermostatic control to
the suitable stage.

Ready ice cubes can be taken out of the tray under
running water then twist or hit it.

Some useful information and
advice

After opening and closing the door of freezer vacuum
will rise inside the appliance because of the low
temperature. So wait 2-3 minutes after closing the
door - if you want to open it again - while inner
pressure equalises.

Summary of Contents for ZFU 319 EW

Page 1: ...NÁVOD K OBSLUZE INSTRUKCJA OBSŁUGI NÁVOD NA OBSLUHU MODE D EMPLOI INSRUCTION BOOK MRAZNIČKA ZAMRAŻARKA CONGÉLATEUR FREEZER ZFU 319 EW ZANUSSI 200382175 SKE Za 70 1 08 PL SK FR GB CZ ...

Page 2: ...ého místního úřadu služby pro likvidaci domovního odpadu nebo v obchodě kde jste výrobek zakoupili Obsah Důležité bezpečnostní informace 3 Obecná bezpečnostní opatření 3 Opatření pro bezpečnost dětí 3 Bezpečnostní opatření pro instalaci 3 Bezpečnostní opatření pro isobutan 3 Pokyny pro uživatele 4 Obecné informace 4 Popis spotřebiče hlavní součásti 4 Zařízení spínače a ukazatele 5 Používání spotře...

Page 3: ...ebič položíte hlubokozmrazené potraviny může se stát že se vlhkost v prostoru pod horním dílem po kontaktu s chladem vysráží V tomto prostoru se nacházejí elektrické díly a jestliže na ně nakape nahromaděná voda mohou zkratovat a tím spotřebič poškodit Nikdy proto nepokládejte hlubokozmrazené potraviny na horní díl spotřebiče Neuchovávejte ve spotřebiči hořlavé plyny a tekutiny protože by mohly ex...

Page 4: ... spotřebič může splňovat požadavky norem na různé teplotní limity podle klimatické třídy Písmeno symbolizující klimatickou třídu se nachází na typovém štítku Pokyny pro uživatele Popis spotřebiče hlavní součásti 1 Mrazicí miska 2 Mrazicí oddíl koš 3 Skladovací boxy koše 4 Datová tabulka 5 Zařízení spínače a ukazatele 6 Odtok rozmrazené vody 7 Nastavitelné nožičky 8 Profil těsnění dveří 9 Větrací m...

Page 5: ...d určitou hodnotu 12 C rozsvítí se výstražná kontrolka a zazní signální tón Výstražná kontrolka je stálé červené světlo E signální tón je přerušovaný Signální tón můžete kdykoli ručně vypnout jedním stisknutím tlačítka D Zmrazování Po příslušné přípravě zmrazujte nejrůznější potraviny vždy v mrazicím oddíle K dosažení maximálního mrazicího výkonu vždy vyjměte mrazicí misku i mrazicí koš a položte ...

Page 6: ...Odmrazování Spotřebič funguje tak že se část vlhkosti v jeho vnitřním prostoru sráží a vytváří rosu nebo vrstvu ledu Silná vrstva rosy nebo námrazy působí izolačně a zhoršuje mrazicí výkon což se projevuje zvýšením vnitřní teploty zvýšením spotřeby energie a při určité síle vrstvy i zhoršeným otevíráním dveří mrazicího oddílu kterou se mohou i ulomit Při menší tloušťce vrstvy můžete vzniklou námra...

Page 7: ...zelo k poruše dodávky proudu Z toho vyplývá požadavek že se nesmíte dotýkat elektrických částí spotřebiče dokud není spotřebič vypnut Porucha Spotřebič dostatečně nechladí Spotřebič příliš chladí Spotřebič vůbec nechladí Spotřebič je hlučný Bliká zelená kontrolka Možná příčina Regulátor teploty je na nižším stupni Před zmrazováním nebyl spotřebič dostatečně vychlazen Vložení většího množství potra...

Page 8: ...nkci spotřebiče Když spotřebič stavíte na místo berte v úvahu že je nutné provozovat spotřebič v mezích teploty okolí podle klimatické třídy uvedené v tabulce níže a na typovém štítku spotřebiče Teplota okolí podle klimatické třídy Jestliže teplota okolí klesne pod nižší hodnotu teplota v oddílu mrazení může dosahovat vyšších hodnot než předepsaných a teplota v oddílu chlazení může dosahovat nižší...

Page 9: ...ebič v této poloze bezpečně přidržela Vyšroubujte nastavitelné nožky umístěné na obou stranách 2 kusy a šrouby připevňující spodní dveřní závěsy 2 kusy případně šroub na druhé straně Nadzvedněte a odejměte zatažením dveří ledničky mírně směrem dolů Odšroubujte čep horního závěsu dveří chladničky a pak ho zašroubujte na druhou stranu Usaďte dveře ledničky na kolík horního pantu Přesaďte čep v desti...

Page 10: ...em smažené hranolky 12 měsíců Polévky masový vývar polévka ze zelených fazolových lusků polévka ze zeleného hrášku a pod 6 měsíců Ovoce višně třešně angrešt ovocný krém drcené kaštany 12 měsíců Maso kuře kachna husa a jejich drůbky 5 měsíců filé tuňák 6 měsíců Mražený krém na tyčince zmrzlina 3 týdny Tento spotřebič odpovídá následujícím direktivám směrnicím E E C 73 23 EEC ze dne 19 02 73 Směrnic...

Page 11: ...miasta lub sklepem w którym produkt został zakupiony Spis treści Wskazówki dotyczące bezpieczeństwa 12 Wskazówki ogólne 12 Wskazówki dotyczące bezpieczeństwa dzieci 12 Wskazówki bezpieczeństwa dotyczące instalacji 12 Wskazówki bezpieczeństwa czynnik chłodniczy izobutan 12 Wskazówki dla użytkownika 13 Wskazówki ogólne 13 Opis urządzenia i jego głównych elementów 13 Przełączniki i wskaźniki 14 Obsłu...

Page 12: ...ni pod górnym elementem może przeniknąć wilgoć na skutek zetknięcia się z zimnem W pustej przestrzeni znajdują się urządzenia elektryczne W przypadku przedostania się do niej wody może dojść do spięcia i uszkodzenia urządzenia Dlatego nie należy kłaść zamrożonego towaru na górnej części urządzenia W urządzeniu nie należy przechowywać łatwopalnych cieczy lub gazów gdyż mogą one eksplodować W zamraż...

Page 13: ...h oraz robienia kostek lodu Urządzenie spełnia wymagania norm dotyczących warunków klimatycznych Symbol oznaczający klasę klimatyczną znajduje się na tabliczce znamionowej 1 Misa do zamrażania 2 Półka w zamrażarce kosz 3 Półki do przechowywania kosze 4 Tablica z danymi 5 Przełączniki i wskaźniki 6 Odpływ wody z rozmrażania 7 Regulowane nożki 8 Profil uszczelek drzwi 9 Kratka wentylacyjna 10 Konden...

Page 14: ... produkty mogą być ułożone bezpośrednio na półkach Nie wpływa to ujemnie na walory odżywcze i smakowe produktów Przygotowanie kostek lodu Aby zrobić kostki lodu należy napełnić pojemnik wodą i wstawić go do komory zamrażania Zwilżenie dolnej części pojemnika skróci czas przygotowywania Zmrożone kostki lodu należy wyjąć z pojemnika np pod bieżącą wodą Przełączniki i wskaźniki A kontrolka zał wył zi...

Page 15: ...ie wpływać na warstwę ozonową Zużyte urządzenia nie mogą być wyrzucane i składowane wraz z innymi odpadami przemysłowymi Zachować ostrożność aby nie uszkodzić układu chłodzącego z tyłu urządzenia Informacji o punktach zbiórki można zasięgnąć u władz lokalnych Materiały użyte do produkcji i oznaczone symbolem nadają się do powtórnego przetworzenia Konserwacja Rozmrażanie Działanie urządzenia powodu...

Page 16: ... Można przyśpieszyć przebieg rozmrażania poprzez postawienie na każdej z półek garnka lub miski z gorącą wodą Po rozmrożeniu przetrzeć do sucha wilgotne powierzchnie i wsunąć z powrotem odpływ wody Włożyć wtyczkę do gniazda sieciowego Przekręcić regulator temperatury w położenie 2 3 i włączyć urządzenie w trybie mrożenia na okres co najmniej 2 godzin Po tym czasie włożyć z powrotem wyciągnięte z z...

Page 17: ...nia ma wpływ na zużycie energii i prawidłową pracę urządzenia Przy wybieraniu miejsca ustawienia urządzenia należy zwrócić uwagę na zakresy temperatur podane w poniższej tabeli i klasę klimatyczną sprzętu wskazaną na tabliczce znamionowej Klasa klimatyczna Temperatura otoczenia SN 10 32 C N 16 32 C ST 18 38 C T 18 43 C Jeżeli temperatura otoczenia spadnie poniżej dolnej wartości temperatura wewnąt...

Page 18: ...iej osoby która będzie podtrzymywała urządzenie w bezpiecznej pozycji Odkręcić nóżki regulacyjne po obu stronach 2 sztuki Zestaw elementów mocujących dolny zawias 2 sztuki przełożyć na drugą stronę Drzwi chłodziarki należy zdjąć ciągnąc je lekko w dół Wykręcić bolec górnego zawiasu drzwi chłodziarki i wkręcić go po drugiej stronie Umieścić drzwi chłodziarki na górnej zawiasie Na dolny zawias założ...

Page 19: ... miesięcy Słodycze lody 3 tygodnie Producent zastrzega sobie prawo wprowadzania zmian w urządzeniu bez wcześniejszego powiadomienia Podłączenie do zasilania elektrycznego Parametry napięcie zasilania 220 230 V AC częstotliwość 50 Hz Urządzenie musi być podłączone do gniazdka z uziemieniem Urządzenie spełnia wymagania norm E E C 73 23 EEC z 19 02 73 o niskich napięciach wraz z późniejszymi zmianami...

Page 20: ...berné suroviny alebo obchod v ktorom ste výrobok kúpili Obsah Dôležité bezpečnostné pokyny 21 Všeobecné bezpečnostné pokyny 21 Bezpečnostné pokyny pre deti 21 Bezpečnostné pokyny pre inštaláciu 21 Bezpečnostné opatrenia pre izobután 21 Pokyny pre užívateľa 22 Všeobecné informácie 22 Popis spotrebiča hlavné časti 22 Spínacie a indikačné prvky 23 Používanie a obsluha 23 Inštalácia 23 Nastavenie tepl...

Page 21: ...nie Ak na spotrebič položíte zmrazené potraviny môže sa stať že v dutej časti pod vrchným dielom sa vplyvom dotyku s chladom môže kondenzovať vlhkosť V tejto dutine sa nachádzajú elektrické diely a keď na ne kvapká kondenzujúca sa voda môže spôsobiť krátke spojenie a poškodenie spotrebiča Preto nikdy neukladajte zmrazené potraviny na vrchný diel spotrebiča V spotrebiči neskladujte horľavé plyny an...

Page 22: ...ľadu Spotrebič vyhovuje požiadavkám štandardov v rámci rôznych teplotných obmedzení v súlade s klimatickou triedou Symbol označujúci klimatickú triedu sa nachádza na typovom štítku Popis spotrebiča hlavné časti 1 Mraziaca vaňa 2 Mraziaca zásuvka kôš 3 Odkladacie poličky koše 4 Štítok s údajmi 5 Spínacie a indikačné prvky 6 Odtok roztopenej vody 7 Prestaviteľné nožičky 8 Tesniaci profil na dvierkac...

Page 23: ...potravín Keď sa táto teplota zvýši nad určitú hodnotu 12 C aktivuje sa zvukový a svetelný alarm Svetelný alarm predstavuje blikajúce červené svetlo E zvukový alarm predstavuje prerušovaný zvukový signál Zvukový signál môžete vypnúť stlačením tlačidla D Zmrazovaniu Rôzne potraviny po vhodnej príprave vždy zmrazujte v mraziacej polici Na dosiahnutie maximálneho mraziaceho výkonu vyberte mraziacu van...

Page 24: ...ch na likvidáciu spotrebiča získate na miestnych úradoch Materiály použité v tomto výrobku ktoré sú označené symbolom sú recyklovateľné Údržba Rozmrazovanie S princípom činnosti spotrebiča súvisí aj to že časť vlhkosti sa vo vnútri prístroja vyzráža v podobe vrstvy inovati alebo ľadu Hrubá vrstva inovati alebo ľadu má izolačný účinok a zhoršuje mraziaci výkon čo spôsobuje zvýšenie teploty vnútorné...

Page 25: ...ič nie je pod elektrickým napätím Za žiadnych okolností sa nedotýkajte elektrických častí spotrebiča ak nie je odpojený od elektrickej siete Prejav poruchy Spotrebič dostatočne nechladí Spotrebič chladí príliš intenzívne Spotrebič vôbec nechladí Spotrebič je príliš hlučný Bliká zelená kontrolka Možná príčina poruchy Regulátor teploty je nastavený na príliš nízkom stupni Pred mrazením nebol spotreb...

Page 26: ...zničke alebo zvýšená spotrebu energie Pri umiestňovaní spotrebiča dbajte na to aby bol vo vodorovnej polohe Pozíciu spotrebiča je možné korigovať dvoma nastaviteľnými nožičkami 1 na spodnej časti vpredu Podložky 2 1 1 kus tvoria príslušenstvo nožičiek V prípade potreby môžete podložky odstrániť Spotrebič neumiestňujte na slnečné miesto ani do blízkosti radiátora alebo sporáka Vo vrecku s príslušen...

Page 27: ...aky dverí 2 kusy ako aj skrutky na druhej strane Opatrne odnímte dvierka chladiaceho priestoru potiahnutím smerom nadol Odskrutkujte čap horného závesu dvierok chladničky a zaskrutkujte ho na druhej strane Dvierka chladničky umiestnite na horný čap držiaka dvierok Posuňte čap na paneli spodného držiaku v smere šípky Panel pripevnite na druhú stranu pričom dvere nechajte v pôvodnej polohe Do uvoľne...

Page 28: ...e čerešne egreše ovocný pretlak atď 12 mesiacov Mäso kurča kačica hus drobky 5 mesiacov filé tuniak 6 mesiacov Zmrzlina nanuky 3 týždne Pripojenie na elektrickú sieť Táto chladnička je skonštruovaná pre zdroj elektrickej energie 230 V AC 50 Hz Zástrčku spotrebiča treba zasunúť do zásuvky s ochranným vodičom Ak nemáte vhodnú zásuvku k dispozícii obráťte sa na elektrikára aby vám v súlade s platnými...

Page 29: ...votre satisfaction Les symboles utilisés Prescriptions de sécurité Les prescriptions et cautions de ce symbole servent à la protection de l appareil et de votre personne Importantes instructions et informations Informations pour la protection de l environnement Conseils pratiques Vous trouverez ici des conseils pratiques concernant les aliments et leur stockage Le symbole sur le produit ou son emb...

Page 30: ...gèlement par n importe quel appareil électrique ou agent chimique Ne gardez pas d ustensiles chand à côte des parties en plastique de l appareil N entreposez pas de gaz ou liquide inflammable dans l appareil un danger de l explosion existe Ne mettez pas de liquides gazeux et boissons embouteillées dans le compartiment de congélation Prescriptions de sécurité pour l enfants Ne laissez jamais les en...

Page 31: ...aux prescriptions des normes dans des limites des diverses classes climatiques La lettre symbolisant la classe climatique se trouve sur le plaque signalétique A l attention de l exploiteur Description de l appareily 1 Compartiment de stockage 2 Plateau de congélation 3 Compartiment de congélation 4 Compartiment de stockage 5 Touches de commande et voyants de contrôle 6 Plaque signalétique 7 Goulot...

Page 32: ...ieure du congélateur a augmenté au delà de 12 C si bien qu un dépôt permanent des aliments n est pas garanti Si vous mettez le congélateur pour la première fois en marche le voyant d avertissement clignote jusqu à ce que la température assurant un dépôt d aliments congelés ait atteint la température nécessaire Erreur de température La température au sein du compartiment de congélation garantit en ...

Page 33: ...aluminium ou mettez les dans des récipients bien fermés pour éviter la formation de givre Evitez que les aliments placés dans le compartiment de congélation entrent en contact avec ceux s y trouvant et déjà congelés N ouvrez pas inutilement la porte et ne la laissez pas ouverte trop longtemps Ne placez pas d aliments chauds dans l appareil laissez le se refroidir à la température ambiante Nettoyez...

Page 34: ...u savon Après le débranchement de l appareil lavez à l eau tiède et séchez soigneusement son intérieur Nettoyez le joint de la porte avec de l eau du cabinet Ensuite remettez l appareil sous tension Enlevez une ou deux fois par an la couche de poussière couvrant la surface du condenseur au fond de l appareil Appareil hors d usage Si vous n utilisez pas l appareil pendant une longue période veuille...

Page 35: ...nctionnement Si l électronique de l appareil ne prend pas en considération la valeur de la température REELLE le voyant d avertissement se trouvant sur le dispositif d affichage du congélateur commence à clignoter L appareil continue de fonctionner au moyen d un programme de remplacement jusqu à ce que le problème ait été résolu par un technicien agréé A l attention de la personne qui mettra en se...

Page 36: ...ment correcty de l appareil Pour installer l appareil prenez en considération que le fonctionnement correcty de l appareil ne sera possible que dans les limites de température ambiante donnes dans le tableau ci dessous Classe climatique Température ambiante SN 10 32 C N 16 32 C ST 18 38 C T 18 43 C Si la température ambiante baisse au dessous de la limite inférieure la température de l espace réfr...

Page 37: ...ivantes 73 23 EEC 73 02 19 Directive des petites tensions et ses amendements en vigueur 89 336 EEC 89 05 03 Directive EMC et ses amendements en vigueur 96 57 CE 03 09 96 Directive concernant les exigences en matière de rendement énergétique et ses amendements ultérieurs F FR R Temps de stockage Temps de stockage de marchandises congelées Marchandise 18 C Légumes haricots verts petits pois légume m...

Page 38: ...symbols below help you to find things more easily Safety precautions Warnings and information at this symbol serve safety for you and your appliance Hints useful information Environmental information Symbol for ideas At this symbol ideas can be found according to food and its storing The symbol on the product or on its packaging indicates that this product may not be treated as household waste Ins...

Page 39: ...rosting faster with any electric heating appliance or chemicals Do not make hot pot touch the plastic parts of the freezer Do not store flammable gas and liquid in the appliance because they may explode Do not put carbonated drinks bottled drinks and bottled fruits into the freezer Precautions for child safety Do not allow children to play with the packaging of the appliance Plastic foil can cause...

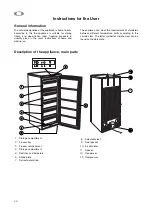
Page 40: ...e can meet the requirements of standards between different temperature limits according to the climate class The letter symbol for climate class can be found on the data plate Instructions for the User Description of the appliance main parts 1 Storage compartment 2 Freezer tray 3 Freezer compartment 4 Storage compartment 5 Switches and indicators 6 Rating plate 7 Defrost water drain 8 Adjustable f...

Page 41: ...mperature rises above a certain level 12 C it will trigger an acoustic and light alarm The light alarm is a blink red light E while the acoustic alarm is an intermittent sound You can stop the acoustic alarm by pressing switch D once Freezing Prepare the various foods properly and then freeze them always in the freezing compartment For maximum freezing performance remove the freezer tray and baske...

Page 42: ... part of the internal humidity is turned into frost and ice during operation However a thick frost or ice layer has an insulating effect and thus reduces the freezing performance leading to rising internal temperatures and higher energy consumption and above a certain layer thickness to difficulties in the opening or sudden break of the freezer door If the formation of frost and ice is not signifi...

Page 43: ...hard The appliance does not cool at all The appliance is noisy Green indicator flashing Possible cause Thermostatic control is set too low Before freezing the appliance was not precooled sufficiently Large sized food was put in Too many foods to be frozen were put in Warm foods were put in Door is not shut properly The thermostatic control is set too high Plug is not connected to the mains socket ...

Page 44: ... the ambient temperature goes beyond the upper data this means longer operating time of the compressor increasing temperature in the freezer or increasing energy consumption When placing the appliance ensure that it stands level This can be achieved by two adjustable feet 1 at the bottom in front 1 1 piece of distance washers 2 are accessories of the adjustable feet If levelling the appliance requ...

Page 45: ... in the direction of the arrow Take the door off Unscrew the top door holding pin and put it on the other side Put over the handles on the other side and put the plastic covering nails supplied in the plastic bag of this instruction book into the holes set free Put the appliance to its place set it level and apply voltage to it In case you do not want to perform the procedures above call the neare...

Page 46: ...from knuckle of ham meat from pig pudding etc 6 months Foods from potatoes pasta mashed potato gnocchi dumpling pasta filled with jam chips 12 months Soups meat broth soup from green beans soup from green peas etc 6 months Fruits sour cherry cherry gooseberry fruit cream mashed maroon 12 months Meat chicken duck goose 5 months fillets tuna fish 6 months Popsicle ice cream 3 weeks Storage time char...

Page 47: ...47 ...

Page 48: ...appliances for kitchen cleaning and outdoor use More than 55 million Electrolux Group products such as refrigerators cookers washing machines vacuum cleaners chain saws and lawn mowers are sold each year to a value of approx USD 14 billion in more than 150 countries around the world ELECTROLUX HOME PRODUCTS OPERATIONS EUROPE ...

Reviews: