background image


6


 Door reversibility


Unplug the appliance from the power supply before 
carrying out any work.

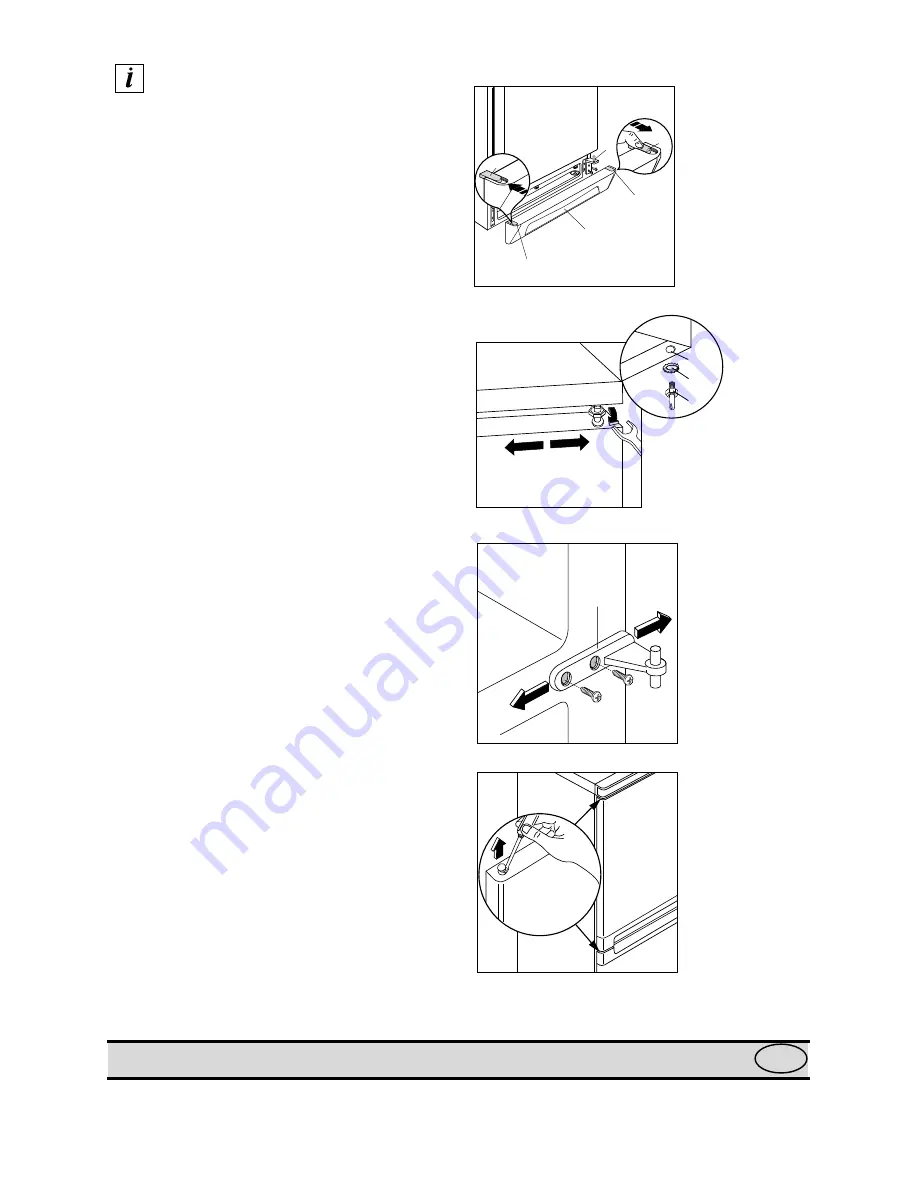
To reverse the doors, proceed as follows:

Remove the ventilation grille (D), which has a snap-in 
fitting.

Remove the bottom hinge (E) by unscrewing the two 
fixing screws.

Remove the bottom door by sliding it off  the centre 
hinge.

Remove the centre hinge (H).

Remove the top door by sliding it off the top pin (A).

Unscrew the top pin (A) and washer (B) from the top 
hinge (C) and refit them on the opposite side.

Refit the top door.

Refit the centre hinge on the opposite side.

Refit the bottom door.

Refit the bottom hinge (E) on the opposite side, using 
the two screws previously removed.

With the help of a tool, remove the small cover (F), 
which blanks off the slot for the bottom hinge, from 
the ventilation grille (D).

Fit cover (G), supplied with the appliance, into the 
slot left open.

Snap the ventilation grille (D) back into place.

The doors can be aligned by adjusting both the middle 
and top hinges.

The middle hinge (H) can be adjusted horizontally, 
with the help of a tool, after having slackened the two 
screws.

The top hinge is adjusted by slackening the nut (A) 
with a 10 mm spanner and then proceeding as shown 
in Fig. 3.


Electrical connection


Before plugging in, ensure that the voltage and 
frequency shown on the serial number plate 
correspond to your domestic power supply.
Voltage can vary by 


±


6% of the rated voltage.

For operation with different voltages, a suitably sized 
auto-transformer must be used.


Fig. 3

Fig. 4

Fig. 5

Fig. 6

E

F

D

D640 

F

F

F

C

B

A

D427

D405

H

D419


TECHNICAL SPECIFICATION


The technical data is indicated in the rating plate on the left side inside the appliance.


GB

Summary of Contents for ZF 18/8 K

Page 1: ...FRIDGE FREEZER REFRIGERATEUR CONGELATEUR FRIGORÍFICO CONGELADOR ZF 18 8 K INSTRUCTION BOOKLET MODE D EMPLOI LIBRO DE INSTRUCCIONES 2222 169 06 ...

Page 2: ...hould solid ice be forced off the liner Solid ice should be allowed to thaw when defrosting the appliance See defrost instructions ª Do not place carbonated or fizzy drinks in the freezer as it creates pressure on the container which may cause it to explode resulting in damage to the appliance Installation ª There are working parts in this product which heat up Always ensure that there is adequate...

Page 3: ...n 6 Technical specification 6 Use 7 ª Refrigerator Freezer Starting up and Temperature Regulation 7 ª Freezing fresh food 7 ª Storage of frozen food 7 ª Thawing 8 ª Ice cubes trays 8 ª Fresh food refrigeration 8 ª Movable shelves 9 ª Positioning the door shelves 9 ª Defrosting 9 Maintenance 11 ª Interior light 11 Servicing 11 GB ...

Page 4: ...lass of your appliance is shown on its rating plate Make sure that there is nothing at the back at the top and at the bottom of the appliance to obstruct air circulation For a more efficient operation of the appliance the minimum distance between the top of the appliance and other overhanging kitchen furniture if any should be at least 100 mm Fig 1 A The best solution is shown in Fig 1 B without o...

Page 5: ...ved This appliance complies with EEC directive number 87 308 of 2 6 87 relative to radio interference suppression This appliance complies with the following E E C Directives 73 23 EEC of 19 2 73 Low Voltage Directive and subsequent modifications 89 336 EEC of 3 5 89 Electromagnetic Compatibility Directive and subsequent modifications Cleaning the interior Before using the appliance for the first t...

Page 6: ... the slot for the bottom hinge from the ventilation grille D Fit cover G supplied with the appliance into the slot left open Snap the ventilation grille D back into place The doors can be aligned by adjusting both the middle and top hinges The middle hinge H can be adjusted horizontally with the help of a tool after having slackened the two screws The top hinge is adjusted by slackening the nut A ...

Page 7: ...h food in small portions to enable it to be rapidly and completely frozen and to make it possible subsequently to thaw only the quantity required at the time Wrap up the food in aluminium foil or polythene and make sure that the packages are airtight It is advisable to show on the single food packet or on the write on produce strips to be found on the front part of the storage baskets the freezing...

Page 8: ...porating liquids in the refrigerator do cover or wrap the food particularly if it has a strong flavour Position food so that air can circulate freely round it Useful hints Meat all types wrap in polythene bags and place on the glass shelf above the vegetable drawer For safety store in this way only one or two days at the most Cooked foods cold dishes etc these should be covered and may be placed o...

Page 9: ...ost is automatically eliminated from the evaporator of the refrigerator compartment every time the motor compressor stops during normal use The defrost water drains out through a trough Fig 10 into special container on the back of the appliance where it evaporates The freezer compartment however will become progressively covered with frost This should be removed with the special plastic scraper pr...

Page 10: ...s shown in Fig 9 place a basin underneath to collect defrost water Fig 9 After complete defrosting dry the interior thoroughly Keep the scraper for future use Reconnect the appliance to the power supply start it up and after half an hour replace the foods previously removed Important Remember that an increase of the surface temperature of already frozen foods may significantly decrease the duratio...

Page 11: ...figure Fig 12 D731 SERVICING What to do if the appliance is not functioning properly If the appliance is not functioning properly check that the plug is firmly in the wall socket and the mains power switch is on there is an electricity supply find out by plugging in another appliance the thermostat knob is in the right position Furthermore if the appliance seems too noisy check that the sides are ...

Reviews: