background image

CAUTION!

Install the appliance only on a

worktop with flat surface.

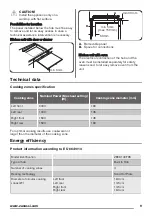
Possibilities for insertion

The panel installed below the hob must be easy

to remove and let an easy access in case a

technical assistance intervention is necessary.
Kitchen unit with door or drawer

min 6 mm

min 5 mm

(max 150 mm)

min 30 mm

60 mm

B

A

A. Removable panel

B. Space for connections

Kitchen unit with oven

The electrical connection of the hob and the

oven must be installed separately for safety

reasons and to let easy remove oven from the

unit.

Technical data

Cooking zones specification

Cooking zone

Nominal Power (Max heat setting)

[W]

Cooking zone diameter [mm]

Left front

2000

180

Left rear

1000

145

Right front

1500

145

Right rear

1500

180

For optimal cooking results use cookware not

larger than the diameter of the cooking zone.

Energy efficiency

Product information according to EU 66/2014

Model identification


ZEE6140FXK

Type of hob


Built-In Hob

Number of cooking zones


4

Heating technology


Solid Hot Plate

Diameter of circular cooking

zones (Ø)

Left front

Left rear

Right front

Right rear

18.0 cm

14.5 cm

14.5 cm

18.0 cm

www.zanussi.com

9

Summary of Contents for ZEE6140FXK

Page 1: ...EN ZEE6140FXK User Manual Hob ...

Page 2: ...duced physical sensory or mental capabilities or lack of experience and knowledge if they have been given supervision or instruction concerning the use of the appliance in a safe way and understand the hazards involved Do not let children play with the appliance Keep all packaging away from children and dispose of it appropriately Keep children and pets away from the appliance when it operates or ...

Page 3: ... of the appliance in the instructions for use as suitable or hob guards incorporated in the appliance The use of inappropriate guards can cause accidents Safety instructions Installation WARNING Only a qualified person must install this appliance WARNING Risk of injury or damage to the appliance Remove all the packaging Do not install or use a damaged appliance Follow the installation instruction ...

Page 4: ...e holder earth leakage trips and contactors The electrical installation must have an isolation device which lets you disconnect the appliance from the mains at all poles The isolation device must have a contact opening width of minimum 3 mm Use WARNING Risk of injury burns and electrical shock Remove all the packaging labelling and protective film if applicable before first use Use this appliance ...

Page 5: ...electrical supply before maintenance Do not use water spray and steam to clean the appliance Clean the appliance with a moist soft cloth Only use neutral detergents Do not use any abrasive products abrasive cleaning pads solvents or metal objects Disposal WARNING Risk of injury or suffocation Contact your municipal authority for information on how to discard the appliance correctly Disconnect the ...

Page 6: ...ate during use and even disappear completely after a period of time It does not have an effect on the performance of the hob The heat setting To set or change the heat setting turn the knob to the correct heat setting To deactivate turn the knob to off position Power indicator activates when one or more cooking zones are activated When you deactivate the cooking zones the indicator deactivates Hin...

Page 7: ...regularly Polish off the oil with absorbent paper Troubleshooting WARNING Refer to Safety chapters What to do if Problem Possible cause Remedy You cannot activate or operate the hob The hob is not connected to an electrical supply or it is connec ted incorrectly Check if the hob is correctly con nected to the electrical supply Refer to the connection diagram The fuse is blown Make sure that the fu...

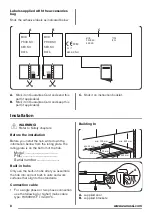
Page 8: ... Safety chapters Before the installation Before you install the hob write down the information bellow from the rating plate The rating plate is on the bottom of the hob Model PNC Serial number Built in hobs Only use the built in hobs after you assemble the hob into correct built in units and work surfaces that align to the standards Connection cable For a single phase or two phase connection use t...

Page 9: ...y for safety reasons and to let easy remove oven from the unit Technical data Cooking zones specification Cooking zone Nominal Power Max heat setting W Cooking zone diameter mm Left front 2000 180 Left rear 1000 145 Right front 1500 145 Right rear 1500 180 For optimal cooking results use cookware not larger than the diameter of the cooking zone Energy efficiency Product information according to EU...

Page 10: ...e you activate the cooking zone put the cookware on it The cookware bottom should have the same diameter as the cooking zone Put the smaller cookware on the smaller cooking zones Put the cookware directly in the centre of the cooking zone Use the residual heat to keep the food warm or to melt it ENVIRONMENTAL CONCERNS Recycle the materials with the symbol Put the packaging in applicable containers...

Page 11: ...www zanussi com 11 ...

Page 12: ...www zanussi com shop 867332912 B 422016 ...

Reviews: