


16
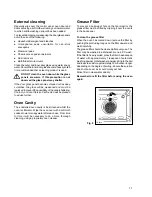
Fitting the Splash back
In some models (not provided with lid), a stainless steel
splash back is supplied with the appliance. This is meant
to be fitted on the rear edge of the cooker's hob. The
splash back package is in the oven cavity.
1. Unpack the splash back and dispose of the
packaging with due regard to safety and the
environment.
2. Slide the two bayonets of the splash back into the
relevant supports on the rear edge of the cooker's
hob (Fig. 16).
Fig. 16
FO 2376
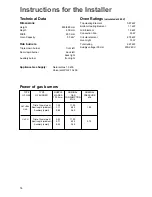
Fitting the Stability Bracket
The stability bracket supplied with the cooker must be
fitted by the installer (see Fig. 17).
1. Place the cooker in its intended position and mark the
cooker height, taken from the top of the trivets
(splashback removed).
2. Mark 720mm below the cooker height. This is the
position of the stability bracket (position of the stability
bracket can be either side of the counterweight, i.e.
not centrally located).
3. Fix the stability bracket (using two of the provided five
fixing holes) to the rear wall (see diagram).
4. Pull the cooker towards the rear wall as shown in the
diagram. The stability bracket should then come into
contact with the bottom panel of the cooker.
Check that the stability bracket securely prevents the
cooker from accidently tipping forward when a downward
force is applied to the open oven door.
Fig. 17
FO 0181
SIDE VIEW
OF THE COOKER
BASE OF COOKER
ENGAGEMENT EDGE FOR
STABILITY BRACKET
BACK OF COOKER
720mm