


13
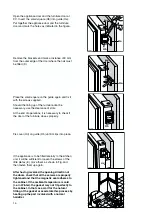
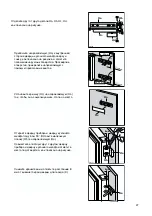
Ha
Hb
Hc
Hd
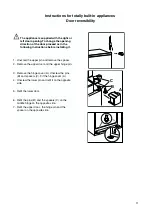
Separate parts Ha, Hb, Hc, Hd as shown in the
figure.
Place guide (Ha) on the inside part of the furniture
door, up and down as shown in the figure and mark
the position of external holes. After having drilled
holes, fix the guide with the screws supplied.
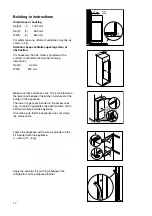
ca. 50 mm
90°
90°
ca. 50 mm
Fix cover (Hc) on guide (Ha) until it clips into place
Hc
Ha
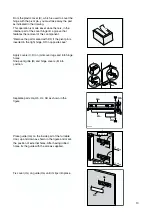
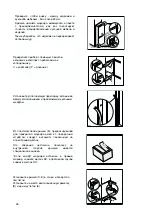
Apply covers (C-D) on joint cover lugs and into hinge
holes.
Snap vent grille (B) and hinge covers (E) into
position.
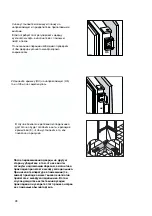
From the plastic cover (E), which is used to cover the
hinge with the pivot pin, you must take away the part
as indicated in the drawing.
This operation is made easer since there is, in the
internal part of the cover hinge lid a groove that
facilates the removal of this coomponent.
“Remove the part marked with DX, if the pivot pin is
inserted in the right hinge, SX in opposite case.”
B
E
E
D
C
Summary of Contents for ZBB 6286
Page 1: ...FRIDGE FREEZER ZBB 6286 INSTRUCTION BOOKLET 2223 208 47...
Page 15: ...15 18 C 43 C 18 C 38 C S 16 C 32 C N 10 C 32 C SN...
Page 16: ...16 15 16 17 18 19 20 21 22 23 24 25 2...
Page 17: ...17 A B 0 1 0 1 2 3 4 D 52 A B C D B A C D...
Page 18: ...18 12 3 3 4...
Page 19: ...19 1 2 3 4...
Page 20: ...20 D338...
Page 21: ...21 4 24 24...
Page 22: ...22 D037...
Page 23: ...23 210 55 0 86 314 4 13 24...
Page 24: ...24 Pa ec e o o a acc o o a c o o e a 6 87 308 2 6 87 73 23 19 02 73 89 336 03 05 89 B A...
Page 26: ...26 4 I P C D B E 44 B E E D C 1 2 44mm I P E DX SX...
Page 28: ...28 Hd Hb Hd Hb Hb D735 E E...
Page 29: ......
Page 30: ......
Page 31: ......