background image

5

OPERATION

Before using

Remove all securing tapes. Wash inside the
appliance with lukewarm water and bicarbonate of
soda (5 ml to 0.5 litre of water). 

Do not use soap or detergent as the smell may
linger. Dry thoroughly.

Setting the temperature

The temperature inside the refrigerator is regulated
by a thermostat with 6 temperature positions and
one ÇOFFÈ (O) position.

Position 1 = minimum coldness

Position 6 = maximum coldness

Turn the thermostat dial to the required position.

The intermediate position is usually the most
suitable (3-4).

The thermostat setting can vary as the temperature
inside the refrigeration compartment depends on the
following factors:

Ð room 

temperature

Р how often the door is opened

Р how much food is stored

Р position of the appliance

Important

If the fridge is not defrosting correctly, it is possible
that because a very low temperature has been
selected, the motor is working continuously, which
prevents the defrost cycle from operating. 

To ensure correct defrosting, a lower number should
be selected on the thermostat and you should notice
that the motor cuts out from time to time, which is
correct.

If you wish to return to a lower temperature, turn the
thermostat to a higher number, however you should
turn the setting lower occasionally to allow automatic
defrosting.

Storage of frozen food

When first starting-up or after a period of use, before
putting the products in the compartment let the
appliance run for at least two hours on the coldest
setting, then turn the thermostat knob to the normal
operating position.

Do not exceed the storage period indicated by the
manufacturer.

Finally, do not open the door frequently or leave it
open longer than is absolutely necessary.

Important

Do not put carbonated liquids, (fizzy drinks etc.), in
the freezer compartment.

Ice Iollies, if consumed immediately after removal
from the freezer, can cause low temperature skin
burns.

Do not remove items from the freezer if your hands
are damp/wet, as this could cause skin abrasions or
Òfrost/freezer burnsÓ.

The freezer compartment

The four-star freezer compartment is suitable for
storage of commercially frozen food and for freezing
fresh foods.

Freezing fresh food

To freeze fresh foods it is not necessary to change
the setting of the thermostat knob.

However, for a quicker freezing operation, turn the
thermostat knob to the coldest setting; but remember

that, in this condition the refrigerator compartment
temperature might drop below 0¡ C.

If this occurs reset thermostat knob to a warmer
setting.

In any 24 hours you can freeze up to 4 kg.

Place the food to be frozen in the upper drawer of
the freezer as this is the coldest part.

Important

In the event of a power cut do not open the door.
The food in the freezer will not be affected if the
power cut is short and if the freezer is full. Should
the food begin to thaw, it must be consumed quickly
and must not be re-frozen.

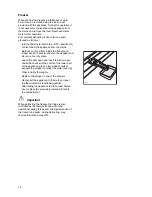
Summary of Contents for ZA 33 S

Page 1: ...REFRIGERATOR FREEZER ZA 33 Y ZA 33 S INSTRUCTION BOOKLET 2222 042 33 ...

Page 2: ...ll away from children During Use This appliance is designed for domestic use only specifically for the storage of edible foodstuffs only Frozen food must NOT be re frozen once it has thawed out Do not place carbonated or fizzy drinks in the freezer Do not remove items from the freezer if your hands are damp wet as this could cause skin abrasions or frost freezer burns Ice lollies can cause Ôfrost ...

Page 3: ...igeration 6 Movable shelves 7 Positioning the door shelves 7 Meat box 7 Hints and Tips 8 Maintenance and Cleaning 9 Internal cleaning 9 External cleaning 9 When the appliance is not in use 9 Changing the light bulb 9 Defrosting 9 Something not working 11 Service and Spare Parts 12 Customer Care 12 Guarantee Conditions 13 Instructions for the Installer Technical specification 14 Installation 15 Pos...

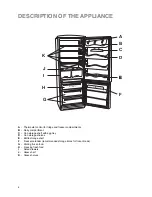
Page 4: ...ntrol for fridge and freezer compartments B Dairy compartment C Can storage shelf with egg tray D Can storage shelves E Bottle storage shelf F Freezer calendar recommended storage times for frozen foods G Storing frozen food H Freezing fresh food I Salad drawers J Glass shelf K Glass shelves ...

Page 5: ...or after a period of use before putting the products in the compartment let the appliance run for at least two hours on the coldest setting then turn the thermostat knob to the normal operating position Do not exceed the storage period indicated by the manufacturer Finally do not open the door frequently or leave it open longer than is absolutely necessary Important Do not put carbonated liquids f...

Page 6: ...ll reduce storage times in the event of a power cut or breakdown Thawing Deep frozen or frozen food prior to being used can be thawed in the fridge or at room temperature depending on the time available Small food items may even be cooked from frozen in this case cooking will take longer Any frozen food which is allowed to thaw accidentally should either be eaten as soon as possible or thrown away...

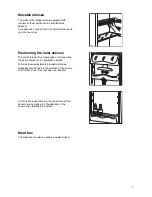
Page 7: ...storage of food packages of various sizes the door shelves can be adjusted in height To make these adjustments proceed as follows Gradually pull the shelf in the direction of the arrows until it comes free then reposition as required For more thorough cleaning the top door shelf can be removed by pulling it in the direction of the arrows then refitting it in position Meat box The meat box can also...

Page 8: ...n it must be consumed within 24 hours Never exceed the storage times indicated by the manufacturer Energy Saving Advice Do not install the appliance close to sources of heat such as a boiler or radiator Locate the appliance in a cool well ventilated room and make sure that the air openings of the appliance are not obstructed Avoid unnecessary frosting in the cabinet by packing all foodstuffs into ...

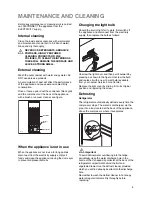
Page 9: ... the appliance with a brush or vacuum cleaner see figure D273 CONDENSER COMPRESSOR DEFROST TRAY Before any maintenance or cleaning work is carried out DISCONNECT the appliance from the ELECTRICITY supply Internal cleaning Clean the inside and accessories with warm water and bicarbonate of soda 5ml to 0 5 litre of water Rinse and dry thoroughly NEVER USE DETERGENTS ABRASIVE POWDERS HIGHLY PERFUMED ...

Page 10: ...and store in a cool dry place Leave the door open and insert the ice scraper under the channel in the centre of the lower part of the appliance place a low sided container beneath the scraper to collect the water see fig Clean and dry thoroughly Replace the scraper in one of the drawers Reconnect the appliance to the mains or reset the thermostat to a functioning position After letting the applian...

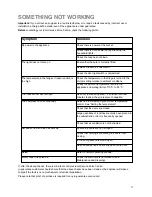
Page 11: ...See ÒSetting the temperatureÓ Check that the doors are closed Large quantities of food have recently been placed in the cabinet and or door is frequently opened Check that air ventilation is not obstructed Ensure the doors are not left open Check that nothing is preventing the doors from closing Is the door gasket intact and clean Has advised periodic defrosting been carried out Refer to normal op...

Page 12: ...eer please ensure you have read the details under the heading ÔSomething Not Working When you contact the Service Force Centre you will need to give the following details 1 Your name address and post code 2 Your telephone number 3 Clear and concise details of the fault 4 The model and serial number of the appliance found on the rating plate 5 The purchase date For general enquiries concerning your...

Page 13: ...lls to put right an appliance which is improperly installed or calls to appliances outside the European Community EC or European Free Trade Area Appliances found to be in use within a commercial environment plus those which are subject to rental agreements Products of Zanussi manufacture which are not marketed by Zanussi European Guarantee If you should move to another country within Europe then y...

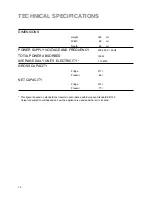
Page 14: ... Hz TOTAL POWER ABSORBED 150 W AVERAGE DAILY UNITS ELECTRICITY 1 10 kWh GROSS CAPACITY Fridge 217 l Freezer 88 l NET CAPACITY Fridge 212 l Freezer 77 l This figure is based on standard test results in accordance with European Standard EN 153 Actual consumption will depend on how the appliance is used and where it is located ...

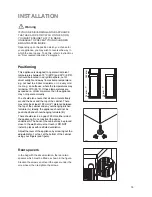
Page 15: ...be a gap of 25 mm either side of the appliance Do not obstruct the space underneath The back of the cabinet may be placed close to the wall but must not touch it DO NOT install in places with restricted ventilation Adjust the level of the appliance by screwing out the adjustable foot or feet at the bottom of the cabinet using your fingers see figure D200 PR153 NP002 100 mm 10 mm 10 mm A B Warning ...

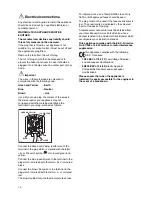
Page 16: ...th symbol or coloured green and yellow Connect the blue neutral wire to the terminal in the plug which is marked with the letter ÇNÈ or coloured black Connect the brown live wire to the terminal in the plug which is marked with the letter ÇLÈ or coloured red The plug moulded onto the lead incorporates a fuse D207 GREEN YELLOW 13 AMP FUSE BROWN CORD CLAMP BLUE 13 AMP For replacement use a 13amp BSI...

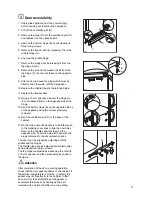
Page 17: ...m hinge E on the opposite side by of the appliance using the screws previously removed 14 Refit the ventilation grill D to the base of the cabinet 15 On the side where the handle is to be fitted push in the blanking cover caps to free the new holes Remove the handles and refit them on the opposite side Cover the holes left open with the plugs contained in the documentation pack The doors can be al...

Reviews: