background image

7

ENGLISH

USE

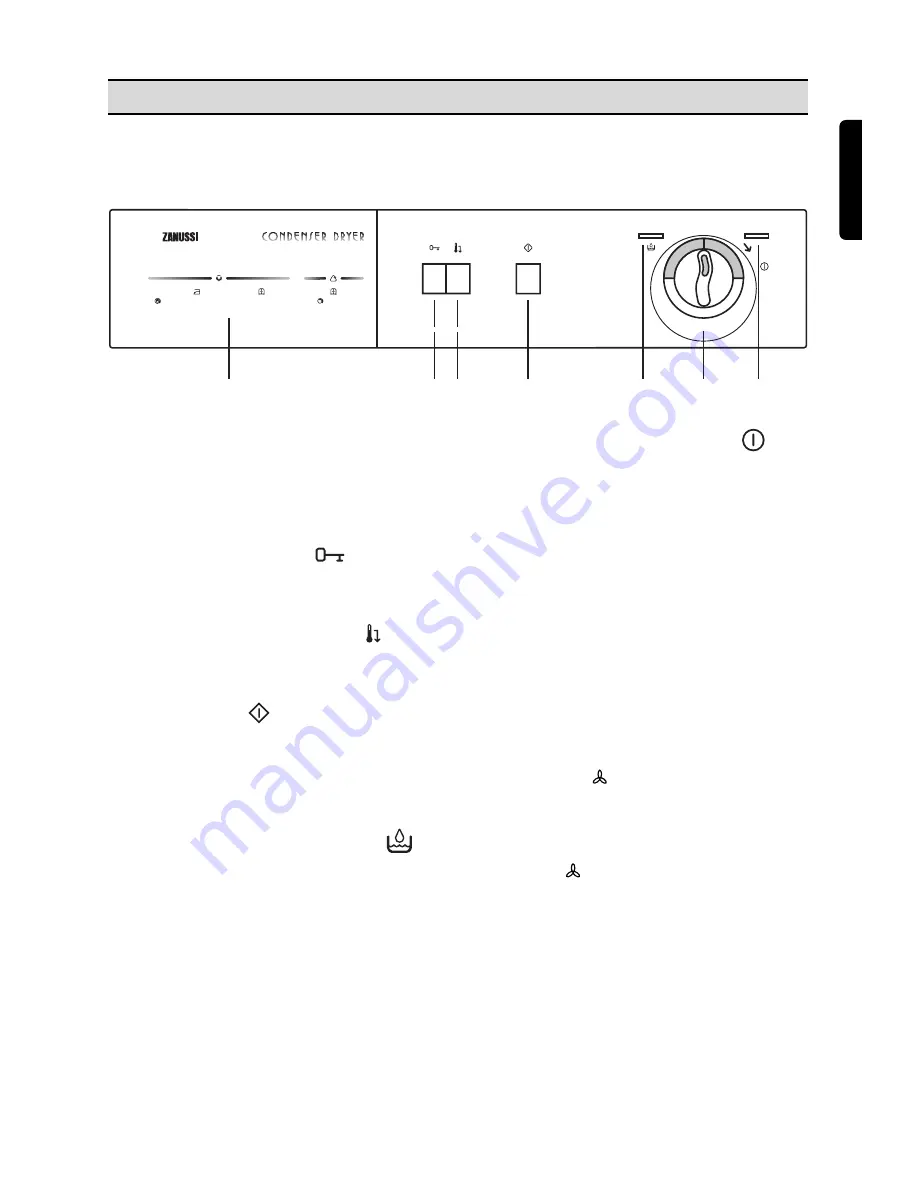
1 Programme Chart

The programme chart provides a summary of all
the programmes available and the corresponding
drying times.

2 Door opening and programme 

interruption button 

To open door, press this button: the programme
in progress is interrupted.

3 Low Temperature button 

Press this button to reduce the temperature when
drying particularly delicate cotton or linen items.

4 Start button 

After selecting the drying time, press start button:
the appliance will start drying.
If the door is opened during  drying, the
programme is interrupted. It will be resumed
by pressing the button again.

5 “Water container full” light 

This light lights up when the water container is
full or when it has been inserted incorrectly.

6 Drying Time Selector Dial 

The selector dial incorporates two drying cycles,
one of up to 150 minutes at a high temperature
for cotton and linen, and one of up to 100
minutes at a low temperature for synthetic
fabrics.
To set the machine to the selected time, turn the
dial clockwise until the time you want coincides
exactly with the pointer.
NEVER attempt to turn the dial in an
anticlockwise direction.
The drying time depends on:
- the speed of the last spin
- the desired degree of drying
- the type of laundry
- the size of the load.

Cooling phase  
When selecting the drying time, it should be
remembered that it includes a 10 minute cooling
phase. The heating is automatically cut off and
the laundry is cooled.
The position 

on the dial can be selected to

refresh jumpers, clothes, etc.

7 Mains-On Light

This lights up when the machine starts operating
and goes out at the end of the programme or by
opening the door.

Control panel

kg  2
kg  1

     650

45' - 55'
25' - 35'

kg  5
kg  2,5

800 / 900

 85' -105'

45' - 60'

1000 / 1200

  75' - 100'

 40' -  55'

800 / 900

110' - 130'

 60' -  75'

1000 / 1200

100' - 125'

 55' -  70'

A U T O R E V E R S E

1

2 3

4

5

6

7

Summary of Contents for TCS 683 LT

Page 1: ... BIELIZNY TCS 683 LT kg 2 kg 1 650 45 55 25 35 kg 5 kg 2 5 800 900 85 105 45 60 1000 1200 75 100 40 55 800 900 110 130 60 75 1000 1200 100 125 55 70 A U T O R E V E R S E INSTRUCTION BOOKLET NAVODILA ZA UPORABO NÁVOD K OBSLUZE INSTRUKCJA OBSŁUGI 125995110 ...

Page 2: ...o be store dried can be dried with laundry that has to be iron Environment protection Packaging recycling Materials marked with the symbol are recyclable To enable them to be recycled they must be placed in the appropriate collection areas or containers Check with your local Council or Environmental Health Office PE polyethylene PS polystyrene PP polypropylene Tumble dryer scrapping When the appli...

Page 3: ...ical connection Page 6 Stacking kit Page 6 Connecting a drain hose Page 6 Use Page 7 Control panel Page 7 Drying Times Page 8 Useful hints Page 9 Drying sequence Page 10 Maintenance Page 11 External cleaning Page 11 Cleaning the filter Page 11 Cleaning condenser Page 11 Emptying water container Page 12 Something not working Page 13 ENGLISH ...

Page 4: ... as this may cause a fire Do not overload the appliance Do not allow fluff to accumulate around the dryer Do not dry canvas shoes or sports shoes as they could get stuck between the door and the drum thus blocking the latter Service Repair Under no circumstances should you attempt to repair the machine yourself Repairs carried out by inexperienced persons may cause injury or serious malfunctioning...

Page 5: ...d subsequent modifications 89 336 EEC of 3 5 89 Electromagnetic Compatibility Directive and subsequent modifications DESCRIPTION OF THE APPLIANCE 01 Top cover 02 Programme chart 03 Door opening button 04 Low temperature button 05 Start button 06 Water container full light 07 Drying time selector dial 08 Mains on light 09 Fluff filter 10 Lock 11 Rating plate 12 Ventilation grid 13 Water container 1...

Page 6: ... single phase 50 Hz supply Check that your domestic electrical installation can take the maximum load required 2 2 kW also taking into account any other appliances in use Connect the machine to an earthed socket in accordance with current wiring regulations The manufacturer declines any responsibility for damage or injury through failure to comply with the above safety precaution 6 INSTALLATION St...

Page 7: ...e of up to 150 minutes at a high temperature for cotton and linen and one of up to 100 minutes at a low temperature for synthetic fabrics To set the machine to the selected time turn the dial clockwise until the time you want coincides exactly with the pointer NEVER attempt to turn the dial in an anticlockwise direction The drying time depends on the speed of the last spin the desired degree of dr...

Page 8: ...rwards Experience will soon enable you to estimate the drying time needed for your usual laundry loads It is advisable to take note of them Size of load It is not necessary to weigh the laundry if these instructions are followed Cottons linen full drum but not overloaded Synthetics half drum Particularly delicate fabrics do not fill the drum more than 1 3 For a mixed load cotton and synthetics for...

Page 9: ...g required Do not over dry laundry this avoids creasing and saves energy Avoid drying dark clothes with light coloured fluffy items such as towels as they could attract the fluff The laundry must be thoroughly spun before tumble drying Easy care items too e g shirts should be briefly pre spun before drying depending on crease resistance approx 30 seconds or using the special brief spin programme o...

Page 10: ... position on the dial is reached the heating is automatically cut off and the laundry is cooled After around 10 minutes the programme is over Important It is not advisable to open the door during operation to check the degree of dryness As the laundry is warm when touched it gives the impression of still being damp even if it is dry Open the door after the programme has finished If the programme h...

Page 11: ... the fluff Then refit the filter Do not be alarmed by the amount of fluff It is not due to excessive wear caused by the dryer All fabric loses fluff when drying but it goes un noticed in the air In a tumble dryer it simply collects in the filter Remove the fluff around the filter and around the seat of the condenser in the inner door using a damp cloth Cleaning condenser Remove fluff from the cond...

Page 12: ...ptied The time selector dial rotates to position O but the drying cycle is not completed In this case after emptying out the container the remaining drying time has to be selected again Insert container correctly Attention After this procedure before the dryer resumes the operation for a few seconds it could remain still and the water container full light could remain on Note The water collected i...

Page 13: ...e The dryer does not start up The dryer does not dry properly The door is open There is no electricity supply from the wall socket The fuse has blown The time selector dial is not set correctly The start button has not been depressed The water container is full or is not properly positioned The filter or the condenser is clogged Insufficient drying time The selected cycle is not suitable for the l...

Page 14: ......

Reviews: