background image

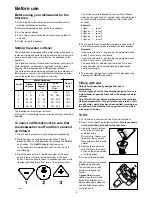
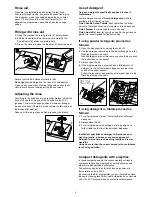
Before using your dishwasher for the
first time:

1. Ensure that the electrical and water connections comply 

with the installation instructions

2. Remove all packaging from inside the appliance

3. Set the water softener

4. Pour 1 litre of water inside the salt container and then fill 

with salt

5. Fill the rinse aid dispenser.

Setting the water softener

T

he dishwasher is equipped with a water softener designed to

remove minerals and salts from the water supply, which would
have a detrimental or adverse effect on the operation of the
appliance.
The higher the content of these salts, the harder your water is.
Water hardness is measured in equivalent scales, Clarke
degrees, French degrees and PPM (parts per Million).
The softener should be adjusted according to the hardness of
the water in your area. Your local Water Authority can advise
you on the hardness of the water in your area.

The dishwasher is factory set at level 3.
If this level is not suitable for your area the softener should be
adjusted. 

To select a different level be sure that
the dishwasher is off and then proceed
as follows:

1. Press and programme push buttons simultaneously.

2. While keeping the programme push buttons and 3

pressed switch on the dishwasher by pressing the On/Off
push button .The On/Off indicator light comes on.

At the same time the programme push buttons and 3
start flashing.

3. Press the push button 1, the indicator light of the push 

button turns off, while the indicator light of the push 
button remains fixed for about 5 seconds and then starts 
flashing indicating the current level of the water softener.

The current level is indicated by the number of flashes 
made by the push button indicator light, that alternates 5 
seconds off with a number of flashes, this for about 60 
seconds.

Example:
1 flash

=

level 1

2 flashes

=

level 2

3 flashes

=

level 3

4 flashes

=

level 4

5 flashes

=

level 5

4. To change the level, press the programme push button 1

Each time the push button is pressed the level changes.

Example:
If the current level is 3, by pressing the programme push 
button once, level 4 is selected.
If the current level is 5, by pressing the programme push 
button once, level 1 is selected.

The push button indicator light remains off for about 
5 seconds after which it starts flashing indicating the 
new level selected.

5. To memorise the new level, switch off the dishwasher by 

pressing the On/Off push button.

Filling with salt

Only use salt specifically designed for use in
dishwashers.
All other types of salt not specifically designed for use in
a dishwasher, especially table salt, will damage the water
softener.
Only fill with salt just before starting one of the complete
washing programmes. This will prevent any grains of salt
or salty water, which may have been spilled, remaining on
the bottom of the machine for any period of time, which
may cause corrosion.

To fill:

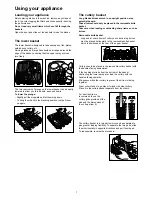
1. To fill with salt, unscrew the cap of the salt container.

2. Pour 1 litre of water inside the container (this is necessary 

only before filling with salt for the first time).

3. Using the funnel provided, 

pour in the salt until the 
container is full.
Do not worry if water over 
flows from the unit when 
filling with salt, this is quite 
normal.

4. Replace the cap making 

sure that there is no trace 
of salt on the screw thread 
or on the gasket.

5. Screw on the cap tightly.

The salt container will require
topping up periodically. 

The salt cap has a refill
indicator window in the
centre. 
green float is clearly
visible when there is salt
inside the container, and
almost disappears when the
salt has finished reminding
you to add salt.

5

Before use

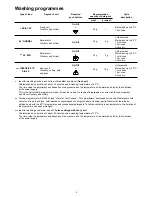
Level

Use of

salt

French

degrees

(°TH)

PPM

(Parts per

Million)

Clarke

degrees 

1

2

3

4

5

NO

YES

YES

YES

YES

< 6

6 - 21

22 - 35

36 - 49

50 - 63

< 8

8 - 30

31 - 50

51 - 70

71 - 90

< 80

81 - 300

301 - 500

501 - 700

701 - 900

Water hardness

SO462

SR11

SALE

SAL

T

SALZ

SEL

SR14

Summary of Contents for IZZI

Page 1: ...DISHWASHER IZZI INSTRUCTION BOOK 152975 75 0 UK ...

Page 2: ... programmes 9 Operating sequence 10 Maintenance and cleaning 11 Something not working 12 Service and Spare Parts 13 Customer Care Department 13 Guarantee Conditions 13 Installation instructions 14 Water supply connections 14 Water outlet hose connection 14 Electrical connection 14 Fitting under a counter 15 Levelling 15 Hints for test centres 15 2 Contents Dimensions Width 60 cm Height with workin...

Page 3: ...detergent specifically designed for use in dishwashers Long bladed knives stored in an upright position are a potential hazard Long and or sharp items of cutlery such as carving knives must be positioned horizontally in the upper basket When finishing loading or unloading close the door as an open door can be a hazard Do not sit or stand on the open door Isolate the appliance from the power supply...

Page 4: ...The upper light corresponds to the 65 NORMAL programme this programme is memorized and without depressing this push button the start of the programme will occur after 6 seconds from the pressure of the On Off push button In this time it is possible to change programme simply pressing the push button of another programme The lower light corresponds to the 50 ECO programme To activate this programme...

Page 5: ...vel 2 3 flashes level 3 4 flashes level 4 5 flashes level 5 4 To change the level press the programme push button 1 Each time the push button is pressed the level changes Example If the current level is 3 by pressing the programme push button 1 once level 4 is selected If the current level is 5 by pressing the programme push button 1 once level 1 is selected The push button 1 indicator light remai...

Page 6: ...d for every day use Finish Liquid Gel ideal for every day use As the gel is extra gentle it is recommended for fine bone china If using powder detergents proceed as follows 1 Open the dispenser lid by pulling the catch D 2 Add the detergent according to the instructions given in the Washing programmes chart As all detergents are not the same you should also consult the instructions on the packet 3...

Page 7: ...e removable knife basket Take care when loading or unloading sharp items such as knives Removable knife basket Long and or sharp items of cutlery such as carving knives must be placed horizontally in the removable knife basket which is positioned at the rear of the upper basket Cutlery should be placed in the removable cutlery basket with the handles facing downwards If the handles protrude from t...

Page 8: ...gy Place dishes in the machine immediately after every meal and wait until the dishwasher is full before washing Do not prewash dishes under running water Select the DAILY 30I programme when dishes are not very soiled following the instructions given in the Washing programmes chart For best washing results Before loading remove all scraps of food and soak very heavily soiled pots and pans Arrange ...

Page 9: ...e is approximate and depends on the pressure and the temperature of the water and also by the variations of the power supply This is the perfect daily programme made to meet the needs of a family of 4 persons who only wish to load breakfast and dinner crockery and cutlery Testing programme for EN 50242 see Hints for Test Centres This programme developed for the use of detergents with enzymes allow...

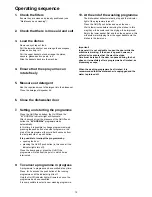
Page 10: ...indicator lights turn off Close the door again or press the On Off the programme will start from the point in which it was interrupted 9 To cancel a programme in progress A programme in progress can be cancelled at any time Press for 3 seconds the push button of the running programme untill the indicator light is off Only the On Off indicator light will remain on once the programme has been cancel...

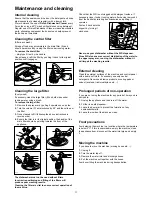
Page 11: ...vital to ensure correct operation of the machine Check that the SID is not clogged with detergent residue If necessary rinse it under running water after having removed it from the basket by twisting it anticlockwise and pulling it upwards Fasten it back onto the support by turning it clockwise Never use your dishwasher without the SID dispenser Since SID also ensures correct distribution of the w...

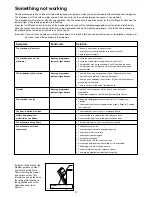
Page 12: ...t drain Running programme The drain hose may be squashed or bent Reposition the hose indicator light flashes The sink may be blocked Clear any blockages The drain hose extension is not correct Follow the instructions for connecting to the waste There is no vent in the end of the drain hose General Running programme Switch off the dishwasher Switch it back on and start the indicator light flashes p...

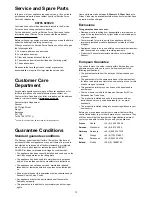
Page 13: ...red taken apart or tampered with by any person not authorised by us All service work under this guarantee must be undertaken by a Zanussi Service Force Centre Any appliance or defective part replaced shall become the Company s property This guarantee is in addition to your statutory and other legal rights Home visits are made between 8 30am and 5 30pm Monday to Friday Visits may be available outsi...

Page 14: ...his could cause the water to siphon back into the machine Attention Our appliances are supplied with a security device to protect against the return of dirty water back into the machine If the spigot of your sink has a no return valve incorporated this can prevent the correct draining of your dishwasher We advise you therefore to remove it If you use a drain hose extension it must be no longer tha...

Page 15: ... Levelling Good levelling is essential for correct closure and sealing of the door When the appliance is correctly levelled the door will not catch on the levelling spacers on either side of the cabinet If the door does not close correctly loosen or tighten the adjustable feet until the machine is perfectly level 820 570 600 600 IN05 IN06 IN07 Hints for test centres Before starting any test it is ...

Page 16: ...chen cleaning and outdoor use More than 55 million Electrolux Group products such as refrigerators cookers vacuum cleaners chain saws and lawn mowers are sold each year to a value of approx 14 billion USD in more than 150 countries around the world Electrolux Household Appliances Limited 2002 0 01 02 Subject to change without notice ...

Reviews: