background image

6

Before cooking for the first time, carefully wash

the 

oven accessories

.

The oven will work only if the time of day has

been set with the electronic programmer.

Once the oven has been installed:

a) set the thermostat knob to MAX (250);

b) switch the oven function control knob to conventional

cooking (   );

c) allow the oven to run empty for approximately 45

minutes;

d) open a window for ventilation.

During this time, an unpleasant odour may be emitted.

This is absolutely 

normal

, and is caused by residues of

manufacturing.

Repeat this operation for the grill and fan cooking function.

Once this operation is carried out, let  the oven cool down,

then clean the oven cavity with a soft cloth soaked in warm

soapy water.

FO 2161

Fig. 4

To  open  the  oven  door,  always  catch    the

handle in its central part (Fig. 4).

When the oven is first installed

Condensation and steam

When food is heated it produces steam in the same way

as a boiling kettle. The oven vents allow some of this

steam to escape. However, 

always stand back from

the oven when opening the oven door

 to allow any

build up of steam or heat to release.

If the steam comes into contact with a cool surface on the

outside of the oven, e.g. a trim, it will condense and

produce water droplets. This is quite normal and is not a

fault with the oven. To prevent discoloration, regularly

wipe away condensation and also soilage from surfaces.

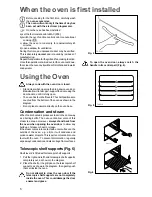
Telescopic shelf supports (Fig. 6)

Shelf level 2 is fitted with telescopic shelf supports.
1. Pull the right and left hand telescopic shelf supports

completely out, as shown in the diagram.

2. Place the shelf or the grill pan on the telescopic shelf

supports, as shown in the diagram, then gently push

them all inside the oven.

Do not attempt to close the oven door if the

telescopic shelf supports are not completely

inside the oven. This could damage the door

enamel and glass.

Using the Oven

4
3
2
1

FO 0019

Fig. 5

Fig. 6

F

Always cook with the oven door closed.

• Stand clear when opening the drop down oven door.

Do not

 allow it to fall open - support the door using the

door handle, until it is fully open.

• The oven has four shelf levels. The shelf positions are

counted from the bottom of the oven as shown in the

diagram.

• Do not place cookware directly on the oven base.

Summary of Contents for BMF810

Page 1: ...BUILT IN OVEN BMF 810 INSTRUCTION BOOKLET IL ...

Page 2: ...2 ...

Page 3: ...gmeat Pouralittle water into the dripping pan to avoid smoke and unpleasant smells Alwaysuseovenglovestoremovepansfromtheoven Forhygieneandsafetyreasons thisapplianceshould be kept clean at all times A build up of fats or other foodstuff could result in a fire Disconnect the appliance from the electrical supply beforecarryingoutanycleaningormanteinancework Some parts of the appliance are covered b...

Page 4: ... ensuring even heating inside the oven Top heating element The heat comes from the top of the oven only Bottom heating element The heat comes from the bottom of the oven only Inner grill element only can be used for grilling small quantities Double Grill The full grill element will be on Thermal Grilling This function offers an al ternative method of cooking food items normally associated with con...

Page 5: ...malfunctioning of the main thermostat and consequent over heating thesafetydevicewillstopthepowersupply to the appliance If this happens call your local Zanussi Service Centre Under no circumstances should you attempt to repair the appliance yourself The cooling fan The cooling fan is designed to cool the walls of the oven and the components of the oven itself The fan switches on automatically aft...

Page 6: ...en when opening the oven door to allow any build up of steam or heat to release Ifthesteamcomesintocontactwithacoolsurfaceonthe outside of the oven e g a trim it will condense and produce water droplets This is quite normal and is not a fault with the oven To prevent discoloration regularly wipeawaycondensationandalsosoilagefromsurfaces Telescopic shelf supports Fig 6 Shelf level 2 is fitted with ...

Page 7: ...cally switch off at the end of a programmed cooking duration time Place food in the oven select acookingfunctionandadjustthecookingtemperature Pressbutton repeatedlytoselectthe Cooking Duration function Therelevantpilot lamp will start flashing Then proceed as follows To set the duration time 1 press button or 2 After the setting is carried out wait for 5 seconds the Cooking Duration pilot lamp wi...

Page 8: ... at a later time 1 With the Cooking duration function carry out the cooking duration setting as described in the relevant chapter set the duration time Then press button the display will show the programmed setting 2 With the End of cooking time function carry out the End of cooking setting as described in the relevant chapter set the end of cooking time The relevant pilot lamps will come on and t...

Page 9: ...FF position symbol l The oven fan operates without heat and circulates the air at room temperature inside the oven The temperatures inside the oven can reach 250 C Always ensure that you are using oven proof baking trays oven dishes etc Fig 8 Always cook with the oven door closed Do not place pans biscuit pans or aluminium foil directly on the base of the oven This could cause a heatbuild upwhichc...

Page 10: ... 175 100 130 On grid 1000 Veal 2 200 2 175 90 120 On grid 1500 English roast beef 2 220 2 200 50 70 On grid 1200 Lamb 2 200 2 175 110 130 Leg 1000 Chicken 2 200 2 175 60 80 Whole 4000 Turkey 2 200 2 175 210 240 Whole 1500 Duck 2 175 2 160 120 150 Whole 3000 Goose 2 175 2 160 150 200 Whole 1200 Hare 2 200 2 175 60 80 Cut in pieces Fish 1000 Whole 2 200 2 1 and 3 175 40 60 2 fishes 800 Fillets 2 200...

Page 11: ...en 1200 2 or 3 190 40 30 Kebabs 800 3 200 15 10 Fish whole 800 3 200 12 8 Cooking Tables Grilling When using the Thermal grill function select a maximum temperature of 200 C and do not exceed 1 hour of operation Thermal grilling FO 0018 Grease Filter When cooking meat the grease filter must be fitted over the oven fan by clipping it over the vents in the back panel This will prevent a built up of ...

Page 12: ... enamel brightness but it will have no consequence on the oven performances To avoid these stains to be burnt out during the next cooking carefully clean the oven cavity after all fruits cookings The Oven Door and its gasket Before cleaning the oven door we recommend you to removeitfromtheoven Proceed as follows a open the oven door completely b find the hinges linking the door to the oven Fig 10 ...

Page 13: ...n Light Ensure the electricity supply is switched off before carrying out this operation The oven bulb has to comply to these features a resistant to temperatures of 300 C b electric rate 230 V 50 Hz c electric power rate 25 W d connection type E 14 To replace the bulb proceed as follows Fig 11 a push in and turn the glass lid anticlockwise b removethafaultybulb c replace it with a new one d refit...

Page 14: ...perature light does not come on n The oven light does not come on n It takes too much time to finish the dishes or they are cooked too fast n Steam and condensation settle on the food and the oven cavity If the appliance is not working correctly please carry out the following checks before contacting your local Service Centre If after the checks listed in the previous chapter the appliance still d...

Page 15: ...ooling fan 25 W Oven lamp 25 W Voltage tension 50 Hz 230 V Maximum power rating 230V 50Hz 2600 W Energy consumption in accordance with EC directive 2002 40 CE 8 May 2002 ENERGY CONSUMPTION HEATING FUNCTION kW FORCED AIR CONVECTION CONVENTIONAL USABLE VOLUME LITRES 0 79 SIZE SMALL MEDIUM LARGE THE AREA OF THE LARGEST BAKING SHEET MODEL ENERGY EFFICIENCY CLASS CONVENTIONAL FORCED AIR CONVECTION _ _ ...

Page 16: ...en away without using any tool Werecommednottoinstalltheappliancenearrefrigerators orfreezer sincetheheatcouldaffecttheperformanceof these appliances Oven dimensions The oven dimensions are shown in Fig 14 In Column recess dimensions The recess must have the dimensions shown in Fig 15 Undertop recess dimensions The recess must have the dimensions shown in Fig 16 Securing the oven to the cabinet Fi...

Page 17: ...ncedirectlytotheelectricsystem a double pole switch must be installed between the applianceandtheelectricitysupply withaminimumgap of 3 mm between the switch contacts and of a type suitable for the required load in compliance with the current rules The earth wire must not be interrupted by the double switch pole The connection cable has to be placed in order that in eachpart itcannotreachatemperat...

Reviews: