24
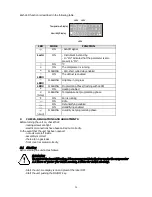
Each LED function is described in the following table.
LED2
LED3
Temperature Display
Humidity Display
LED4
LED
MODE
FUNCTION
ON
- ALARM signal
Led 4
ON
-
Instrument in stand by.
-
In “Pr2” indicates that the parameter is also
present in “Pr1”.
ON
°C
ON
The compressor is running
FLASHING - Anti-short cycle delay enabled
LED 3
ON
The defrost is enabled
LED 3
FLASHING Drip time in progress
LED 2
FLASHING Programming Phase (flashing with LED3)
ON
Heating enabled
(temp)
FLASHING Temperature Set programming phase
ON
Fan is running
ON
RH%
ON
Dehumidifying enabled
ON
Humidifying enabled
(umid)
FLASHING Humidity Set programming phase
9
CHECKS, REGULATIONS AND ADJUSTMENTS
Before turning the unit on, check that:
-
locking screws are tight
-
electrical connections have been carried out correctly.
In the event that the unit has been opened:
-
no tools were left inside
-
assembly is correct
-
there are no gas leaks
-
front cover is secured correctly
9.1
Starting
Before starting the unit act as follows:
WARNING
To control the humidification, it’s necessary put into the tray under the evaporator
1.5 liters of w ater (for RCV1 models, 2 liters for RCV2 models).
-
Start the unit. He display is on and present the label OFF
-
Start the unit pushing the ON/OFF key.

