background image

37

Important:

Never use sharp metal tools to scrape off frost
from the evaporator as you could damage it.

Do not use a maechanical device or any artificial
means to speed up the thawing process other
than those recommended by the manufacturer.

A temperature rise of the frozen food packs,
during defrosting, may shorten their safe storage
life.

Defrosting

Frost is automatically eliminated from the evaporator
of the refrigerator compartment every time the motor
compressor stops, during normal use. The defrost
water drains out through a trough into a special
container at the back of the appliance, over the
motor compressor, where it evaporates.

It is important to periodically clean the defrost
water drain hole in the middle of the refrigerator
compartment channel to prevent the water
overflowing and dripping onto the food inside.
Use the special cleaner provided, which you will
find already inserted into the drain hole.

The freezer compartment, however, will become
progressively covered with frost. This should be
removed with a plastic scraper , whenever the
thickness of the frost exceeds 4 mm. During this
operation it is not necessary to switch off the power
supply or to remove the foodstuffs.

However, when the ice becomes very thick on the
inner liner, complete defrosting should be carried out
and it is advisable to carry out this operation when
the appliance is empty.

To carry out complete defrosting of the freezer

compartment  

proceed as follows:

1. pull out the plug from the wall socket or turn the

thermostat knob to the «O» setting;

2. remove any stored food, wrap it in several layers

of newspaper and put it in a cool place;

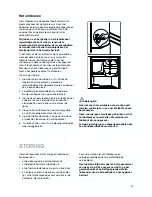
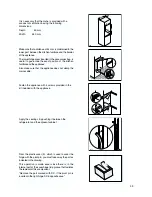
3. leave the door open, place a basin on the top

shelf of the refrigerator compartment  under the
drain hole, remove the plugas shown in the
figure;

4. when defrosting is completed, dry the interior

thoroughly and refit the plug;

5. turn the thermostat knob back to the required

setting or replace the plug in the power socket.
After letting the appliance run for at least half an
hour, replace the previously removed food into
the compartment.

PR151

D037

CUSTOMER SERVICE AND SPARE PARTS

If the appliance is not functioning properly, check
that:

the plug is firmly in the wall socket and the mains
power switch is on;

there is an electricity supply (find out by plugging
in another appliance);

the thermostat knob is in the correct position.

If there are water drops on the bottom of the
cabinet, check that the defrost water drain

opening is not obstructed (see “Defrosting”
section).

If your appliance is still not working properly after
making the above checks, contact the nearest
service centre.

To obtain fast service, it is essential that when you
apply for it you specify the model and serial number
of your appliance which can be found on the
guarantee certificate or on the rating plate located
inside the appliance, on the bottom left-hand side.

Summary of Contents for ZKK8421

Page 1: ...K hl Gefrierger t R frig rateur Cong lateur Diepvries Koelkast Fridge Freezer ZANKER ZKK 8421 Gebrauchsanweisung Mode d emploi Gebruiksaanwijzing User Manual 2223 272 75...

Page 2: ...ollte vermieden werden Eine ausreichende Luftzirkulation an der Ger ter ckseite mu gew hrleistet sein Jegliche Besch digung des K hlkreislaufes ist zu vermeiden NUR F R GEFRIERSCHR NKE Einbauger te au...

Page 3: ...s Ger t enth lt im K hlkreislauf und in der Isolierung kein ozonsch digendes Gas Das Ger t darf nicht mit dem Hausm ll entsorgt werden Eine Besch digung des K ltemittelkreislaufs insbesondere des W rm...

Page 4: ...rden da die K lte um sie frei zirkulieren kann GEBRAUCH Wichtig H chste K lteeinstellung bei hoher Raumtemperatur und erheblicher Lebensmittelmenge kann fortdauernden K hlschrank Betrieb verursachen d...

Page 5: ...erden Bitte zur Entnahme der Eisw rfelschalen keine Metallgegenst nde benutzen H henverstellung der Abstellregale Zur Einlagerung von Lebensmittel Packungen verschiedener Gr e sind die Abstellregale d...

Page 6: ...ein einwandfreies Einfrieren der Lebensmittel geben wir folgende Ratschl ge Das Gefrierverm gen des Gefrierabteils in 24 Std kann auf dem Typenschild abgelesen werden Der Gefriervorgang dauert ca 24 S...

Page 7: ...n St psel wie in der Abbildung gezeigt entfernen 4 Nach beendetem Abtauproze das Gefrierabteil gut nachtrocknen und den St psel wieder hineingeben 5 Den Thermostatknopf wieder in die gew nschte Stellu...

Page 8: ...cht der folgende EWG Richtlinie 87 308 EWG vom 2 6 87 Deutschland Ausf hrung bzw der VE Richtlinie Nr F 61 84 sterreich Ausf hrung bez glich Funkentst rung 73 23 EWG vom 19 02 73 Niederspannung und fo...

Page 9: ...werden Ferner ist auch am hinteren Einbauschrankteil ein L ftungskamin mit filgenden Massen notwendig Tiefe 50 mm Breite 540 mm 50 mm min 200cm2 200cm 2 min D567 PR0 540 50 3 2 1 Vergewissern Sie sic...

Page 10: ...anzeichnen Nachdem die L cher gebohrt wurden die Schiene mit den mitgelieferten Schrauben befestigen 21 mm 21 mm ca 50 mm 90 90 ca 50 mm PR33 Hc Ha Die Abdeckung Hc in die Schiene Ha eindr cken bis si...

Page 11: ...ne anbringen und mit den mitgelieferten Schrauben befestigen F r eine allf llig notwendige Ausrichtung der M belt r den Spielraum der Langl cher nutzen Nach Beendigung der Arbeiten den einwandfreien V...

Page 12: ...d air suffisante la partie arri re de l appareil et il faut viter tout endommagement du circuit r frig rant Seulement pour cong lateurs sauf mod les encastr s un emplacement optimal est la cave Ne pas...

Page 13: ...ration et cong lation il y a des surfaces qui se couvrent de givre Suivant le mod le ce givre peut tre limin automatiquement d givrage automatique ou bien manuellement N essayez jamais d enlever le gi...

Page 14: ...TILISATION R glage de la temp rature La temp rature est r gl e automatiquement et peut tre augment e moins froid en tournant le bouton vers les num ros les plus bas ou bien diminu e plus froid en le t...

Page 15: ...ns Il faut remplir ces bacs d eau potable et les placer dans le cong lateur N employez pas d objet m tallique pour d coller les bacs glace Positionnement des balconnets de la contre porte Il est possi...

Page 16: ...ur chaque paquet la date de Conseils pour la surg lation Comment utiliser ce compartiment au mieux v rifiez que les aliments aient bien t conserv s en magasin assurez vous que le transport du moment d...

Page 17: ...etirez le bouchon comme l illustre la figure 4 une fois que le d givrage est termin pongez bien le cong lateur et remettez le bouchon sa place 5 ramenez le bouton du thermostat sur la position d sir e...

Page 18: ...ts n est pas respect e Cet appareil est conforme aux Directives Communautaires suivantes 87 308 CEE du 2 6 87 concernant la suppression des interf rences radio lectriques 73 23 CEE 19 02 73 Basse Tens...

Page 19: ...st galement n cessaire que la niche soit quip e d un conduit d areation ayant les mesures suivantes Profondeur 50 mm Largeur 540 mm 50 mm min 200cm2 200cm 2 min D567 PR0 540 50 3 2 1 Veillez maintenir...

Page 20: ...Apr s avoir pratiqu les trous fixer la glissi re avec les vis fournies 21 mm 21 mm ca 50 mm 90 90 ca 50 mm PR266 Ha Hb Hc Hd S parer les pi ces Ha Hb Hc Hd comme l indique de la figure Sur le cache pl...

Page 21: ...Hd Hb Remettre l querre en place sur la glissi re et fixer avec les vis fournies Pour effectuer l ventuel alignement de la porte du meuble utiliser le jeu des trous ovales A la fin des op rations il...

Page 22: ...en dat de delen van het koelcircuit niet zodanig worden beschadigd dat de koelvloeistof naar buiten zou kunnen lekken Plaats het apparaat niet in de nabijheid van een centrale verwarming of een gasfor...

Page 23: ...araat bevat zowel in het koelcircuit als in de isolatie geen ozononvriendelijke stoffen Het apparaat mag niet samen met huisvuil of gesloopte apparaten weggegooid worden Afgedankte koel en vriesappara...

Page 24: ...Attentie Het kan voorkomen dat indien de thermostaat knop in de koudste stand gedraaid is bijvoor beeld ten gevolge van zeer warme omgevings temperatuur of het snel willen koelen van grote hoeveelhed...

Page 25: ...t vak geleidelijk naar de door de pijlen aangegeven richting totdat het loskomt Daarna verplaats het vak naar de gewenste hoogte Verplaatsbare platen De koelkastwanden zijn van richels voorzien zodat...

Page 26: ...atiedatum en respekteer de vervaldatum van de fabrikant produkten de temperatuur van deze laatste zou daardoor kunnen stijgen vermijd rechtstreekse konsumptie van ijslollies uit het vriesvak u zou uw...

Page 27: ...het vriesvak dient u echter de rijp te verwijderen wanneer deze een laag van circa 4 mm vormt Gebruik hiervoor het plastic spatel Voor het uitvoeren van deze handeling hoeft u het apparaat niet uit t...

Page 28: ...twoordelijkheid van de fabrikant valt INSTALLATIE Plaats van opstelling Plaats het apparaat uit de buurt van warmtebronnen centrale verwarming kachels felle zonnestralen enz Zie voor inbouw de betreff...

Page 29: ...tentie zorg ervoor dat de ventilatie openingen tijdens gebruik niet worden afgedekt De nis moet tevens voorzien zijn van een luchtkanaal met de volgende afmetningen diepte 50 mm breedte 540 mm U moet...

Page 30: ...e binnenkant van de kastdeur aan de boven en onderkant houden volgens de tekening en de plaats van de buitenste gaten aangeven Nadat u de gaten geboord heeft de geleider met de bijgeleverde schroeven...

Page 31: ...chtstellen van de kastdeur kunt u gebruik maken van de langwerpige gaten Tenslotte dient u te controleren of de deur van het apparaat goed sluit Afdekking Hd op geleider Hb vastklikken Omkeren draairi...

Page 32: ...re must be adequate ventilation round the back of the appliance and any damage to the refrigerant circuit must be avoided For freezers only except built in models an ideal location is the cellar or ba...

Page 33: ...te ventilation as a failure to do this will result in component failure and possible food loss See installation instructions Parts which heat up should not be exposed Wherever possible the back of the...

Page 34: ...quids in the refrigerator do cover or wrap the food particularly if it has a strong flavour Position food so that air can circulate freely round it Storage of frozen food When first starting up or aft...

Page 35: ...ll types wrap in polythene bags and place on the glass shelf above the vegetable drawer For safety store in this way only one or two days at the most Cooked foods cold dishes etc these should be cover...

Page 36: ...s already frozen thus avoiding a rise in temperature of the latter lean foods store better and longer than fatty ones salt reduces the storage life of food water ices if consumed immediately after rem...

Page 37: ...is operation when the appliance is empty To carry out complete defrosting of the freezer compartment proceed as follows 1 pull out the plug from the wall socket or turn the thermostat knob to the O se...

Page 38: ...r supply socket is not earthed connect the appliance to a separate earth in compliance with current regulations consulting a specialist technician ATTENTION It must be possible to disconnect the appli...

Page 39: ...the exact position of the kitchen furniture and the appliance Also make sure that the appliance does not clamp the mains cable 1 2 44mm E PR0 540 50 3 2 1 D724 I I Fasten the appliance with 4 screws...

Page 40: ...the screws supplied 21 mm 21 mm ca 50 mm 90 90 ca 50 mm Fix cover Hc on guide Ha until it clips into place PR33 Hc Ha PR167 Ha Hb 8mm Open the appliance door and the furniture door at 90 Insert the sm...

Page 41: ...re door be necessary use the clearance of slots At the end of operations it is necessary to check if the door of the furniture closes properly Fix cover Hd on guide Hb until it clips into place 180 In...

Page 42: ......

Page 43: ......

Page 44: ......

Reviews: