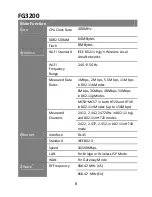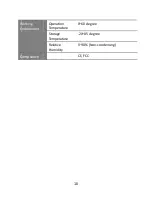
9
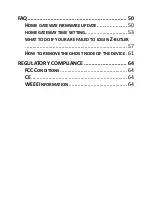
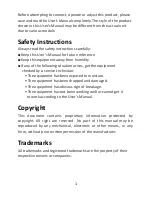
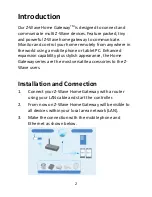
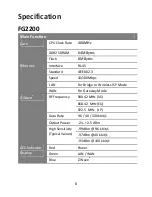
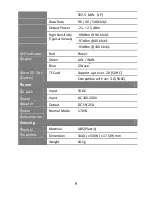
922.5 MHz (JP)
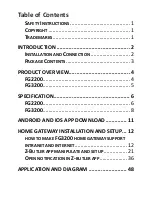
Data Rate
9.6 / 40 / 100kbit/s
Output Power
-21…+2.5 dBm
High Sensitivity
(Typical Values)
-99 dBm @9.6 kbit/s
-97 dBm @40 kbit/s
-93 dBm @100 kbit/s
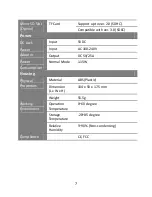
LED Indicator
Display
Red
Power
Green
LAN / WAN
Blue
Z-Wave
®
Micro SD Slot
(Option)
TF Card
Support up to ver. 2.0 (SDHC)
Compatible with ver. 3.0 (SDXC)
Power
DC Jack
Input
5VDC
Power
Adapter
Input
AC 100-240V
Output
DC 5V/2.5A
Power
Consumption
Normal Mode
1.70W
Housing
Physical
Properties
Material
ABS (Plastic)
Dimension
104(L) x 50(W) x 17.5(H) mm
Weight
64.5g
Summary of Contents for FG2200
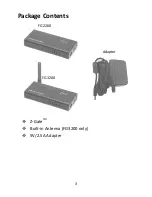
Page 6: ...3 Package Contents Z GateTM Built in Antenna FG3200 only 5V 2 5A Adapter FG2200 FG3200 Adapter...
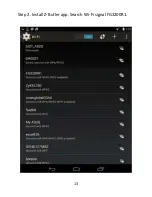
Page 16: ...13 Step 2 Install Z Butler app Search Wi Fi signal FG3200R1...
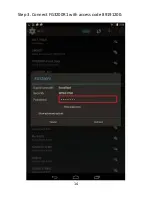
Page 17: ...14 Step 3 Connect FG3200R1 with access code 89191200...
Page 19: ...16 Step 5 Click the pop up gateway information bar...
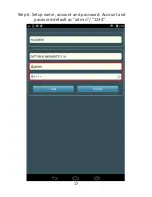
Page 20: ...17 Step 6 Setup name account and password Account and password default as admin 1234...
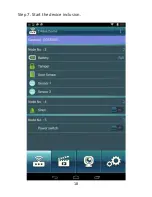
Page 21: ...18 Step 7 Start the device inclusion...
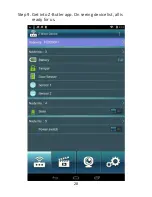
Page 23: ...20 Step 9 Get into Z Butler app On seeing device list all is ready for us...
Page 24: ...21 Z Butler APP Manipulate and Setup Step 1 Select Scene settings from function bar...
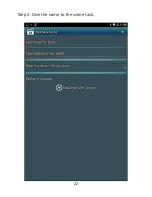
Page 25: ...22 Step 2 Give the name to the scene task...
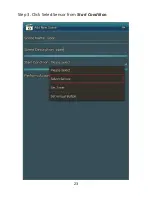
Page 26: ...23 Step 3 Click SelectSensor from Start Condition...
Page 28: ...25 Step 5 Click SelectZWave device from Perform_Actions...
Page 29: ...26 Step 6 Choose Siren from Action Device Select On from Sensor Status...
Page 30: ...27 Step 7 Press OK...
Page 31: ...28 Step 8 Please Click if you want to add more scene setting...
Page 32: ...29 Step 9 Give a name to the new scene...
Page 33: ...30 Step 10 Click SelectSensor from Start Condition...
Page 35: ...32 Step 12 Click SelectZWave Device from Perform _ Actions...
Page 36: ...33 Step 13 Select Siren from Action Device Click OFF from Sensor Status Press OK...
Page 37: ...34 Step 14 Press OK...
Page 38: ...35 Step 15 You will see all the scene setting that you have made from the list...
Page 40: ...37 Step 2 Click Z Butler...
Page 41: ...38 Step 3 Click Show notifications...
Page 42: ...39 Step 4 In Z Butler app match up with TS2001Z1 Door Sensor...
Page 43: ...40 Step 5 Click Notification Settings in the setting section...
Page 44: ...41 Step 6 Check Push notification sound and Push notification vibrate...
Page 46: ...43 Step 8 After finishing installing Z Butler in iOS mobile click Settings General...
Page 47: ...44 Step 9 Click Notification...
Page 49: ...46 Step 11 Match up with TS2001Z1 Door Sensor in Z Butler app...
Page 52: ...49...
Page 57: ...54 Step 2 Set the time in manual or through NTP server...
Page 61: ...58 Step 2 Execute Clear Data...
Page 63: ...60 Step 4 Open Z Butler app Input the default account admin and password 1234...
Page 64: ...61 How to remove the ghost node of the device Step 1 Select Node...
Page 65: ...62 Step 2 Select Remove Device...


