background image

-2-

1    Introduction

Welcome to the Z3Pro car dash cam. Protect you and your vehicle with real-time 

video and audio recording whilst you're driving. Featuring a stealth size design 

and dual-lens for recording front and back. Please read this manual carefully 

before using this product. We hope you enjoy using this product.

1.1    Features

•  

Full HD 1920 x 1080P

•  2.0" LCD Color screen

•  Up to 150-degree wide angle lens

•  Built-in G-Sensor

•  Motion Detection

•  Audio Recording

•  Night Vision

•  GPS

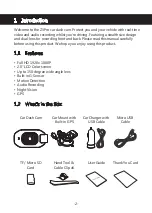
1.2    What's in the Box

Car Dash Cam

Car Charger with 

USB Cable

Car Mount with 

Built-in GPS

User Guide

TF / Micro SD 

Card

Micro USB 

Cable 

Thank You Card

Hand Tool & 

Cable Clip x6

Summary of Contents for Z3Pro

Page 1: ...BEDIENUNGSANLEITUNG USER GUIDE Z3Pro...

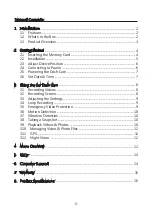
Page 2: ...English 1 Deutsch 18 CONTENTS INHALTSVERZEICHNIS...

Page 3: ...7 2 6 Set Date Time 7 3 Using the Car Dash Cam 8 3 1 Recording Videos 8 3 2 Recording Screen 8 3 3 Adjusting the Settings 9 3 4 Loop Recording 9 3 5 Emergency Video Protection 9 3 6 Motion Detection...

Page 4: ...ase read this manual carefully before using this product We hope you enjoy using this product 1 1 Features Full HD 1920 x 1080P 2 0 LCD Color screen Up to 150 degree wide angle lens Built in G Sensor...

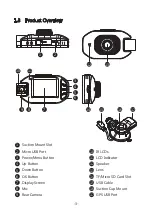
Page 5: ...Micro USB Port Power Menu Button Up Button Down Button OK Button Display Screen Mic Rear Camera 10 11 12 13 14 15 16 17 IR LCDs LCD Indicator Speaker Lens TF Micro SD Card Slot USB Cable Suction Cup...

Page 6: ...u can remove it from the slot WARNING It is recommended to format the memory card before initial use Please note that all data saved on the memory card will be erased after formatting Note Supports Mi...

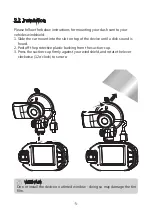
Page 7: ...mount into the slot on top of the device until a click sound is heard 2 Peel off the protective plastic backing from the suction cup 3 Press the suction cup firmly against your windshield and rotate...

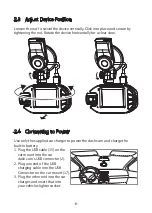
Page 8: ...2 4 Connecting to Power Use only the supplied car charger to power the dash cam and charge the built in battery 1 Plug the USB cable 15 on the car mount into the car dash cam s USB connector 2 2 Plug...

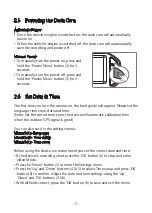
Page 9: ...Please set the language time zone date and time Note Set the correct time zone the device will automatic calibration time when the outdoor GPS signal is good You can also set it in the settings menu...

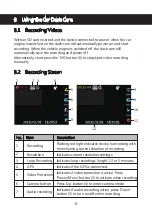
Page 10: ...ding Screen No Item Description Recording Flashing red light indicates device is recording with time showing current duration of recording GPS Indicates if the GPS is connected Video Protection Indica...

Page 11: ...ally overwrites the earliest unprotected saved file This prevents long duration video clips from being lost in a single overwrite Video files can be saved to the memory card in 1 3 or 5 mins intervals...

Page 12: ...nusual impacts or collisions detected by the built in G Sensor It automatically triggers the Emergency Video Protection To Set the sensitivity to automatically trigger these features with smaller or l...

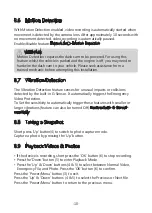
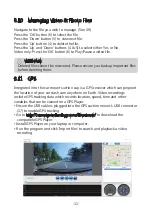
Page 13: ...iles before deleting them 3 11 GPS Integrated into the car mount suction cup is a GPS receiver which can pinpoint the location of your car dash cam anywhere on Earth Video recordings include GPS track...

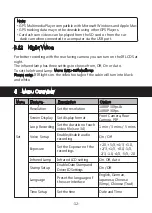
Page 14: ...on the video footage of the cabin will turn into black and white Menu Feature Description Option Set the resolution Resolution 1080P 30fps 1080P 30fps Set the duration of each video file see 3 4 Loop...

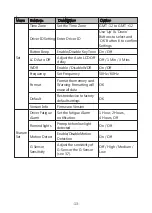
Page 15: ...ver Fatigue Alarm On Off Prompt when low light detected Remind lights On Off Enable Disable Motion Detection Motion Detect Off High Medium Low Format the memory card Warning Formatting will erase all...

Page 16: ...y cards below Class 10 are used they may cause the dash cam to freeze or other related video recording erasing issues How do I turn off the audio during recording To turn off Audio Record short press...

Page 17: ...discounts and giveaways Thank you for choosing Z Edge 7 Warranty All Zero Edge customers have a 30 day money back guarantee to make sure your shopping experience is worry free You also get a 12 month...

Page 18: ...024 JPEG Yes Yes Yes Micro USB Super Capacitor 10 to 60 C 14 to 140 F 20 to 70 C 4 to 158 F 3 74 inch x 2 05 inch x 1 24 inch 95mm x 52mm x 31 5mm LxWxH 2 65 oz 75g INPUT DC 12 24V OUTPUT DC 5V Built...

Page 19: ...termined by turning the equipment off and on the user is encouraged to try to correct the interference by one or more of the following measures Reorient or relocate the receiving antenna Increase the...

Page 20: ......

Page 21: ...usschalten 24 2 6 Datum Uhrzeit einstellen 24 3 Kamerabetrieb 25 3 1 Videoaufnahmen 25 3 2 Aufnahmebildschirm 25 3 3 Einstellungen anpassen 26 3 4 Loop Aufnahme 26 3 5 Notfall Video Sch tzen 27 3 6 Be...

Page 22: ...ufmerksam durch und bewaren Sie diese zum nachschlagen in der Zukunft auf 1 1 Eigenschaften Full HD 1920 x 1080P Video Aufl sung 2 0 Zoll LCD Farbanzeige Bis zu 150 Grad Weitwinkelobjektiv Eingebauter...

Page 23: ...Men Taste Aufw rts Taste Abw rts Taste OK Taste Bildschirm Mikrofon R ckkamera Objektiv 10 11 12 13 14 15 16 17 IR LCDs LCD Anzeige Lautsprecher Frontkamera Objektiv TF Micro SD Kartenschlitz USBKabe...

Page 24: ...UNG Es wird empfohlen die Speicherkarte vor der ersten Benutzung zu formatieren Bitte beachten Sie dass alle auf der Speicherkarte gespeicherten Daten nach dem Formatieren gel scht werden Anmerkungen...

Page 25: ...Ger t an Schieben Sie ihn in dem Anschluss bis diese einrastet 2 Ziehen Sie die Schutzfolie vom Saugnapf ab 3 Dr cken Sie den Saugnapf fest gegen die Windschutzscheibe und drehen Sie den Hebel im Uhrz...

Page 26: ...g anschlie en Verwenden Sie nur das mitgelieferte Autoladeger t um die Kamera mit Strom zu versorgen 1 Verbinden Sie die USB Kabel der Saugnapfhalterung 15 mit dem USB Anschluss 2 an der Kamera 2 Verb...

Page 27: ...itzone ein Das Ger t kalibriert die Zeit automatisch wenn das GPS Signal im Freien gut ist Sie k nnen es auch im Einstellungsmen einstellen Einstellungsmen Sprache Einstellungsmen Zeiteinstellung Eins...

Page 28: ...ufnahme manuell zu stoppen starten 3 2 Aufnahmebildschirm Nr Name Beschreibung Videoaufnahme Ein blinkender roter Punkt zeigt an dass die Kamera jetzt aufnimmt GPS Es zeigt an ob das GPS angeschlossen...

Page 29: ...rte gespeichert Sobald die Speicherkarte Karte voll ist berschreibt die Schleifenaufnahme automatisch die fr heste ungesch tzte gespeicherte Datei Dies verhindert dass lange Videoclips bei einem einzi...

Page 30: ...rung oder Vibrationen Sie l st automatisch die Funktionen Notfall Video Schutz und Park berwachung aus Stellen Sie die Empfindlichkeit ein dass diese Funktionen automatisch mit kleineren oder gr eren...

Page 31: ...bw rts Tasten 4 5 um zwischen Ja und Nein zu w hlen Nur f r Video m glich Dr cken Sie die OK Taste 6 um Video Datei zu spielen und pausen WARNUNG Gel schte Dateien k nnen nicht wiederhergestellt werde...

Page 32: ...ayern angezeigt werden Die Videos k nnen von der SD Karte abgespielt werden wenn ein Kartenleser verwendet wird oder k nnen auf dem Computer wiedergegeben werden wenn die Kamera ber den USB Anschluss...

Page 33: ...lung JJJJ MM TT GMT SS MM SS Einstell ungen Die Sprache ausw hlen Sprache Audioaufnahme an aus Audioaufnahme An Aus IR LCD einstellen IR Lampe An Aus Automatisch Englisch Deutsch Japanisch Chinesisch...

Page 34: ...Standard zur cksetzen 1 Std 2 Std 4 Std Aus Erm dungsalarm einstellen Erm dungsalarm An Aus Scheinwerfer Erinnern Scheinwerfer Erinnern An Aus Bewegungserkennung an aus Bewegungs erkennung Niedrig Mit...

Page 35: ...sse 10 oder h her Ein 1080P HD Video hat einen gr eren Datenfluss und erfordert daher eine Speicherkarte mit h herer Schreibgeschwindigkeit Wenn die Speicherkarten unter Class 10 verwendet werden kann...

Page 36: ...chten Rabatte und Gewinnspiele zu erhalten Vielen Dank dass Sie sich f r Z Edge entschieden haben 7 Garantie Alle Zero Edge Kunden erhalten eine 30 t gige Geld zur ck Garanti um sicherzustellen dass I...

Page 37: ...PS MP4 Aufl sung 4032x3024 12M JPEG Integriert Integriert Integriert Micro USB Superkondensator 10 bis 60 C 14 bis 140 F 20 bis 70 C 4 bis 158 F 95 x 52 x 31 5 mm 75g Eingang DC 12 24V Ausgang DC 5V 2...

Page 38: ...ltung des Ger ts gepr ft werden kann versuchen Sie diese durch folgende Ma nahmen zu beheben Richten Sie die Empfangsantenne neu aus Erh hen Sie den Abstand zwischen Ger t und Empf nger Schlie en Sie...

Page 39: ......

Page 40: ...Z3ProZ18UM 01...

Reviews: