background image

Connection to

External equipment

11

EN

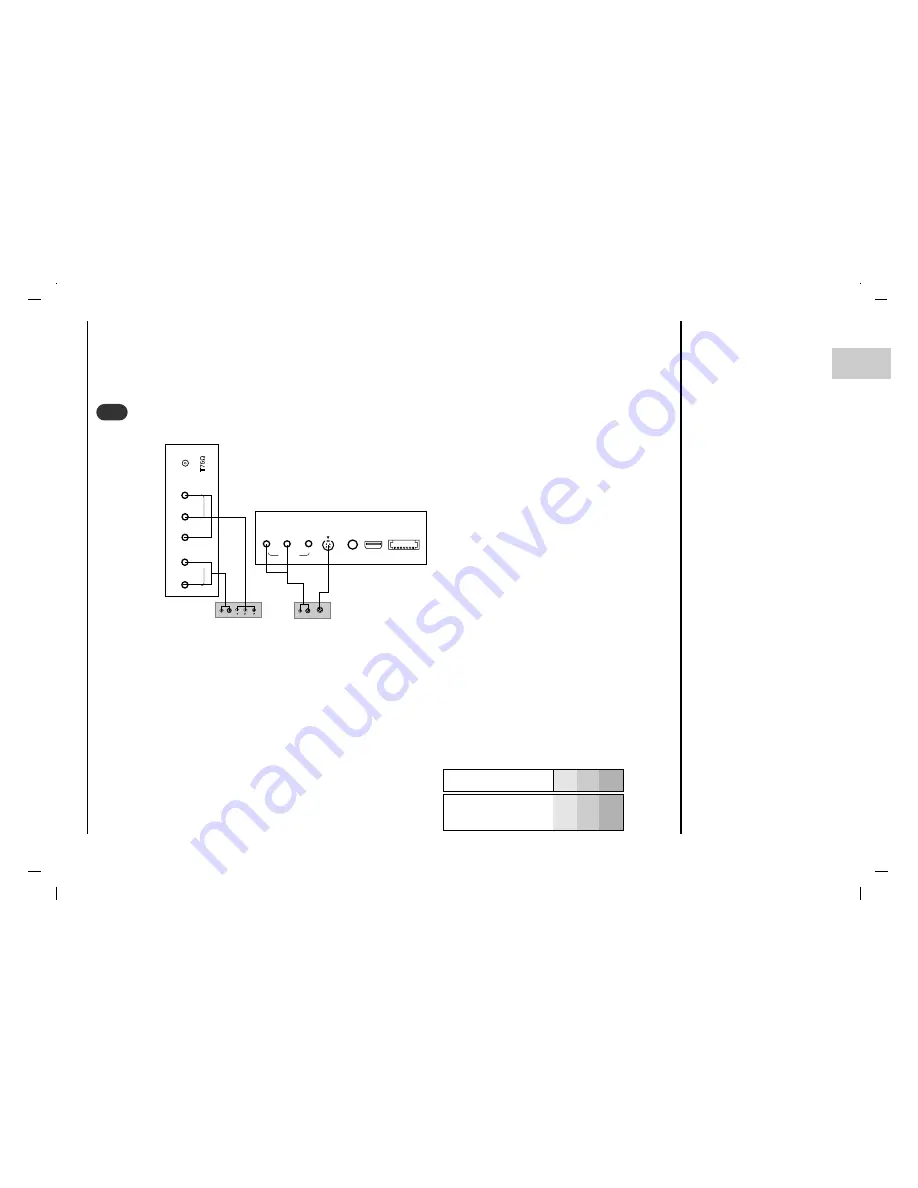
• COMPONENT Input ports

You can get better picture quality if you connect DVD player with
COMPONENT input ports as below.

How to connect
Connect DVD video inputs to Y, P

B

, P

R

of COMPONENT (DVD INPUT) and audio inputs to Audio sockets of AUDIO

INPUT.

How to use
Turn on the DVD player, and insert a DVD.

Use  INPUT  button on the remote control to select 

COMPONENT

. Refer to the DVD player's manual for operating

instructions.

Watching DVD

B

R

(R) AUDIO (L)

(R) AUDIO (L)

S-VIDEO

ANT

. IN

(R)AUDIO(L)

COMPONENT

 IN

YP

B

P

R

S-VIDEO IN

MIC

USB

SLOT2

(SD/MMC/MS)

(R)AUDIO(L)

VIDEO

AV4 IN

5

5

< Side panel of the set >

< Back panel of a DVD player >

or

COMPONENT

ports of the set

Y

P

B

P

R

Video output ports 
of DVD player

Y
Y
Y
Y

Pb

B-Y

Cb

P

B

Pr

R-Y

Cr

P

R

Summary of Contents for LN-40IEB3

Page 1: ...40IEB3 LN 46IEB3 Please read this manual carefully before operating your set Retain it for future reference See the label attached on the back cover and quote this information to your dealer when you require service create excite inspire www yuraku com sg ...

Page 2: ... Picture Format 23 Sound adjustment 24 28 SSM Sound Status Memory 24 Balance 25 AVL Auto Volume Leveler 25 SRS 26 TV Speaker 26 MIC 27 Stereo Dual NICAM reception 27 28 Time Menu 29 32 Clock 29 On Off Time 30 Auto sleep 31 Timer Recording 31 Sleep timer 32 Setup Menu 33 Front Light 33 Child Lock 33 Memory Card Type in NIMP mode 34 Basic operation in NIMP mode 35 On screen menus 36 Menu selection i...

Page 3: ...de 53 Image capture in NIMP mode 54 When editing the file in NIMP mode 55 Information Error message Multimedia Format in NIMP mode 56 Memory storage device being compatible at TV in NIMP mode 57 Connection of PC PC Setup 58 WXGA or VGA Only RGB mode 58 PIP Picture In Picture Feature 59 61 Watching PIP 59 PIP Audio Output 59 Moving the PIP 60 Swapping the PIP 60 Selecting a Input Signal Source for ...

Page 4: ...properly unplug it and call your dealer Aerial Connect the aerial cable to the socket marked 75 Ω on the back cover For the best reception an outdoor aerial should be used Location Position your set so that no bright light or sunlight falls directly onto the screen Care should be taken not to expose the set to any unnecessary vibration moisture dust or heat Also ensure that the set is placed in a ...

Page 5: ...cture in clockwise direc tion STILL freezes motion of the sub picture SCAN switches on the programme scan mode through 4 16 sub pictures MUTE switches the sound On or Off SSM Sound Status Memory recalls your preferred sound setting ARC select your desired picture format I II selects the language during dual language broadcast selects the sound output INPUT Select TV AV1 AV2 AV3 AV4 S VIDEO COMPO N...

Page 6: ...card of batteries safely BACK Move back to previous status in NIMP mode only HELP Select the help menu in NIMP mode only CAPTURE Display image is captured RECORD Record the current screen NIMP Selects the NIMP mode VCR Button These buttons are used for NIMP mode For further details see the NIMP mode sec tion in NIMP mode only A B Decide whether to repeat interval playback in NIMP mode only REPEAT ...

Page 7: ...enu 5 INPUT selects TV AV1 AV2 AV3 AV4 S VIDEO COMPO NENT PC RGB HDMI1 HDMI2 NIMP mode 6 POWER r r switches the set On from standby or On to standby 7 POWER STANDBY INDICATOR r r illuminates red in standby mode illuminates green when the set is switched On 8 REMOTE CONTROL SENSOR 9 Front Light LED On Off INPUT MENU I VOL PR 1 7 9 8 6 5 4 3 Shown is a simplified representation of the set Here shown...

Page 8: ... This set operates on an AC power The voltage is indi cated on the Specifications page Never attempt to operate the set on DC power 7 AUDIO VIDEO SOCKET Connect the audio video out sockets of the VCR to AV sockets of the set 8 S VIDEO INPUT connect video out from an S VIDEO VCR to the S VIDEO input 9 MIC Microphone socket 10 USB USB Host socket 11 SLOT2 SD MMC MS card socket 12 SLOT1 CF TYPE I II ...

Page 9: ...ing sec tion Select the programme number where the VCR channel is stored Press the PLAY button on the VCR Connect to Aerial socket If you connect an S VIDEO VCR to the S VIDEO input the pic ture quality is improved compared to connecting a regular VCR to the Video input To avoid picture noise interference leave an adequate dis tance between the VCR and set Use the INPUT button on the remote contro...

Page 10: ... provided channels using the cable box Cable TV R AUDIO L VIDEO VCR RF Cable TV R AUDIO L VIDEO VCR RF AV1 AV2 AV3 ANT IN AV1 AV2 Watching Cable TV 3 3 When connecting the set to an external source match the colours of AUDIO VIDEO input jacks on the set with the output jacks on the audio video equipment Video yellow Audio Left white Audio Right red Use the INPUT button on the remote control to sel...

Page 11: ...INPUT How to use Turn on the DVD player and insert a DVD Use INPUT button on the remote control to select COMPONENT Refer to the DVD player s manual for operating instructions Watching DVD B R R AUDIO L R AUDIO L S VIDEO ANT IN R AUDIO L COMPONENT IN Y P B P R S VIDEO IN MIC USB SLOT2 SD MMC MS R AUDIO L VIDEO AV4 IN 5 5 Side panel of the set Back panel of a DVD player or COMPONENT ports of the se...

Page 12: ...DMI screen appears on the set HDMI DTV input signal 480p 60Hz 576p 50Hz 720p 50Hz 720p 60Hz 1080i 50Hz 1080i 60Hz 1080p 50Hz 1080p 60Hz HDMI Interface with HDCP Copy Protection enables all digital rendering of video without the losses This TV SET can receive the High Definition Multimedia Interface HDMI or Input of Digital Visual Interface DVI Connecting HDMI DTV HDMI OUTPUT R AUDIO L AUDIO IN RGB...

Page 13: ... 1080p 60Hz Connecting PC DTV RGB OUTPUT RGB OUTPUT R R AUDIO L AUDIO L AUDIO IN RGB DVI RGB IN PC DTV ANT IN R AUDIO L COMPONENT IN Y PB PR 7 7 Send the set s audio to external audio equipment stereo system via the Digital Audio Output Optical Caution Do not look into the optical output port Looking at the laser beam may damage your vision How to connect Connect one end of an optical cable to the...

Page 14: ...witch it on fully Press the POWER button on the remote control handset The set reverts to standby mode Press the main power button again to switch the set off 1 1 On and Off 2 2 Programme selection 3 3 Volume adjustment Press the MENU button and then use D E button to select the SETUP menu Press the G button and then use D E button to select Language Press the G button and then use D E button to s...

Page 15: ...hange the setting of an item in the sub or pull down menu with F G or D E You can move to the higher level menu with F button and to move to the lower level menu press the G button 4 4 Auto Manual Edit D E E G OK MENU STATION CSM PSM Contrast Brightness Colour Sharpness D E E G OK MENU PICTURE SSM Balance AVL SRS TV Speaker MIC D E E G OK MENU SOUND Clock Off Time On Time Auto Sleep Timer Recordin...

Page 16: ... Press the D E button to select Storage From Select the beginning programme number with the F G button on the Storage From pull down menu 2 2 Press the D E button to select Search Press the G button to begin auto programming All receivable stations are stored The station name is stored for stations which broadcast VPS Video Programme Service PDC Programme Delivery Control or TELE TEXT data If no s...

Page 17: ...ect the pro gramme number 1 1 2 2 Press the D E button to select System Select a TV system with the F G button on the System pull down menu L SECAM L L France BG PAL B G SECAM B G Europe East Europe I PAL I U K Ireland DK PAL D K SECAM D K East Europe Press the D E button to select Channel Press the F G button to select V UHF or CABLE on the Channel pull down menu 3 3 D E E F G 0 9 OK MENU STATION...

Page 18: ...he E button you can select in the opposite direction Select the position by pressing the F G button and then take your choice of the second character and so on Press the OK button In some models Booster is an optional function Only a set with Booster can perform this function If the reception is poor at the fringe area of TV signal select Booster to On Press the D E button to select Booster Press ...

Page 19: ... button twice The selected programme is deleted all the following programmes are shifted up one position 2 2 3 3 Deleting a programme Select a programme to be copied with the D E or F G button Press the GREEN button All the following programmes are shifted down one position 4 4 Copying a programme Select a programme to be moved with the D E or F G button Press the YELLOW button Move the programme ...

Page 20: ...mes stored in the memory by displaying the programme table Press the LIST button to display the Programme table menu The programme table appears on the screen One programme table con tains ten programmes as below You may find some blue programmes They have been set up to be skipped by auto programming or in the programme edit mode Some programmes with the channel number shown in the programme tabl...

Page 21: ...r tempera ture you prefer Press the MENU button and then use D E button to select the PICTURE menu Press the G button and then use D E button to select CSM Press the G button and then use D E button to select User Press the E button and then use F G button to make appropriate adjustments Repeatedly press the MENU button to return to normal TV viewing D E E F G OK MENU PICTURE Cool Warm Normal User...

Page 22: ...e programmed for good picture reproduc tion at the factory and cannot be changed 2 2 PSM Picture Status Memory 3 3 Manual Picture Control Press the MENU button and then use D E button to select the PICTURE menu Press the G button and then use D E button to select the desired picture option Press the G button and then use F G button to make appropriate adjustments You can adjust picture contrast br...

Page 23: ...d picture format 1 Press the ARC button to select a desired picture format Each press of ARC button changes the screen display as shown below You can also select 16 9 14 9 4 3 ZOOM1 ZOOM2 SPECTACLE AUTO in the PIP menu You can only select 16 9 14 9 4 3 ZOOM1 ZOOM2 SPECTACLE AUTO in TV AV1 AV2 AV3 AV4 S VIDEO mode only 4 4 Picture format 16 9 AUTO 14 9 4 3 SPECTACLE ZOOM2 ZOOM1 ...

Page 24: ...ake appropriate sound level with the D E button d Press the OK button to store it for the sound User You can also recall a desired sound Flat Music Movie Speech or User with SSM button on the remote control The sound Flat Music Movie and Speech are programmed for good sound reproduction at the fac tory and cannot be changed When changing SSM option in SOUND menu SRS is automatically changed to Off...

Page 25: ...ange channels 3 3 AVL Auto Volume Leveler Press the MENU button and then use D E button to select the SOUND menu Press the G button and then use D E button to select the desired sound item Press the G button and then use F G button to make appropriate adjustments Repeatedly press the MENU button to return to normal TV viewing 2 2 Balance D E E F G OK MENU SOUND L 0 R SSM Balance AVL SRS TV Speaker...

Page 26: ... changed Flat When selecting 3D Echo sound or TruSurround XT option in SRS menu SSM is automatically changed User Turn TV speakers off if using external audio equipment Press the MENU button and then use D E button to select the SOUND menu Press the G button and then use D E but ton to select TV Speaker Press the G button and then use D E but ton to select On or Off Repeatedly press the MENU butto...

Page 27: ...E button to adjust vol ume level and Echo level Repeatedly press the MENU button to return to normal TV viewing 6 6 Mic In AV mode you can select output sound for the left and right loudspeakers Repeatedly press the I II button to select the sound output L R Audio signal from audio L input is sent to left loud speaker and audio signal from audio R input is sent to right loudspeaker L L Audio signa...

Page 28: ... equipped with the receiver for NICAM recep tion the high quality NICAM Near Instantaneous Companding Audio Multiplex digital sound can be received Sound output can be selected according to the type of received broadcast as follows by pressing the I II button repeatedly When NICAM mono is received you can select NICAM MONO or FM MONO When NICAM stereo is received you can select NICAM STEREO or FM ...

Page 29: ...n D E button to select Clock Press the G button and then D E button to adjust the Year month day Press the G button and then D E button to adjust the hour minute Repeatedly press the MENU button to return to normal TV viewing 1 1 Clock Off Time On Time Auto Sleep Timer Recording D E E G OK MENU TIME D E E F G OK MENU TIME PM Clock Off Time On Time Auto Sleep Timer Recording Clock ...

Page 30: ... clock must be reset b Two hours after the set is switched on by the on time function it will automatically switch back to standby mode unless a button has been pressed c Once the on or off time is set these functions operate daily at the preset time d Off Timer function overrides On Timer function if they are set to the same time e The set must be in standby mode for the On Timer to work f The On...

Page 31: ...ton and then D E button to select Timer Recording Press the G button and then D E button to adjust the Year month day Press the G button and then D E button to adjust the hour minute Press the G button and then D E button to adjust the program number Press the G button and then D E button to adjust the recording minute Press the G button and then D E button to select On or Off Repeatedly press the...

Page 32: ... number of minutes The display will appear on the screen followed by 10 20 30 60 90 120 180 and 240 The timer begins to count down from the number of minutes selected Note a To view the remaining sleep time press the SLEEP button once b To cancel the sleep time repeatedly press the SLEEP button until the display appears c When you switch the set off the set releases the preset sleep time Sleep tim...

Page 33: ...nt Light Child Lock D E E G OK MENU SETUP Child Lock The TV can be set so that the remote control handset is needed to control it This feature can be used to prevent unauthorized viewing Press the MENU button and then D E button to select the SETUP menu Press the G button and then D E button to select Child Lock Press the G button and then D E button to select On or Off Repeatedly press the MENU b...

Page 34: ...oss or damage Before you remove the USB Memory stick from the USB Host socket don t forget to press the USB RELEASE button on the remote control or the USB Memory stick may be damaged Only insert on card to each slot The manufacturer shall not be responsible for damaged data Be careful to avoid data damage and back up your files Unsupported or damaged files can cause errors Do not try to change th...

Page 35: ...e MEM ORY cable to connect the MEMORY storage device 2 Download image video audio files to the MEMORY storage device 3 Connect the MEMORY storage device to the MEM ORY port of the TV 4 Press the NIMP button to display the NIMP menu Note Hard disc is not built in the set Memory card and hard disc are not supplied sepa rately The USB Memory stick supplied when you bought the TV set is strongly advis...

Page 36: ...ay each menu Press the OK button and then use D E button to select a menu item Press the OK button to display the sub menu or the pull down menu Change the setting of an item in the sub or pull down menu with G You can move to the higher level menu with BACK button and to move to the lower level menu press the OK button Note Menus may vary according to input mode 3 3 Album D E E F G G OK BACK Movi...

Page 37: ...n select the image file to display using the D E button If you press the OK button you can see the preview on the right If you press the OK button again or press the PLAY button you can see the full screen If you press the EXIT button you can switch to the ini tial screen File Error Shown when you are trying to playback a file in full screen or preview of which the format cannot be played When dis...

Page 38: ...see the preview on the right If you press the OK button again or press the PLAY but ton you can see the full screen When you press the PLAY button in the full image view the slide show will start When you press the STOP button the slide show will stop You can press the HELP button to select the help menu If you press the EXIT button you can switch to the initial screen When viewing the image files...

Page 39: ...e image on the screen using the number keys 1 2 You can select the image you want using the D E button Feature by button PLAY Start slide show STOP Stop slide show BACK Prior screen EXIT Initial screen You can press the Help button to select the help menu Current page Total page Image Multi view Image rotate view 1 5 ...

Page 40: ...ed If you press the OK button you can see the preview on the right When previewing the movie it will only play up to 5 minutes If you press the OK button again or press the PLAY button you can see the full screen You can press the HELP button to select the help menu If you press the EXIT button you can switch to the initial screen When displaying the video file Feature by button PLAY Video file pl...

Page 41: ...e to display using the D E button If you press the OK button you can see the preview on the right If you press the OK button again or press the PLAY but ton you can see the full screen Press the REPEAT button during video playback to decide whether to repeat the playback Non Do not repeat the playback FILE Repeat the playback for the current file DIR Repeats the playback for the files in the folde...

Page 42: ...review on the right If you press the OK button again or press the PLAY but ton you can see the full screen Press the A B button at the starting position of the interval to repeat during video playback When the A icon appears press the A B button at the ending position of the interval to repeat during video play back The Repeat Setting in the A B section sets only more than 3 minutes When you want ...

Page 43: ...will be played When you press the OK button again or press the PLAY button you can see the full screen You can press the HELP button to select the help menu If you press the EXIT button you can switch to the initial screen During music playback the file name of the current music will be floated after 30 seconds When listening to the audio file Feature by button PLAY Audio file plays PAUSE Audio fi...

Page 44: ... press the PLAY button you can see the full screen Press the REPEAT button during audio playback to decide whether to repeat the playback Non Do not repeat the playback FILE Repeat the playback for the current file DIR Repeats the playback for the files in the folder in the order You can press the HELP button to select the help menu If you press the EXIT button you can switch to the initial screen...

Page 45: ...p menu Press the A B button at the starting position of the interval to repeat during audio playback When the A icon appears press the A B button at the ending position of the interval to repeat during video play back The Repeat Setting in the A B section sets only more than 3 minutes When you want to cancel the interval repeat playback press the A B button one more time You can press the HELP but...

Page 46: ...ile After pressing the OK button you can select the desired file using the D E button If you press the OK button again or press the PLAY but ton the file will be played If you press the EXIT button you can switch to the initial screen This is the icon of the file that cannot be executed When displaying the list file Mountain jpg List D E E F G G OK BACK Test Mountain jpg Mount jpg God2 mp3 Madaga ...

Page 47: ...button you can select the desired menu using the D E button If you press the EXIT button you can switch to the initial screen This applies to Record button Timer Record When recording 1G memory it takes around 60 min at the Fine around 80 min at the Normal 150 min at the Economic The recorded picture is produced smaller than TV screen size Record Setup Menu Setup D E E F G G OK BACK Record Fine No...

Page 48: ...he USB device If you press the EXIT button you can switch to the initial screen If the set does not work for a long time turn off the Set Main Power button and then turn it back on Upgrading Method Download the new firmware www indtek co kr Copy the firmware to USB memory root directory Insert the USB memory to the USB host socket in TV Select USB upgrade menu Press the OK button Upgrading message...

Page 49: ... D E button to select Movie or Music After pressing the OK button you can select the desired file using the D E button None Do not repeat the playback FILE Repeat the playback for the current file Directory Repeats the playback for the files in the fold er in the order If you press the EXIT button you can switch to the initial screen 3 3 Repeat Setup D E E F G G OK BACK Setup Menu Repeat Movie Mus...

Page 50: ...Show Folder MP3 This sets the folder which has the files to display in slide show during MP3 file playback Same folder This displays the images in the same fold er as the file currently in play Root This plays the initially set folder User This plays the folder designated by the user Off This does not display the slide show If you press the EXIT button you can switch to the initial screen 4 4 Slid...

Page 51: ...elect device Select the device with the music file to use for the Wake up Call Device Slot1 CF card Slot2 SD MMC MS card USB NIMP The music file within the TV set will be played Search File Select the MP3 file within the designated device from Select device If you press the EXIT button you can switch to the initial screen 5 5 Wake up Call Setup D E E F G G OK BACK Setup Menu Wake up Call Select De...

Page 52: ...riginal video signal as it is Full Screen This shows the video signal by scaling to 16 9 size File Sort The files within the device will be assorted in the format designated by the user Resume This feature memorizes the last playback location during video playback and continues the playback from there Default Setting Initialize all the settings Version It shows the current version of the software ...

Page 53: ... REC 00 00 00 will be shown on the screen When the recording is complete you will see the mes sage saying Recorded on the screen If you see a message saying Not Available on the screen It means that the recording is not correctly saved Check the Memory storage device and re record Not Available Shown when Record or Capture button is pressed in modes other than TV AV1 AV2 AV3 AV4 or S VIDEO Recordi...

Page 54: ...but ton When you see the message Captured it means that 1 image was captured and saved When you see the message Not Available it means that the image was not properly captured and saved Check the MEMORY storage device and trying capturing the image again Image from TV AV1 AV2 AV3 AV4 or S VIDEO is captured to the CF SD MMC MS card device Not USB ...

Page 55: ...leting a folder or a file Press the HELP button when not in file preview mode and select Copy using the D E button When you are using the CF or SD MMC MS mode you can use the Copy USB from the Help menu When you select Copy USB the files in the card device will be copied to the USB When you are using the USB mode you will see the Copy Slot1 and Copy Slot2 in the Help menu When you select Copy Slot...

Page 56: ...record input signal is not TV AV1 AV2 AV3 AV4 or S VIDEO Captured This appears when capture is complete Upgrading This appears when upgrade is conducted through USB System Reset This appears after upgrade is complete After the message is outputted and then system reboot Unknown File This appears when you attempt to play a file of an unrecognizable file format For Video Playback format the applicat...

Page 57: ... Lover Disk 1GB Kingston Datatrabeler 1GB Transcend Jet Flash 110 1GB LG Ultra High Speed 128MB Lexar 128MB Samsung Pleomax 128MB Transcend 80x 128MB Vivanco 256MB Transcend Mini 80x 512MB Zyrus Mini 512MB SanDisk Mini 256MB SanDisk Mini 512MB SanDisk 1GB Terabit 256MB Transcend 512MB Transcend MMC Plus 1GB Lexar Memory Stick Pro Duo 512MB Sony Memory Stick Duo 128MB Sony Memory Stick Pro 512MB So...

Page 58: ...osition clock and phase The displayed image will disap pear for a few seconds while the Auto configuration is in progress Reset This function allows you to return to the good picture repro duction programmed at the factory and cannot be changed Note Some signal from some graphics boards may not function properly If the results are unsatisfactory adjust your monitor s position clock and phase manua...

Page 59: ...n and then D E button to select Main or Sub Repeatedly press the MENU button to return to normal TV viewing 1 1 Watching PIP 2 2 PIP Audio Output PIP mode main and sub picture audio select PIP lets you view 2 different inputs sources on your monitor screen at the same time One source will be large and the other source will show a smaller inset image PIP OFF POP DW1 DW2 D E E F G OK MENU Main PIP M...

Page 60: ...ION button Press the PIP POSITION button repeatedly until desired position is achieved The sub pictures move clockwise 3 3 Moving the PIP TV AV1 AV2 AV3 AV4 S VIDEO X O O O O O O X O O O O O O X O O O O O O X O O O O O O O X O O O O O O O O O O O O O O O O O O TV MAIN SUB AV1 AV2 AV3 O O O O X O AV4 S VIDEO COMP PC RGB HDMI1 O O O O O O HDMI2 X X X X X X NIMP ...

Page 61: ...ure 6 6 Programme selection for sub picture 61 EN PIP Picture in Picture Feature This function enables you to search all the stored sta tions on 4 or 16 sub pictures and see your favourite station by exchanging the main and sub pictures Press the SCAN button repeatedly to select POP4 POP16 The selected sub or main pictures search all the stored stations Press the EXIT button to switch off sub or m...

Page 62: ...used to select the preced ing or following page Programming a colour button in LIST mode If the TV is in SIMPLE text TOP text or FASTEXT mode press the button to switch to LIST mode Four teletext page numbers of your choice can be colour coded and easily selected by pressing the corresponding coloured button on the remote control handset 1 Press a coloured button 2 Using the NUMBER buttons select ...

Page 63: ...ture on the screen while waiting for the new teletext page The display will appear at the top left hand corner of the screen When the updated page is available then display will change to the page num ber Press this button to view the updated teletext page HOLD Stops the automatic page change which will occur if a tele text page consists of 2 or more sub pages The number of sub pages and the sub p...

Page 64: ...istortion effects on the screen e When the PC screen appears on the set a message may appear on the screen and the message will differ according to the Window system version Win98 2000 If a message appears click Next until the message fin ishes f If the message Out Of Range appears on the screen adjust the PC as in the Displayable Monitor Specification section g Supportable resolution may vary as ...

Page 65: ...65 EN Note ...

Page 66: ...66 Note ...

Page 67: ...ground Horizontal noise Signal Cable message appears The mains plug plugged in and switched on Is the TV switched on Try another channel weak signal Check aerial plugged into TV Check aerial broken lead Check aerial Check for local interference Adjust contrast Adjust brightness Adjust colour Adjust volume Check the batteries in remote control Check Audio Video sockets VCR only Auto configure or ad...

Page 68: ...www yuraku com sg ...

Reviews: