YTORA TPW599C Manual Download Page 4


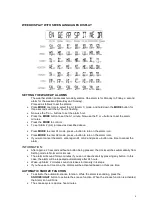
WEEK DISPLAY WITH SEVEN LANGUAGES DISPLAY 


SETTING THE WAKE-UP ALARMS 

The weather station possesses two daily alarms. One alarm is for Monday to Friday, a second 
alarm for the weekend (Saturday and Sunday). 
Proceed as follows to set the alarms: 


Press MODE one time to select the A1 (Alarm 1) mode, and hold down the MODE button for 
three seconds until the A1 hour is flashing. 


Now use the 

+

 or 

 buttons to set the alarm hour. 


Press the MODE button to set the A1 minute. Now use the 

+

 or 

 buttons to set the alarm 

minutes. 


Press the MODE to confirm 


To set Alarm 2 (A2), proceed as described above. 


Press MODE to enter A1 mode, press 

 button to turn on the alarm icon. 


Press MODE to enter A2 mode, press 

 button to turn on the alarm icom. 


If you want cancel the alarm, enter again A1 or A2 and press 

 button one time to cancel the 

alarm.  


INFORMATION: 


After approx. 20 seconds without a button being pressed, the clock switches automatically from 
Setting mode to Normal clock mode  


The alarm will sound for two minutes if you do not deactivate it by pressing any button. In this 
case, the alarm will be repeated automatically after 24 hours. 


Wake-up Alarm: 2 minutes sound; increases in intensity in 4 steps. 


If you have set a time zone, the alarms will be activated based on this zone time  


AUTOMATIC SNOOZE FUNCTION 


To activate the automatic snooze function: While the alarm is sounding, press the 
SNOOZE/LIGHT button to activate the snooze function. When the snooze function is activated, 
the Alarm icon will blink. 


The snooze cycle is approx. five minutes. 

Summary of Contents for TPW599C

Page 1: ...a or the inHg scale Altitude setting from 200 to 2000 meter Weather forecast using four icons sunny lightly cloudy cloudy rainy Current weather icon setting for easy start up Thermometer Indoor measur...

Page 2: ...adaptor You may also open the battery compartment on the rear side of the receiver and insert the batteries by observing the correct polarity Close the battery compartment After the power up all the...

Page 3: ...at this time A single synchronization each day is sufficient to keep the time display accurate to one second DAYLIGHT SAVINGS TIME The radio controlled clock will automatically set itself in the spri...

Page 4: ...o enter A2 mode press button to turn on the alarm icom If you want cancel the alarm enter again A1 or A2 and press button one time to cancel the alarm INFORMATION After approx 20 seconds without a but...

Page 5: ...ss and hold the key TEMPERATURE AND RELATIVE HUMIDITY TREND DISPLAY After you insert the batteries the weather station measures the current temperature and relative humidity The individual trend displ...

Page 6: ...y minute and the upper or lower limit symbol is shown If the alarming channel is on the display the temperature will flash too Condition for stop alert 1 Press any button to stop the alert sound The r...

Page 7: ...est level is 200 meters WEATHER FORECAST The weather station uses the air pressure data of the last four to twelve hours to create a weather forecast for the next 12 hours It must be taken into accoun...

Page 8: ...Range up to 25m open field Transmission cycle approx CH1 57 secs CH2 67 secs CH3 79 secs Power supply Receiver unit Battery 2 x AA LR06 not included External transmission unit Battery 2 x AAA LR03 not...

Reviews: