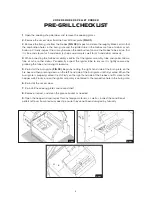
background image

5

1. 

Open the cooking chamber to remove the cooking grates and heat diffuser plate. 

2. 

Install the oven heat distribution plate into the cooker as shown 

(FIG 01)

. The heat distribution 

plate will rest on the lower cooking grate rails and should be slid toward the burn pot until it contacts 

the hopper wall.

3

. Install the wood-fired oven onto the plate as shown 

(FIG 02)

. There are four tabs/slots that will 

locate the hood in the proper position.

4.

 Place the stone on the rails inside the oven 

(FIG 03)

. Make sure the rough “glossy” side of the 

stone is facing upward.

NOTE:

 The stone is pre-seasoned as delivered and ready to use. If it is below 40° Fahrenheit take 

the stone into a temperature-controlled environment and allow the stone to get to 60° or above 

before use. This will prevent the stone from cracking which could happen if exposed to flame if the 

stone and the surface temperature of the stone is 40° or below.

1. 

Install the oven per the installation instructions above.

2. 

Set the temperature on your cooker’s ACS controller to 350° and let it run for 30 minutes.

This will allow all the parts to season in and remove any impurities from the manufacturing process.

YODER SMOKERS WOOD-FIRED OVEN   

INSTALLATION GUIDE

YODER SMOKERS WOOD-FIRED OVEN   

SEASONING GUIDE

FIG 01

FIG 02

FIG 03

Summary of Contents for YS640

Page 1: ...O P E R A T I O N M A N U A L WOOD FIRED OVEN ...

Page 2: ...f carbon monoxide poisoning An electrical supply with GFCI protection is required To prevent and protect against any shock hazard locate a safely grounded 3 prong GFCI receptacle in reach of the power cord Outdoor extension cords can be used if they are surface marked with the suffix letter W and with a tag stating Suitable for use with outdoor appliances FOR USERS OUTSIDE NORTH AMERICA Plug into ...

Page 3: ...thing food or cooking pans are placed in the oven NOTE The Yoder Smokers ACS controller is NOT reflecting the temperature inside the wood fired oven The set point on the controller is the heat source for the oven not the oven temperature The oven is designed to be much hotter and a fully interactive cooking experience Infrared or instant read thermometers are necessary to determine the oven s temp...

Page 4: ...r tube to ensure it is tightly secured by grabbing the tube and turning it clockwise 5 Re install the burn grate FIG 03 Begin by resting the right hand side of the burn grate on the fire box and then pressing down on the left hand side of the burn grate until fully seated When the burn grate is properly seated it rests firmly on the right hand side of the firebox and fits close to the hopper wall ...

Page 5: ...ne is facing upward NOTE The stone is pre seasoned as delivered and ready to use If it is below 40 Fahrenheit take the stone into a temperature controlled environment and allow the stone to get to 60 or above before use This will prevent the stone from cracking which could happen if exposed to flame if the stone and the surface temperature of the stone is 40 or below 1 Install the oven per the ins...

Page 6: ...ing on the dough and topping thickness to done 10 The standard pizza will require one turn way through the cook Watch the crust towards the rear of the oven to determine the best timing The crust at the back of the oven will cook faster than the side with the opening When the crust begins to brown towards the back approximately two minutes in it will be time to rotate 11 Using your pizza peel remo...

Page 7: ...DY FOR THE LAST SURPRISE PAN COOKING BROWNING BAKING The Yoder Powered Wood Fired Oven takes versatility to a whole new level Perfect for casseroles and any other dish you would typically cook in your home oven We don t recommend the use of glass cookware in our oven It will discolor and possibly damage cookware We recommend cast iron or metal cookware for use inside the oven EXTERIOR SURFACE CARE...

Reviews: