

S tep 6
: Add more remotes to the network as you would like
.
S tep 7
: Factory reset the lighting devices that you would like then add them to the network, refer to their manuals.
S tep 8
: Touchlink to pair the added remotes and lighting devices, refer to their manuals. Each remote can link
with max. 30 lighting devices. Each lighting device can be linked by max. 30 remotes.
• When powered on.
• When operating the switch to send data packets (over 4 hours since last operation).
• When added to the network by a coordinator
.
Short press any other buttons except group buttons, indicator blinking means the remote has already been
added to a network, no blinking of indicator means the remote does not belong to any network.
ZigB ee L ighting D ev ic e
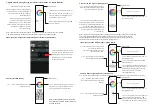
S tep 1
: Start find and bind mode on the
Zigbee lighting device (initiator node)
and enable it to find and bind target,
refer to its manual
.
LED indicator
S tep 2
: Short
press
a group button that
you would like to bind the device to
.
S tep 3
:Press and hold down until LED
indicator turns on
.
S tep 4
:Short press to enable the remote
(target node) to find and bind initiator.
LED indicator flashes 4 times for
successful binding or twice if binding fails.
ZigB ee L ighting D ev ic e
S tep 1
: Start find and bind mode on the
ZigBee lighting device (initiator node)
and enable it to find and unbind target,
refer to its manual
.
LED indicator
S tep 2
: Short
press
the group button
that the device already bound to
.
S tep 4
:Short press twice to enable the
remote (target node) to find and unbind
initiator. LED indicator flashes 4 times
for successful unbinding or twice if
unbinding fails.
S tep 1
: Short
press
t
o
choose the group
that you would like to unbind all devices
.
LED indicator
S tep 3
:Short press 5 times continuously
to clear all bound lighting devices with this
group. LED indicator flashes 4 times for
successful unbinding.
ZigB ee L ighting D ev ic e
< 10cm
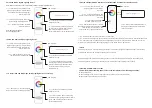
S tep 1
: Factory reset the remote and
the lighting device
,
refer to their
manuals
.
LED indicator
S tep 2
: TouchLink the remote and
device to setup a network, refer to their
manuals
.
S tep 4
: Short press button S1 to enable
the network to discover and add devices,
LED indicator will flash twice. 180
seconds timeout, repeat the operation
.
S tep 5
:Set another remote into network
pairing mode and pair it to the network,
refer to its manual
.
Short press any button, indicator blinking means the remote has already been added to a network. No blinking
of indicator means the remote does not belong to any network.
S tep 3
: Press and hold down until LED
indicator turns on.
S tep 3
: Press and hold down until LED
indicator turns on.
S tep 2
: Press and hold down until LED
indicator turns on.
S tep 3
: Press and hold down
until LED indicator turns on.
Note: Each remote can bind
max. 30 lighting devices.
Note: Make sure the device and remote already added to the same Zigbee Network
9.Find and Bind a Zigbee Lighting Device
12. Setup a Network & Add Devices to the Network (No Coordinator or Hub Required)
13. OTA
15. Battery Power Monitor Function
The remote will report battery power value to the coordinator under following situations:
10.Find and Unbind a Zigbee Lighting Device
11. Clear All find and Bind mode paired Lighting Devices of a Group