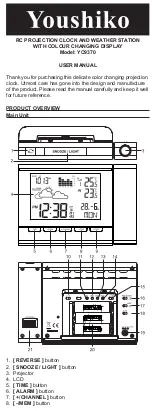


4. Press
[ ALARM ]
button to confirm and exit setting.
The dual alarm feature of this product is designed to provide
more convenience; user can set two alarms if needed.
To Use Alarm and Snooze
How to turn on or turn off alarm:
Method 1:
In normal time mode, press
[ TIME ]
button to select alarm 1
or alarm 2 mode, and press
[ ALARM ]
button to turn on the
alarm, alarm icon “ ” or “
”displays. Press
[ ALARM ]
button again to turn off alarm.
Method 2:
In normal time mode, press
[ ALARM ]
button once to turn on
alarm 1, press it the second time to turn on alarm 2, press it
third time to turn on both Alarm 1 and Alarm 2, with alarm icons
displayed on the LCD. Press it again to turn off both Alarm 1
and Alarm 2, alarm icons disappears.
If alarm is turned on, alarm beeps at the alarm time.
Alarm beeping can be stopped by:
1. Auto stop if no button is pressed during alarm sound beeping.
Alarm beeping lasts for 2 minutes.
2. Press
[ SNOOZE / LIGHT ]
button to stop the current alarm
and enter snooze. The alarm will sound again in 5 minutes.
Snooze can be operated continuously.
3. Press
[ ALARM ]
button to turn off alarm function.
TEMPERATURE
To Select Temperature Unit
Slide
[ °C / °F ]
switch to <°C> or <°F> position.
To Read Outdoor Temperature
The default displayed channel is channel 1.
1. In normal time mode, press
[ + / CHANNEL ]
button
repeatedly to view readings of channel 1, 2 and 3.
2. Press and hold
[ + / CHANNEL ]
button for 2 seconds to enter
channel auto-change, and channels change automatically in
every 4 seconds.
3. Press
[ + / CHANNEL ]
again to return to normal time mode.
NOTE:
1. Once the channel is assigned to one sensor, you can only
change it by removing the batteries or resetting the unit.
2. If no signals are received or the transmission is interfered,
“---” will appear on the LCD.
3. Relocate the main unit and sensor in other positions and
make sure the transmission is within the effective range of
50 meters approx.
4. After several trials in vain, please reset the main unit
thoroughly. Try out where your multifunctional main unit
receives the signals best.
SETTING BARO DISPLAY
1. In normal time mode, press
[ BARO ]
button to change
barometric unit (hPa / inHg / mmHg).
2. Press and hold
[ BARO ]
button for 2 seconds to enter
barometric unit setting mode, press
[ +/CHANNEL ]
button
and
[ - /MEM ]
button to switch between relative and absolute
mode.
3. In rel mode, press
[ + ] / [ - ]
button to set the value.
4. Press
[ BARO ]
button to save and exit setting.
NOTE:
Pressure unit can only be set in relative mode.
VIEWING MAXIMUM AND MINIMUM RECORDS
1. Press
[ - /MEM ]
button to review temperature and barometric
records, with the time and date of the record, the
sequences: Outdoor Maximum Temperature > Outdoor
Minimum Temperature > Indoor Maximum Temperature >
Indoor Minimum Temperature> Maximum Baro Reading >
Minimum Baro Reading.
2. While reviewing the record of outdoor/indoor/baro, press
and hold
[ - /MEM ]
button for 3 seconds to clear the current
display record individually.
NOTE:
Record value will be updated by new higher or low record.
VIEWING RECORDS IN PAST 24 HOURS
1. In normal time mode, press
[ HISTORY ]
button to show past
24 hour indoor / outdoor / barometric record and their
timestamp.
2. If no button is pressed in 5 seconds, the screen goes back
to normal time mode.
WEATHER FORECAST
This main unit contains built-in sensitive pressure sensor to
predict weather forecast in next 12 to 24 hours. It has 2 different
color models of LCD backlight, user can use
[ FORECAST/DEMO ]
slide switch to select:
1.
WEATHER FORECAST:
The color changes according to
different weather forecast.
2.
DEMO:
The color gradually changes between the colors
(demo mode).
ICON
BACKLIGHT COLOR
DESCRIPTION
Red
Sunny
Orange
Partly Cloudy
Green
Cloudy
Blue
Rainy
NOTE:
1. To access to the above color modes, RC reception must
stop. If the main unit is in RC reception period, the backlight
color will be
GREEN
no matter what weather forecast is
displaying.
2. The accuracy of a general pressure-based weather forecast
is about 70% to 75%.
3. The weather forecast is meant for the next 12 ~ 24 hours, it
may not necessarily reflect the current situation.
ICE ALERT
When the outdoor temperature falls between -2°C to 3°C (28°F
to 37°F), the ice alert icon will display on the LCD and flash
continuously, and disappear once the temperature is out of this
range.
PROJECTION IMAGE
Press
[ SNOOZE/LIGHT ]
button to turn on projection and
project the light beam to a dark background with 1-4 meters.
Projected
image
Time
Indoor temp Outdoor temp
Normal
Reversed
Section A: When the main unit is powered by battery:
1. Press
[ SNOOZE/LIGHT ]
button to turn on the projector and
backlight for 5 seconds.
2. Or press and hold
[ SNOOZE/LIGHT ]
button for 4 seconds
to turn on the projection for 30 minutes. During the projection,
press
[ SNOOZE/LIGHT ]
button can turn off the projection.
Section B: When the main unit is powered by DC adaptor:
1. Slide the
[
PROJECTION ON/OFF ]
switch to <ON> position,
the projection will be on all the time. Slide it to <OFF>
position; operation in section A applies to it now.
2. Slide the
[
LIGHT ON/OFF ]
switch to <ON> position, the
backlight will be on all the time. Slide it to <OFF> position;
operation in section A applies to it now.
NOTE:
1. During the projection, press
[ REVERSE ]
button to inverse
the projected data, and make sure press it only after pressing
[ SNOOZE/LIGHT ]
button.
2. Rotate angle of the projector is 180°.
3. Adjust the quality of the projected data by adjusting the
FOCUS knob.
SET BACKLIGHT
In any mode, press
[ SNOOZE/LIGHT ]
button to turn on backlight.
Slide
[ H/L ]
switch to select brightness of backlight.
HOW TO PLACE MAIN UNIT AND SENSOR
For main unit, it is designed to place on flat surface directly.
Please install wireless sensor outside, where direct sunshine
and very heavy rain can be avoided for accurate readings.
BATTERY REPLACEMENT
When segments of the LCD becomes dim, replace with 3 new
AA size batteries at once; while if the low battery indicator “ ”
displays, the sensor needs changing new batteries.
SPECIFICATIONS
Main Unit
Displayed range
-40.0~70.0°C (-40.0~158.0°F)
Operating range
0.0~45.0°C (32.0~113.0°F)
Temperature resolution
0.1°C / °F
Barometer resolution
1hPa / 0.01inHg / 0.1mmHg
Radio-controlled signal
UK (MSF)
No. of remote sensor
Up to 3 units
Hi display
Indoor temperature >70°C
Lo display
Indoor temperature <-40°C
Dimension
158(W) x 108(H)x 43(D) mm
Power
4.5V, use 3xAA 1.5V battery
DC 4.5V, 200mA adaptor
Remote Sensor
Displayed range
-40.0~70.0°C (-40.0~158.0°F)
Operating range
-20.0~60.0°C (-4.0~140.0°F)
Temperature resolution
0.1°C / °F
TR transmission frequency
433MHz
TR transmission range
Maximum 50 meters
Dimension
65(W) x 100(H) x 35(D) mm
Power
3V, use 2xAA 1.5V battery
All enquiries: [email protected]
Made for Youshiko UK in PRC
C8416B-PD16151M-Youshiko-A3-2016.7.15.indd 2
2016/7/15 15:30:11


