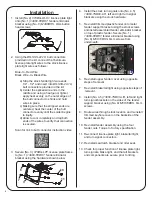
4. Install the stock turn signals onto (No. 4,5)
13960-TSB00-L/R,
left and right turn signal
brackets using the stock hardware.
5. Re-install trimmed plastic fender onto metal
fender support bracket using the stock screws
and install assembled fender eliminator bracket
on top of plastic fender. Secure (No. 1)
13960-FEBKT,
fender eliminator bracket using
(No. 8)
M6X10BHS,
6mm screws from
underneath.
6. Re-install upper fender cover using opposite
steps of removal.
7. Re-install brake/tail light using opposite steps of
removal.
8. Install (No. 4,5)
13960-TSB00-L/R,
left and right
turn signal brackets on the sides of the fender
support bracket using (No. 8)
M6X10BHS,
6mm
screws.
9. Route wires through stock location and re-install
trimmed keyhole cover on the backside of the
fender assembly.
10. Re-install fender assembly using the four
fender nuts. Torque to factory specification.
11. Re-connect license plate light, brake/tail light,
and turn signal connectors.
12. Re-install seat latch bracket and rider seat.
13. Check for proper function of license plate light,
turn signals, brake light, and that all brackets
and components are secure prior to riding.
4
Installation
1. Install (No. 2)
070BG-LH-K1,
license plate light
onto (No. 1)
13960-FEBKT,
fender eliminator
bracket using (No. 9)
M4X6BHS,
4mm button
head screws.
2. Using the
BN-SSS-22-18
, butt connectors
provided in the kit, connect the Yoshimura
license plate light wires to the stock license
plate light wires as follows:
Blue -to- Red Wire
Black Wire -to- Black Wire
a) Strip the stock fender light wire ends
1/4” - 1/2” and insert into
BN-SSS-22-18,
butt connectors provided in the kit.
b) Center the spliced wire ends in the
middle and using a heatgun or lighter,
apply heat evenly on the outer edges of
the butt connector to shrink and hold
wires in place.
c) Making sure that the stripped ends are
centered, heat the center of the butt
connector evenly until the solder begins
to liquify.
d) Allow to cool completely and tug both
ends of the wires to verify that connection
is secured.
Scan for link to butt connector instruction video.
3. Secure (No. 3)
070BG-LPF,
license plate frame
to (No. 1)
13960-FEBKT,
fender eliminator
bracket using the hardware shown below.
1
2
3
6
7
10
11
9
1


