background image

YO Modbus

User guide

v2.1

page 12/33

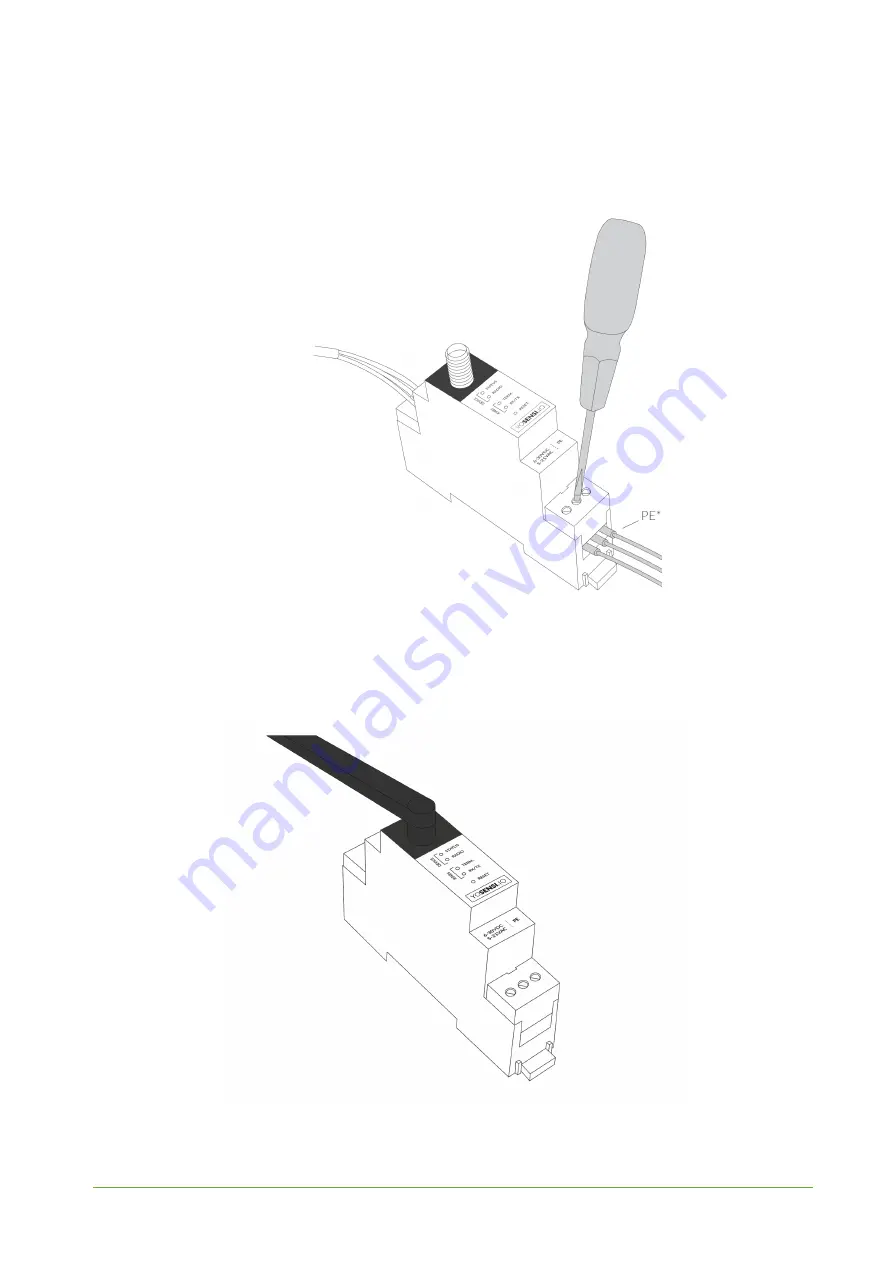
3. Screw the power supply wires to the device (6–30 V DC, 5–21 V AC). Optionally, connect a

protective earth (PE) cable. Once power is connected, the indicator diodes should behave as
described on physical interfaces of the LEDs.

Figure 8

Connecting power supply to the device

.

4. Connect the antenna to the device.

Figure 9

Device with antenna.

www.yo

sensi

.

io

Summary of Contents for LNRM

Page 1: ...YO Modbus User guide v2 1...

Page 2: ...node description using Yosensi platform added Description of MODBUS communication protocol Device parameters names and description modified Configuration file modified Changed description of connecti...

Page 3: ...kage contents 10 Safety precautions 10 Installation guide 11 Operation 13 IoT system components 13 Device configuration 14 Configurable parameters 14 Parameters description 18 Configuration node via Y...

Page 4: ...nt LoRa packets These are sent in LoRA packets of up to 5 queries each i e maximum of 30 packets Figure 1 Device top view Device sticker placed on the right side of the device enclosure contains infor...

Page 5: ...AN Server within specified timeout Single flash White LoRaWAN communication LoRaWAN packet sent confirmation from LoRaWAN Server after receiving the packet Slow flashing Blue BLE communication connect...

Page 6: ...logy may or may not require terminating loads depending on the length of cable used The impedance of the termination load should match with line impedance on both ends The termination load is usually...

Page 7: ...device PHYSICAL SPECIFICATION Dimensions Height 90 mm Width 17 5 4 pole mm Depth 58 mm Colour Light grey Mounting method 35 mm DIN rail Vertical can be screwed to the wall Enclosure material Polycarbo...

Page 8: ...ower supply 6 30 V DC 5 21 V AC Power consumption Typical 12 mA DC 12 V DC Maximum 120 mA DC 12 V DC Measured values Internal voltage is used to monitor device condition to detect anomalies like sudde...

Page 9: ...ns 01 0x01 Read coils 02 0x02 Read discrete inputs 03 0x03 Read holding registers 04 0x04 Read input registers The query data are read by Modbus RTU and sent by LoRaWAN Each LoRa packet contains data...

Page 10: ...static discharge when replacing battery connecting input or doing some other operations near inside electronics Be careful while handling the device dropping it may cause damage that will affect the s...

Page 11: ...DIN rail Figure 6 Device mounted on 35 mm DIN rail 2 Screw RS485 protocol communication wires to the device s A and B terminal blocks Optionally connect cable shielding to the device s GND terminal b...

Page 12: ...5 21 V AC Optionally connect a protective earth PE cable Once power is connected the indicator diodes should behave as described on physical interfaces of the LEDs Figure 8 Connecting power supply to...

Page 13: ...ay 2 Gateway device similar to routers equipped with a LoRa concentrator that receives LoRa packets and send them to the Internet connected server 3 Server in most cases a cloud based service where da...

Page 14: ...on of Modbus RTU communication serial dynamic asynchronous serial communication parameters for Modbus RTU protocol timings dynamic timings for response and delays between master slave communications q...

Page 15: ...onsetimeout 1000 delaybetweenpolls 100 queries name 01Ph1V slaveaddr 1 funccode 3 startreg 1000 regnbr 2 name RunHour slaveaddr 1 funccode 3 startreg 106e regnbr 1 name 3PHpwrfctr slaveaddr 1 funccode...

Page 16: ...EUI Extended Unique Identifier 8 B HEX predefined R W appeui Application EUI 8 B HEX predefined R W appkey Application Key 16 B HEX predefined R W trials Join request trials 1 9 3 R W lorawan abp deva...

Page 17: ...e Delay ms of TX and RX parameters in serial communication between devices in the network 1 100 5 R W SERIAL AND TIMINGS PARAMETERS NAME DESCRIPTION POSSIBLE VALUES DEFAULT VALUE READ WRITE baudrate B...

Page 18: ...packet 0 9 A Z a z e g aB cD 01 R W Parameters description nwktype network type for setting the device operation to public or private acttype activation type for setting the device in ABP or OTAA mod...

Page 19: ...0 ms delaybetweenpolls the minimum delay until the next request is transmitted Default is 100 ms name name of the query parameter up to 10 characters The name can be freely modified by the user to cor...

Page 20: ...and 6 910 3 911 7 MHz channels 40 47 6 Sub band 7 911 9 913 3 MHz channels 48 55 7 Sub band 8 915 5 914 9 MHz channels 56 63 8 AU915 Sub band 1 915 2 916 6 MHz channels 0 7 1 2 R W Sub band 2 916 8 91...

Page 21: ...s on which parameters you want to read from the slave device 6 There are two options to configure the device First recommended is form based editor second is text editor To add queries and responses t...

Page 22: ...rs startreg 1000 register variable 0x1000 regnbr 2 format UD_WORD value regnbr 2 meaning read 4 bytes name RunHour Phase 1 phase voltage slaveaddr 1 slave address 1 funccode 3 function code 3 read hol...

Page 23: ...ead 4 bytes name RunHour Phase 1 phase voltage slaveaddr 1 slave address 1 funccode 3 function code 3 read holding registers startreg 106e register variable 0x106e regnbr 1 format U_WORD value regnbr...

Page 24: ...YO Modbus User guide v2 1 page 24 33 Figure 16 Configuration with added queries for first phase voltage and run hour using form based editor www yosensi io...

Page 25: ...25 33 Figure 17 Configuration with polls to send for first phase voltage and run hour using form based editor NOTE Additional information including device configuration can be found in Yosensi configu...

Page 26: ...ou can also scan the QR code placed on the node It will redirect you right to the device details 3 After selecting the device go to the configuration option in device details Now wait your mobile will...

Page 27: ...ode into the Yosensi Management Platform is described below Nodes can be added manually or via Bluetooth NOTE A subscription is needed to use Yosensi Management Platform Contact us on contact yosensi...

Page 28: ...s the number of charts and data source YO Modbus You can also set the node s Location if locations have been pre defined If you haven t defined a suitable location leave this field set at None Figure...

Page 29: ...Node Name column link and clicking CHARTS Adding node via Bluetooth 1 Log in at app yosensi io 2 You ll see the default organization view To switch to another organization click on the user avatar in...

Page 30: ...ple sensor ID 36011000 where 36 is measurement type 01 slave id 1000 register Example of YO Modbus payload with description 1fst frame 02 4C 00 7A 08 00 01 5E 9B Payload header First measurement volta...

Page 31: ...er 0x02 0x01 0x00 0x0A 0x90 0x00 0x33 0x01 0x10 0x2C 0x00 0x00 0x00 0x00 ver 2 cnt 1 pct s 10 type 36 prec 0 md s 0 addr_len 3 meas_len 4 slave_addr 0x01 start_Reg 0x102c val 0 0 W Second measurement...

Page 32: ...YO Modbus User guide v2 1 page 32 33 Compliance statements www yosensi io...

Page 33: ...YO Modbus User guide v2 1 page 33 33 www yosensi io...

Reviews: