
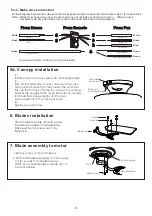
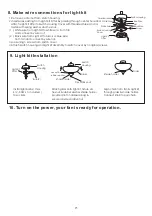

5c-2. Make wire connection
Follow diagram below and make sure that all exposed wires are secured inside wire nuts or terminal block.
Note : Wires from house may vary in color and may not include ground wire ( green ). After wiring is
completed, gently push wires into junction box with wire nuts pointing upward.
From House
From House
From Fan
From Fan
( from downrod )
( from mounting bracket )
From Remote
From Remote
( for ground wire )
( for light kit )
(AC-N)
(AC-L)
Black
White
Blue
Black
White
( Motor - N )
( Motor - L )
Secure with twist - lock wire nuts (Included).
White
White
Black
Black
Blue
Green
Green
Green
5d. Canopy installation
(1)
Install remote control receiver into mounting bracket.
(2)
Take off left-hand side screws ( one of each across )
on mounting bracket first, then loosen the other two.
Push up the Canopy until the two screws on mounting
bracket are engaged with L type slot holes on canopy.
(3)Rotate the canopy slightly until the two
screw heads are in the L type slot holes.
(4)
Tighten 4 screws firmly.
Screws on
mounting bracket
Left-hand
side screw
Attach blade to blade arm with screws
& washers provided in hardware bag.
Make sure that all Screws are firmly
tightened.
2.Attach the blade assembly to motor using
motor screws from hardware bag.
NOTE: Do not bend blade or blade arm to
prevent wobble.
6. Blades installation
7. Blade assembly to motor
Screws
Washers
Blade arm
Motor
Blade Assembly
Motor screw
Motor stopper
1.Remove 3pcs of motor stoppers.
P4


