background image

 2

6. Installing the Brackets

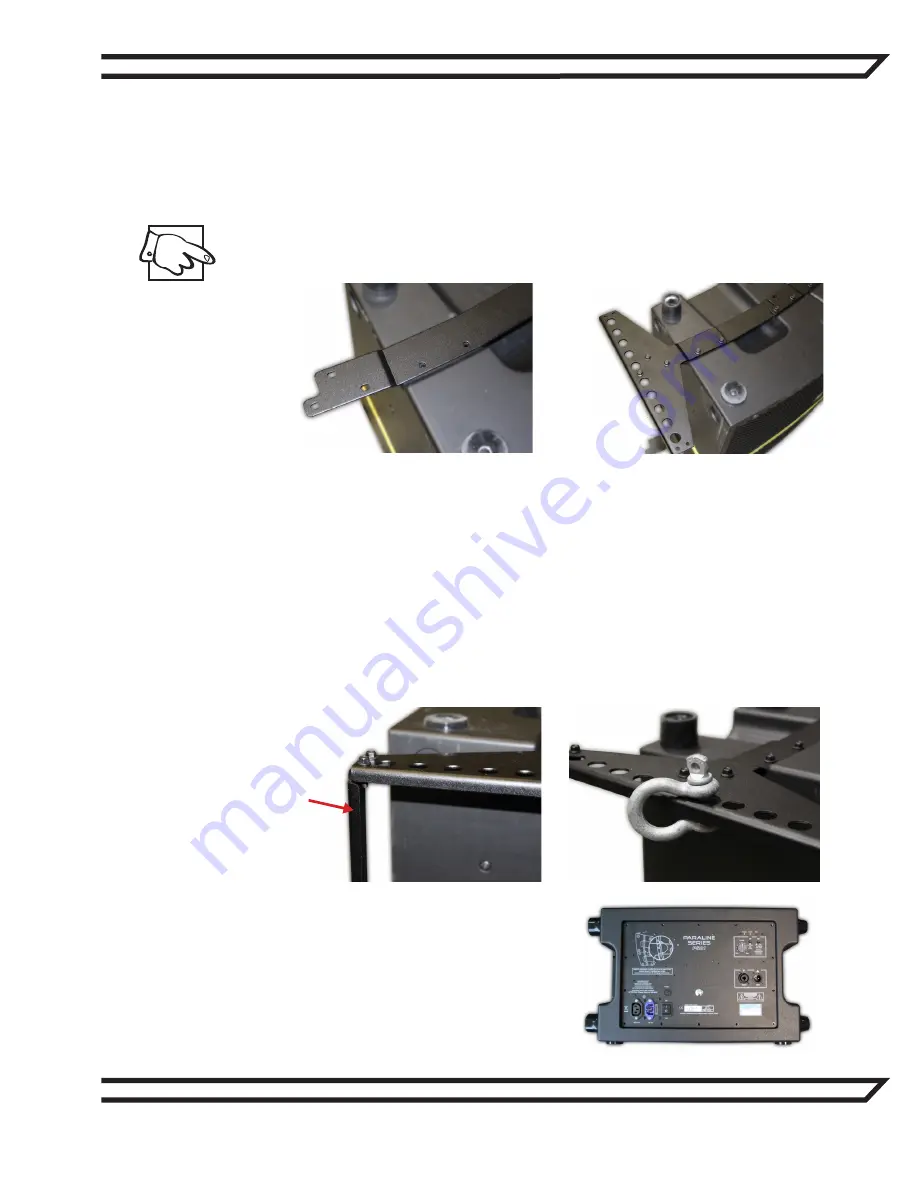
Start from the upper-most enclosure and loosely position the brackets in place of the handles*, use the bolts to 

help alignment - do not tighten until positioned correctly. Work from highest to the lowest in the array. The installed 

brackets protrude on the TOP SIDE of the enclosures and mount onto the enclosure ‘above.’ Repeat all of these 

steps for all enclosures in the array. When all brackets are in place and aligned, tighten the nuts and bolts properly. 

*NOTE: PSA1s manufactured after February 2012 use handles that include threading and will allow the 

PSA1RIGKIT to mount directly, no nuts required. 

7. PSA1FRAMEKIT

Once the PSA1RIGKIT brackets on the enclosures are in place (and tightened), the PSA1FRAMEKIT (with the 10-point 

mounting holes) can be mounted to the upper-most enclosure, using the portion of the bracket that protrudes. The 

groove of the PSA1FRAMEKIT bumper should mate perfectly with the top PSA1RIGKIT. When the PSA1RIGKIT and 

PSA1FRAMEKIT have been installed properly and are safe, the ratchet-strap around the array can be removed.

To complete the assembly attach the two supplied painted cross-members to the PSA1FRAMEKIT on 

the upper-most enclosure. The cross-members attach to the front and rear of the 10-point mounting hole 

PSA1FRAMEKIT side brackets. Make sure the “lip” of the cross-members are facing inwards, towards each 

other as shown in the image below. Use two bolts and hex nuts per corner (as supplied).

When cross-members have been successfully attached to complete the bumper bar, a 

minimum

 of two ½-inch 

shackles (Crosby part #1017494) 

must

 be used for each array. The shackles can be mounted on any of the 10 

pickup points along the PSA1FRAMEKIT’s bumper. The pickup point chosen 

must

 correspond to one on the other 

side (ex. If you choose the 4

th

 pickup point on the left side, you will also use the 4

th

 pickup point on the right side).

8. Reinstall Amplifier Module

When the whole array is assembled correctly the 

PSA1 amplifier modules should be reinstalled. 

Connect the amplifier/speaker connectors care-

fully and refit each module in the cavities using 

the original screws.

Lip

Summary of Contents for PARALINE Series

Page 1: ...PSA1RIGKIT Pre 2012 Installation Manual Manuel d Installation PSA1RIGKIT Cover ...

Page 2: ...EKIT 2 8 Reinstall Amplifier Module 2 9 Flying the Array 3 PSA1RIGKIT Installation 4 1 Retrait du Module Amplificateur 4 2 Déconnexion du Module Amplificateur 4 3 Préparation des Enceintes pour les Supports 5 4 L Ensemble 5 5 Positionner et Aligner les Supports 5 6 Installation des Supports 6 7 PSA1FRAMEKIT 6 8 Réinstallez les Module Amplificateurs 7 9 Suspendre L Ensemble de Haut Parleur 7 Warran...

Page 3: ... being used was manufactured after February 2012 The newer enclosure s handles feature threading and will allow the PSA1RIGKIT to mount directly without removal NOTE A torque of 125 inch pounds is recommended when tightening the hardware 1 Removing Amp Module Place the PSA1 on a solid flat surface such as the floor or a sturdy table Remove the 14 screws along the edges of the amplifier module When...

Page 4: ...abling the PSA1 enclosures to be mounted on top of each other as well as for installing onto a PSA1FRAMEKIT It is important to recognize the L on the LEFT side bracket for your PSA1RIGKIT The LEFT bracket should be installed on the LEFT side of the speaker facing the front of the cabinet The L will be placed towards the cabinet leaving it unseen when properly mounted NOTE PSA1s manufactured after ...

Page 5: ...IT and PSA1FRAMEKIT have been installed properly and are safe the ratchet strap around the array can be removed To complete the assembly attach the two supplied painted cross members to the PSA1FRAMEKIT on the upper most enclosure The cross members attach to the front and rear of the 10 point mounting hole PSA1FRAMEKIT side brackets Make sure the lip of the cross members are facing inwards towards...

Page 6: ...n The end result should look something like the images below Here s an example of four PSA1 cabinets safely integrated together with four PSA1RIGKITS and one PSA1FRAMEKIT2 The 10th pickup point was chosen to represent the most extreme down tilt you can get with this system If you have any questions please contact Yorkville Support directly at support yorkville com ...

Page 7: ...briquée après Février 2012 Les poignées de la nouvelle enceinte disposent de filetage qui permettra au PSA1RIGKITd être monter directement sur celle ci sans avoir à les enlever NOTE Un moment de torsion de 125 po lb est recommandé lors du serrage de la quincaillerie 1 Retrait du Module Amplificateur Placez la PSA1 sur une surface solide et plane comme le sol ou une table solide Retirer les 14 vis ...

Page 8: ... et un support droit permettant aux enceintes PSA1 d être montées l une sur l autre Il permet aussi l installation sur un PSA1FRAMEKIT Il est important de reconnaitre le L sur le sup port de gauche pour votre PSA1RIGKIT Le support GAUCHE doit être installé sur le côté GAUCHE du haut parleur face à l avant de l enceinte Le L sera placée vers l enceinte il sera donc invisible lorsqu il est correctem...

Page 9: ... du PSA1FRAMEKIT devrait s accoupler parfaitement avec la partie supérieure du PSA1RIGKIT Lorsque le PSA1RIGKIT et PSA1FRAMEKIT ont été correctement installés de façon sécuritaire la sangle à cliquet autour de l ensemble peut être retiré Pour compléter le montage fixez les deux pièces transversales de quincaillerie peintes incluses au PSA1FRAMEKIT sur l enceinte supérieur la première du haut Les p...

Page 10: ...rrectement et de façon sécuritaire pour la suspension il est recommandé de faire appel à un technicien professionnel pour vous aider avec l installation Le résultat final devrait ressembler à quelque chose comme les images ci dessous Voici un exemple de quatre enceintes PSA1 intégrées en toute sécurité avec quatre PSA1RIGKITS et un PSA1FRAMEKIT2 Le 10e point de suspension a été choisi pour représe...

Page 11: ...s de Yorkville Sound ou de votre détaillant Si pour une raison quelconque ce produit devient défectueux durant les deux années qui suivent la date d achat initial dix ans pour l ébénisterie retournez le simplement à votre détaillant Yorkville avec la preuve d achat original et il sera réparé gratuitement Ceci inclus tous les produits Yorkville à l exception de la série de moniteurs de studio YSM l...

Page 12: ...gara Falls New York 14305 USA Voice 716 297 2920 Fax 716 297 3689 WORLD HEADQUARTERS CANADA Yorkville Sound Limited 550 Granite Court Pickering Ontario L1W 3Y8 CANADA Voice 905 837 8481 Fax 905 837 8746 Manual Owners PSA1RIGKIT pre 2012 00 1v3 September 13 2022 ...

Reviews: