


13
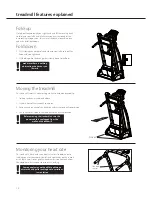
exercising with your treadmill
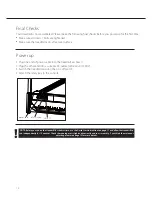
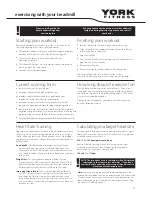
Starting your workout
Begin each workout with a Warm Up session – a few minutes of
stretching to help prevent strains, pulls and cramps
•
Get onto the treadmill, using the handrails for support, and place
your feet on the side rails (either side of the running mat)
•
Activate the treadmill (using the details found in the
Operation Instructions)
•
The treadmill will always start at the lowest speed, step onto the
mat and walk at the same speed
•
Continue the rest of your workout
Finishing your workout
•
turn the treadmill to the lowest speed and incline settings
•
Using the handrails for support place your feet on the side rails
(either side of the running mat)
•
Stop the treadmill
•
Turn the treadmill off at the main power switch and remove the
plug from the electrical outlet
•
Remove the safety key
•
If necessary, wipe the treadmill down with a damp cloth
Always consult your doctor
before undertaking a new
exercise regime
If you experience nausea, dizziness or other abnormal
symptoms during exercise, stop at once and consult
your doctor
!
Correct running form
•
run in the centre of the running mat
•
keep your head erect and look straight ahead
•
shoulders should be square and level, don’t round your
shoulders or swing them forwards or backwards
•
keep your torso erect with the chest up so there’s plenty of
room for the diaphragm to move for proper breathing actions
•
do not lean forwards, backwards or slouch, as all of these posture
deviations can place a lot of stress on the lower back, interfering with
proper running mechanics and possibly causing lower back injury
•
feet should be pointed straight ahead and land directly under the hips
How long should I exercise for?
That really depends on your current level of fitness. If you’re just
starting out on a new exercise program, you should start gradually
and build up – do not try to do too much too quickly. 30 minutes,
3 times a week should be enough.
Don’t push yourself too hard - you should never feel exhausted
during or following exercise.
End each workout with a Warm Down session – a few
minutes of stretching to help prevent strains, pulls and cramps
Heart Rate Training
To get the most out of your new piece of fitness equipment and see
the best results from your training you should exercise at the right
level of effort, and that means listening to your heart! Working out
to a target heart rate means you can direct your workout to achieve
different goals:
Good health
- For those wishing to improve quality of life and
general well being. Your sessions will need to be done at an
intensity of between 50-60% of your estimated maximum heart
rate, should last about 30 minutes and can be done on most days
of the week.
Weight loss
– To see a significant reduction in body fat, your
sessions must be a little more intense - between 60 and 70% of
your estimated maximum heart rate. These sessions can also be
performed on most days of the week for up to 30 minutes.
Improving Fitness levels
–These sessions should be performed
at 70-80% of your estimated maximum heart rate and can also
involve bouts of interval training that would have your heart
rate peaking for short times near your maximum heart rate level.
These are intense sessions and will require at least a 48 hour rest
between sessions.
Calculating your target heart rate
First, you need to find your estimated maximum heart rate using the
formula ‘220 minus your age in years’. So, if you are 35 years old your
estimated maximum heart rate is:
220 – 35 = 185 beats per minute (bpm)
Next, to calculate your target heart rate, simply multiply your
estimated maximum heart rate (185bpm) by the applicable
percentage. So, if your goal is better heath:
185 x 60% = 111bpm
NOTE: The important issue to remember with all estimated
calculations is that they are just estimates – if you don’t
feel comfortable exercising at your target then reduce it to
a level you are comfortable with.
!
Note:
Heart rate training requires you to monitor your heart rate
throughout the workout. For this we recommend using a chest strap
(if your machine has a wireless receiver) or a heart rate monitor. For
more information please visit yorkfitness.com or get in touch using
the Contact Us details on page 5.
Summary of Contents for t13i
Page 1: ...owner s manual treadmill 08 11 2009 ...
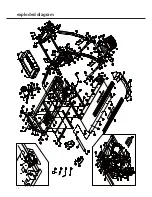
Page 18: ...exploded diagram 18 ...
Page 19: ...19 19 Parts List ...
Page 20: ......


