

SHOULD YOU REQUIRE ANY ASSISTANCE REGARDING THIS PRODUCT PLEASE CONTACT YORK DIRECTLY.
*
*
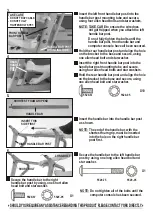
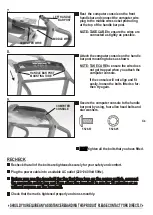
3.
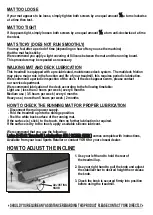
Insert the left front handle bar post into the
handle
post mounting tube and secure,
using four allen head bolts and star washers.
bar
Insert the handle bar into the handle bar post
as shown.
NOTE: The end of the handle bar, with the
shortest foam grip, must be inserted
into the hole on the right handle bar
post first.
HANDLE BAR POST
MOUNTING TUBE
6.
Secure the handle bar to the left handle bar
post by using, one long allen head bolt and
star washer.
INSERT THIS
SIDE FIRST
RIGHT HANDLE BAR POST
LONG BOLT
X1
5.
HANDLE BAR
SHORTEST FOAM GRIP END
Do not fully tighten the bolts until the
handle bar post, front handle bar and
computer console have all been secured.
NOTE: TAKE CARE to ensure the wire does
not get trapped when you attach the left
handle bar post.
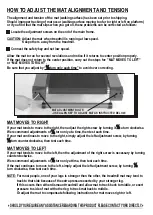
Hold the rear handle bar post and align the hole
on the bracket to the base and secure, using
one allen head bolt and star washer.
TAKE CARE
- DO NOT TRAP CABLE.
- DO NOT FULLY
TIGHTEN BOLTS YET.
X10
5529-67
5529-05
5529-75
5529-05
X1
Secure the handle bar to the right
handle bar post by using, one short allen
head bolt and star washer.
NOTE: Do not tighten all of the bolts until the
computer console has been secured.
5529-67
5529-05
4
SHORT BOLT
FRONT HANDLE
BAR POST
Insert the right front handle bar post into the
handle bar post mounting tube and secure,
using four allen head bolts and star washers.
Hold the rear handle bar post and align the hole
on the bracket to the base and secure, using
one allen head bolt and star washer.
REAR
HANDLE
BAR
POST
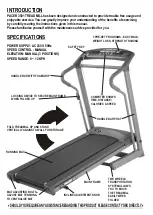
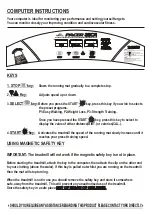
Summary of Contents for pacer 3501
Page 1: ......
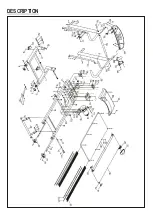
Page 7: ...DESCRIPTION ...


