background image

18

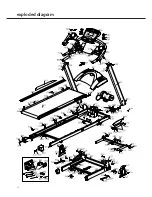
exploded diagram

Summary of Contents for anniversary t203

Page 1: ...owner s manual yorkfitness com anniversary t203 29 05 2007 version III ...

Page 2: ...ative piece of equipment as your training partner and we are certain it will keep you motivated on the way to achieving your personal fitness goals Please take the time to read this owner s manual as it will help you to get the most out of your new treadmill For more information visit www yorkfitness com 2 ...

Page 3: ...er instructions 10 quick start console display and feedback button functions using workout programs treadmill features explained 12 how to take care with your treadmill 14 exercising with your treadmill 15 troubleshooting 16 your warranty 17 exploded diagrams and parts list 18 3 ...

Page 4: ...ys wear suitable clothing and footwear e g tracksuit shorts training shoes Remove all personal jewellery before exercising Ensure you warm up well before using the equipment as this will help to prevent muscle strain After eating allow 1 2 hours before exercising as this will help to prevent muscle strain Never overload the equipment the maximum user weight for this treadmill is 130kg Never use th...

Page 5: ...r local authority for recycling advice and facilities Europe only Customer Support Should you require any assistance regarding this product please gather the following information and then contact us using the details below 1 Serial no this can be found on the sticker below located as indicated For future reference please write down your serial number in the space provided below 2 Original purchas...

Page 6: ...om around the treadmill c Make sure you have the following parts If you suspect you may have some parts missing please contact us before going back to your retailer Refer to the Customer Support section on page 5 for contact details This treadmill takes up a floor space of 185cm x 82cm and weighs 100kg Safety Key x 1 Plastic Covers Left front support cover x 1 Fixings Tools and Consumables x 6 x 2...

Page 7: ...1 Lift the uprights 2 Attach at the base using 4 x screws C07 2 x washers C04 and 2 x washers C08 use the allen key to tighten them well FIXINGS FIXINGS x 4 x 2 x 2 C07 C04 C07 C08 C07 C08 C04 C07 Part No C07 Part No C04 Part No C08 ...

Page 8: ...x 2 x 2 Part No C08 Part No C07 C07 C08 C07 C08 1 Rotate the computer until it s in the position shown 2 Attach to the top of the uprights using 2 x bolts C07 and 2 x washers C08 use the allen key to tighten them well ...

Page 9: ...dmill on using the on off switch 4 Attach the safety key to the console NOTE Before you run on the treadmill for the first time use the Quick Start instructions on page 10 and allow the treadmill to run independently for 10 minutes Check the running mat is tightened correctly and runs smoothly If you think the mat needs adjusting please see page 14 for more details FIXINGS FIXINGS x 6 safety switc...

Page 10: ...splayed Time Time exercised this session counts up from zero Speed Current speed the treadmill is providing in km h Distance Distance travelled this session counts up from zero Cal Approximate calories burned this session for comparison only not to be used for medical purposes counts up from zero Incline Default display is current heart rate in beats per minute bpm Switches to show current incline...

Page 11: ...setting for the first segment 7 Press enter to confirm 8 Repeat steps 6 and 7 until all 10 segments have been set 9 Press start to begin your workout NOTE If a speed or incline value is changed while using program U1 or U2 this new value will be stored Heart Rate Controlled Program The t203 features 1 Heart Rate Controlled HRC workout program The program is targeted at weight loss and is pre set t...

Page 12: ...and forward 2 Push the locking lever down with your foot 3 Allow the deck to gently lower itself make sure there is nothing obstructing the deck as it lowers Moving the Treadmill This treadmill features 4 non marking wheels to help manoeuvrability Fold the deck up as explained above and use the handlebars to push the treadmill to the desired location Before moving the treadmill ensure the power ca...

Page 13: ... using HRC programs To purchase one please see the Contact Us section at the start of this manual or visit www yorkfitness com Cushioned Running Deck This treadmill features a cushioned running deck The cushioning is provided by elastomer blocks placed between the deck and the metal frame They help reduce impact on the joints by up to 300 over road running Handlebar Controls This treadmill feature...

Page 14: ... front of this manual or visit www yorkfitness com Adjusting running mat tension The tension of the mat has been pre set at the factory however with use the mat can stretch slightly and become loose If the mat is too loose you will find it starts to slip during use To tighten the mat 1 Set the treadmill to run at 3 km h 2 Locate the adjustment screws at the end of the treadmill there s one on each...

Page 15: ...following exercise End each workout with a Warm Down session a few minutes of stretching to help prevent strains pulls and cramps Heart Rate Training To get the most out of your new piece of fitness equipment and see the best results from your training you should exercise at the right level of effort and that means listening to your heart Working out to a target heart rate means you can direct you...

Page 16: ... treadmill of incidental errors and prepare it for normal operation If there is still a problem call your local York distributor for advice Please find below some specific error messages you may see on the display ERR1 means there is a problem with the speed function Malfunctions and Errors 16 Problem Cause Correction Treadmill will not start Running mat slipping Treadmill noisy Inaccurate pulse r...

Page 17: ...t York Barbell s option if it becomes defective malfunctions or otherwise fails to conform with this warranty under normal non commercial personal family or household use In repairing the product York Barbell may replace defective parts or at the option of York Barbell use serviceable used parts that are equivalent to new parts in performance All exchanged parts and products replaced under this wa...

Page 18: ...18 exploded diagram ...

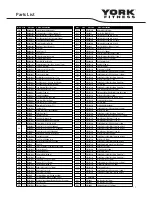
Page 19: ...F10147n1 Nyloc Nut M10 B16 1 YKF40044b1 Running Belt 470 x 2840 x T1 75 C14 1 YKF10148n1 Hex Head Bolt M10 x 40mm B17 1 YKF20141b5 Top Motor Cover C15 6 YKF10149n1 Round Philips Head Self Tapping Screw 4 x 12mm B18 1 YKF60078 Drive Motor 1 5hp x 180V x 4000rpm C16 3 YKF10143n1 Star Washer ID 4mm B19 1 YKF40045 Pulley Belt 190J 7 C17 4 YKF10166n1 Round Allen Head Bolt M8 x 40mm 6mmAllen B20 1 YKF60...

Reviews: