background image

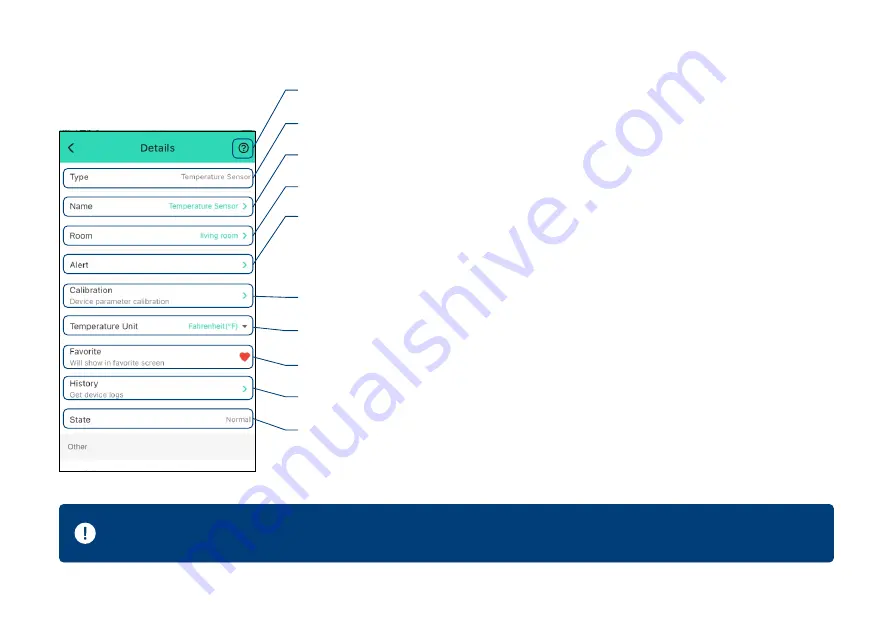
D-2. Details Page

i. Real- me Status: 

Normal, Warning

g. Add/Remove


from favorites

a. Device Type

c. Choose a Room 

for device

e. A calibra on Value


for temperature

b. Rename the Device

d. Alert Se ngs

- Select an alarm strategy for the device

Set alert range for temperature
Set re-no fica on interval a er a temperature alert(refer to page 11) 

h. Historical Log

 of temperature alerts, logged with date &  me

f. Switch Temperature Display Mode

:

 °F / °C

9

- Tap to get device manual link, feedback, contact us informa on, etc.

A er changing “Alert” and / or “Calibra on” se ngs, press the device’s SET bu on once, to sync the new 
se ngs to the device. Otherwise, the device will automa cally update within 4 hours (maximum)

Summary of Contents for YS8004-UC

Page 1: ...Weatherproof Temperature Sensor YS8004 UC User Guide Rev 1 0...

Page 2: ...us a chance to assist you before returning your purchase We at Customer Support are here for you If you need any assistance installing se ng up or using a YoLink product or our app Find addi onal supp...

Page 3: ...G H I In the Box 1 Introduc on 2 Set Up 4 Using the YoLink App 7 Maintenance 16 Speci ca ons 20 Troubleshoo ng 22 Warning 23 Customer Service Warranty 25 Revised 08 06 2021 Copyright 2021 YoSmart Inc...

Page 4: ...A In the Box 1 A Weatherproof Temperature Sensor B Quick Start Guide B A...

Page 5: ...an alert level is reached the LED will blink red once and no ca ons will be sent to you via the YoLink app Available no ca on types are email and banner push no ca ons on your Apple or Android smartp...

Page 6: ...Device turned on Blinking Green Connec ng to Cloud Slow Blinking Green Upda ng Blinking Red Once Device is connected to the cloud and is func oning normally Fast Red Every 30 Seconds Blinking Ba erie...

Page 7: ...h Apple App Store or Google Play Store Search in the store or use the QR code on the right 1 Apple iPhone or tablet that is iOS 9 0 or higher or an Android phone or tablet that is Android 4 4 or highe...

Page 8: ...normally 3 If the red LED does NOT blink as noted this may indicate a problem with the sensor Please see the troubleshoo ng sec on and the contact sec on for technical support Press the SET bu on onc...

Page 9: ...at it will not fall o or be knocked down Wall moun ng hang the sensor body from the wall on a nail or screw or other secure object using the moun ng ring Applica on and Installa on Examples Place both...

Page 10: ...go to Details page refer to page 9 10 Latest Refresh me for Temperature Value Sensor refresh frequency refer to page 8 Device Alert History Historical log of temperature alerts logged with date me Ch...

Page 11: ...are met 8 a The SET bu on has been pressed b At least 0 9 F 0 5 C change over a period longer than 1 minute c At least 3 6 F 2 C change within 1 minute d Otherwise the values will be refreshed automa...

Page 12: ...range for temperature Set re no ca on interval a er a temperature alert refer to page 11 h Historical Log of temperature alerts logged with date me f Switch Temperature Display Mode F C 9 Tap to get...

Page 13: ...nec on Status of sensor and Hub n Current Ba ery Level Shown red if ba ery level is low o Firmware Version ready now refer to page 16 indicates a new update is available p Remove Device From Current A...

Page 14: ...Slide to set the low temperature alert value Default is 64 F 18 C b c Slide to set the High temperature alert value Default is 95 F 35 C d Enable or disable re no ca on a er a temperature alert e Set...

Page 15: ...rt rst Go to Se ngs Alarm Strategy for no ca ons preferences se ngs Only support Host account Tap in the upper le corner to go to My Pro le a Alarm Strategy Se ngs a 1 The alarm strategy should be ena...

Page 16: ...rigger b 3 Edit behavior You must have at least one ac on device or you cannot set a behavior b 4 Edit when Set a me range for the automa on always or during speci c days or mes b 5 Tap to save the se...

Page 17: ...d p a r t y n o n Yo L i n k b r a n d s Follow the instruc ons to authorize and add the connec on to your YoLink account 1 YoLink Weatherproof Temperature Sensor is integrated with Alexa and is also...

Page 18: ...2 Alexa Monitor the latest temperature value of the Weatherproof Temperature Sensor The latest temperature value can be queried by voice command For example Alexa what is the temperature of the Weathe...

Page 19: ...maximum To force an immediate update press the SET bu on on the device twice to make the device enter update mode In Firmware if a new version is listed as available ready now click it to start the r...

Page 20: ...our device will remain in your Yolink account SET Bu on Factory reset will be complete when the status light stops blinking Hold the SET bu on for 20 25 seconds un l the status light blinks red and gr...

Page 21: ...lacement instruc ons closely 2 Do not mix old and new ba eries 3 Make sure that the bo om shell and sealed rubber pads are ghtly secured Otherwise the entry of water into the sensor may cause severe d...

Page 22: ...Remove the two old ba eries 3 Rea ach the four sealing rubber pads 6 Close and secure t h e b a s e b y reinstalling and g hte n i n g t h e four screws 5 Install new two AAA ba eries 4 2 x AAA 19...

Page 23: ...F C Alert Temperature 40 F 221 F 40 C 105 C 135mA opera ng 5uA standby Device Current Draw Sensor Types Temperature Temperature Error Typical 40 14 40 10 F F 1 26 F C C 0 7 C 14 F 116 6 F 0 9 F 10 C...

Page 24: ...40 F 221 F 40 C 105 C Working Humidity 1 Sensor body 95 non condensing 2 Cable Whip Detec on Probe 100 non condensing Dimensions Sensor body 2 44 x 2 44 x 0 87 inches 62 x 62 x 22 millimeters L x W x...

Page 25: ...he SET bu on on the Weatherproof Temperature Sensor once If sensor is out of range with Hub reloca ng the sensor or Hub may be required For a device with low ba ery indicators or alerts or if the cond...

Page 26: ...the Environmental sec on in Speci ca ons on page 20 21 Please install operate and maintain the Weatherproof Temperature Sensor only as outlined in this manual Improper use may damage the unit and or v...

Page 27: ...ge the exterior and or damage the electronics voiding the warranty Do not install or use this device where it will be subjected to physical impacts and or strong vibra on Physical damage is not covere...

Page 28: ...2 year from the date of purchase User must provide a copy of original purchase receipt This warranty does not cover abuse or misused products or products used in commercial applica ons This warranty...

Page 29: ...ned by turning the equipment o and on the user is encouraged to try to correct the interference by one or more of the following measures FCC Statement Reorient or relocate the receiving antenna Connec...

Page 30: ...pplicable to only Mobile Con gura ons The antennas used for this transmi er must be installed to provide a separa on distance of at least 20 cm from all persons and must not be co located or opera ng...

Reviews: