Yolink Finger User Manual Download Page 22

This equipment has been tested and found to comply with the limits for a Class B digital device, pursuant to 
part  15  of  the  FCC  Rules.  These  limits  are  designed  to  provide  reasonable  protection  against  harmful 
interference in a residential installation. This equipment generates, uses and can radiate radio frequency 
energy and, if not installed and used in accordance with the instructions, may cause harmful interference to 
radio  communications.  However,  there  is  no  guarantee  that  interference  will  not  occur  in  a  particular 
installation. If this equipment does cause harmful interference to radio or television reception, which can be 
determined by turning the equipment off and on, the user is encouraged to try to correct the interference by 
one or more of the following measures:

FCC


Statement

Reorient or relocate the receiving antenna.

Increase the separation between the equipment and receiver.

Connect the equipment into an outlet on a circuit different from that to which the receiver is connected.

Consult the dealer or an experienced radio / TV technician for help.

This device complies with part 15 of the FCC Rules. Operation is subject to the following two conditions:

1) This device may not cause harmful interference.

Note:  The  manufacturer  is  not  responsible  for  any  radio  or  TV  interference  caused  by  unauthorized 
modifications to this equipment. Such modifications could void the user’s authority to operate the equipment.

2)  This  device  must  accept  any  interference  received,  including  interference  that  may  cause  undesired 
operation.


Any  changes  or  modifications  not  expressly  approved  by  the  party  responsible  for  compliance 

could  void  the  user’s  authority  to


operate  the  equipment.

Summary of Contents for Finger

Page 1: ...User Guide YoLink Finger YS4908 UC SET UP DOWN...

Page 2: ...nk Finger 4 YoLink Control 13 Maintaining the YoLink Finger 15 Using YoLink App with YoLink Finger 11 Speci cations 7 1 Installation 8 Troubleshooting 18 Introduction 2 Features 3 Product Required 1 C...

Page 3: ...s wait until the garage door or gate to be completely closed Product Required A YoLink Hub The smartphone or tablet able to run iOS 9 0 or higher Android 4 4 or higher A Garage Door Opener To gain ful...

Page 4: ...oller to open or close your garage door anywhere anytime LED light can show you the current status See the explanation below s 2 SET UP DOWN DOWN BUTTON FINGER GREEN ONCE Open Close the garage door BL...

Page 5: ...TLY OPEN AND CLOSE your garage door with your mobile device anywhere anytime Long Range Up to 1 000 Feet between Hub and device Battery Status Update surplus of battery power and send low battery aler...

Page 6: ...4 Set Up YoLink Finger Follow the steps below to set up your YoLink Finger via YoLink App Step 1 Set up YoLink App Get the YoLink App from the Apple App Store or Google Play YoLink...

Page 7: ...5 If you don t have a YoLink account tap Sign up for an account and follow the steps to sign up an account Open the App Use your YoLink account to log in Step 2 Log in or sign up with YoLink account...

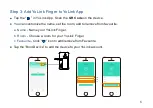
Page 8: ...a Name Name your YoLink Finger You can customize the name set the room add to remove from favourite Tap the in YoLink App Scan the QR Code on the device Tap the Bind Device to add the device to your...

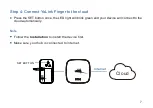
Page 9: ...low the Installation to install the device rst Press the SET button once the LED light will blink green and your device will connect to the cloud automatically Note Make sure your hub is connected to...

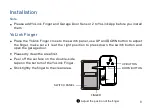
Page 10: ...button to adjust the nger make sure it is at the right position to press down the switch button and open the garage door YoLink Finger Peel off the surface on the double side tape on the bottom of the...

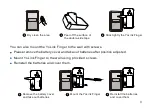
Page 11: ...l with screws Mount YoLink Finger to the wall using provided screws Please remove the battery cover and take out batteries after position adjusted Reinstall the batteries and cover them Reinstall the...

Page 12: ...10 Installation Diagram Partly A B C SET UP DOWN SET UP DOWN SET UP DOWN...

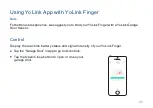
Page 13: ...we suggest you to bind your YoLink Finger with a YoLink Garage Door Sensor Tap the Garage Door in App to go to its controls Tap Open Close button to open or close your the garage door Display the real...

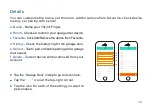
Page 14: ...sensor d History Check the history log for the garage door c Favourite ClickAdd Remove the device from Favourite Tap the icon for each of the setting you want to personalize f Delete Current device w...

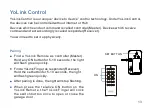
Page 15: ...ct accordingly is called responder Receiver Find a YoLink Remote as controller Master Hold any ON button for 5 10 seconds the light will ash green quickly After pairing is done the light will stop ash...

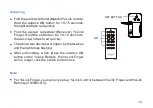
Page 16: ...ng Find the paired responder Receiver YoLink Finger Hold the set button for 10 15 seconds the device will ash red quickly After unbundling when press the relative ON button on the YoLink Remote the Yo...

Page 17: ...Only the YoLink Finger that is currently reachable and has an available update will be shown on the Details screen The light will be slowly blinking green during the update and stop blinking when the...

Page 18: ...g it back to default After the factory reset your device will still in your Yolink account Hold the set button of controller for 20 25 seconds until the LED blinks red and green alternately Factory re...

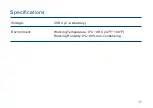
Page 19: ...17 Speci cations Voltage 3V DC 2 AA battery Environment Working Temperature 0 C 40 C 32 F 104 F Working Humidity 0 90 non condensing...

Page 20: ...t your hub to the Internet and press the set button of YoLink Finger once Please power on the hub again and press the set button of once YoLink Finger Hub is powered off YoLink Finger is battery died...

Page 21: ...al applications This warranty does not apply to YoLink Fingers that have been improperly installed modi ed put to a use other than designed or subjected to acts of God such as oods lightning earthquak...

Page 22: ...ne or more of the following measures FCC Statement Reorient or relocate the receiving antenna Increase the separation between the equipment and receiver Connect the equipment into an outlet on a circu...

Page 23: ...other antenna or transmitter FCC RF Radiation Exposure Statement To comply with FCC RF exposure compliance requirements this grant is applicable to only Mobile Con gurations The antennas used for this...

Reviews: