


22
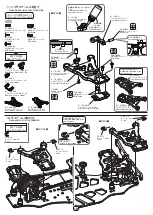
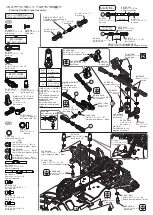
袋 #15 の内容
Bag #15 Contents
このページで使用するパーツ
Parts used on this page
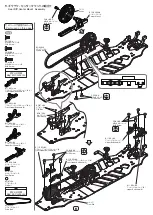
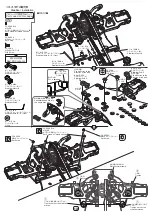
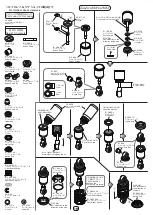
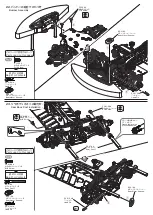
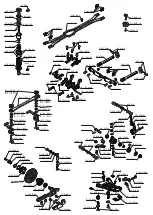
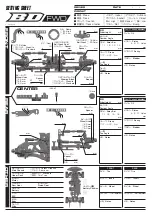
24. モーターの取付け
Motor Installation
B10-302MFA
モーターマウント ×1
Motor Mount
ZC-BH36-A
M3x6 ボタンヘッド ×4
BHS Screw
バックラッシュを合わせボタンヘッドビス (Gray)
2 本を本締めします。
Adjust the motor position so that the gears
mesh correctly and tighten the two button
head screws(Gray) to secure the motor.
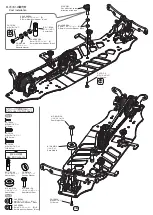
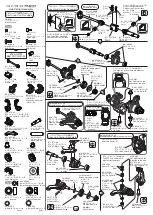
2.0
ZC-BH36-A
M3x6 ボタンヘッド
BHS Screw
仮止程度に。
Lightly tighten.
モーター
Motor
ドライブベルト
Drive Belt
アッパーデッキ
Upper Deck
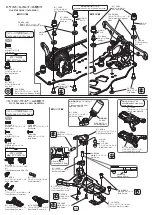
モーター
Motor
別途ご用意下さい。
Sold separately.
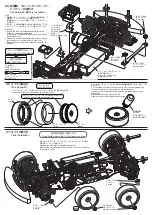
ZC-SS33A
M3x3 セットスクリュー
Set Screw
ピニオンギヤ
Pinion Gear
別途ご用意下さい。
Sold separately.
ZC-BH36-A
M3x6 ボタンヘッド
BHS Screw
B10-302MFA
モーターマウント
Motor Mount
2.0
1.5
面取加工モーター推奨。
Edge trimming motor
recommendation.
平らな面
Flat side
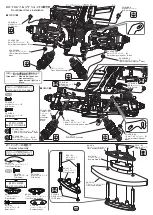
注意!
①キットにはモーター、ピニオンギヤは含まれてお
りませんので、別途ご用意下さい。
②ピニオンギヤの取り付けはモーターシャフトの
D カット されている部分にセットスクリュー
が当たる様、しっかりと締め込んで下さい。
③バックラッシュは少し隙間が出来る程度に調整し
て下さい。
(調整不足はノイズ及びギヤ破損の原因になりま
す。)
④連続走行はモーターに必要以上の負荷を掛けるだ
けでなく寿命も短くなりますので完全に冷えた事
を確認してから走行をさせて下さい。
Important!
①Motor and pinion gear not included in kit.
Please purchase separately.
②Install the pinion so that the set screw is
tightened onto the flat portion of the
motor shaft.
③Adjust the gear mesh to allow a very
small gap between the teeth of the pinion
and spur gear.
(Improper adjustment of the pinion and
spur gear may result in damage to the
gears.)
④Continuous running of the motor will
result in shorter motor life.
Allow the motor to cool between runs.
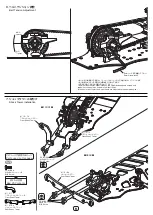
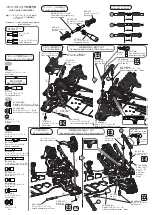
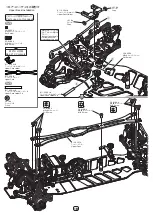
大きいピニオンギヤを使用する場合はアッパーデッキを取り
外し、モーターユニットを取り付けて下さい。
If using a large pinion gear,remove the upper deck
and attach the motor unit.
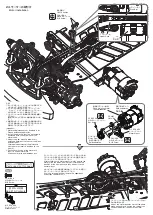
モーターマウント / ピニオンギヤをモーターに取り付けた後、
スパーギヤの位置に合うようにピニオンギヤの位置を合わせ
てセンターマウントに取り付けて下さい。
After attaching the motor mount / pinion gear to the
motor, align the pinion gear so that it matches the
position of the spur gear, and then attach it to the
center mount.
Summary of Contents for Master Speed BD FWD
Page 31: ...MEMO...


