background image

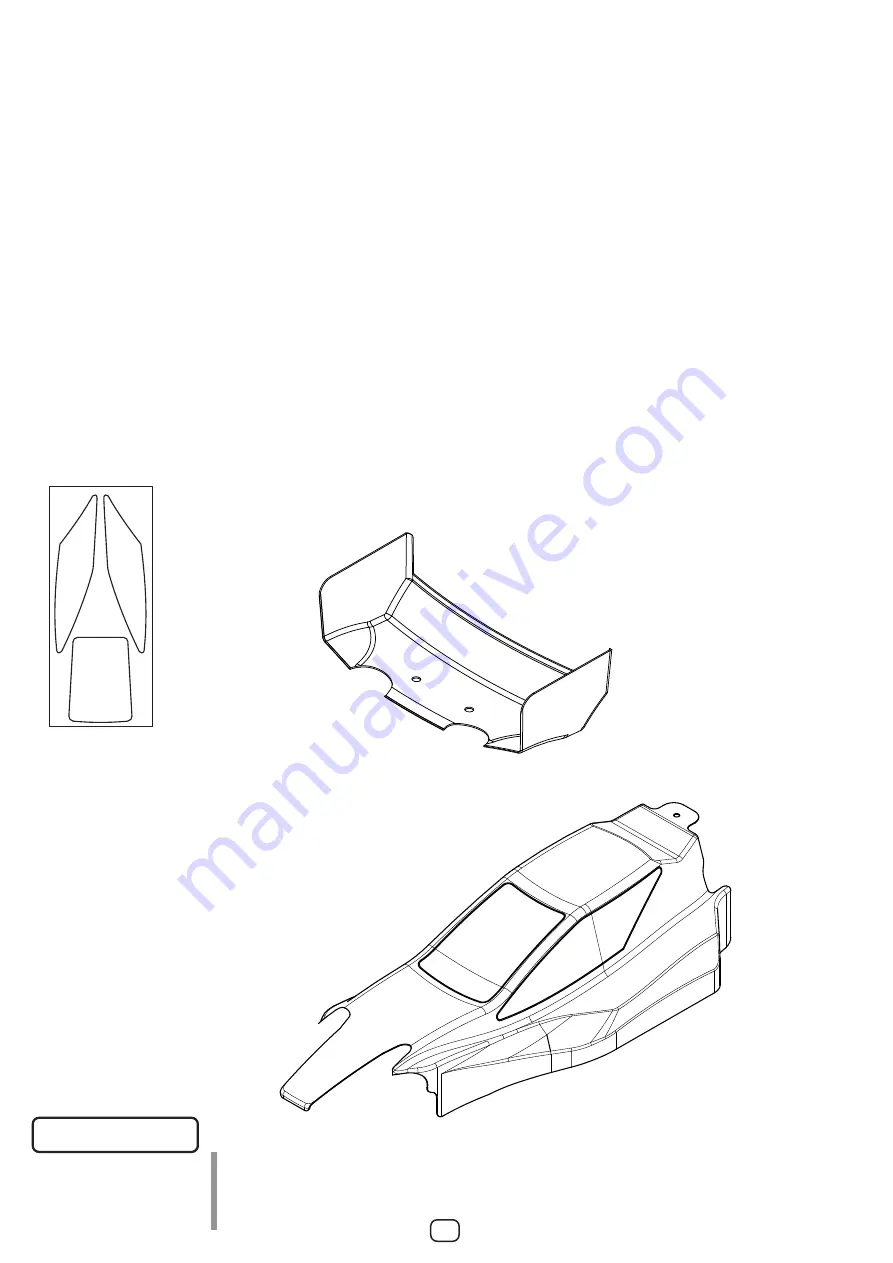
21. ボディの塗装&デカールの貼り方
   

Painting the body & Applying the decals

このページで使用するパーツ 

Parts used on this page 

ZC-BM-2
B-MAX2 デカール ×1
B-MAX2 Decal

※塗装してからデカールを貼ります。※ 

Apply the decals after painting. 

●デカールの貼り方 

・ボディ表面の保護シートを剥がしてから行います。 

①デカールを台紙も一緒に切り抜きます。 
②台紙の端の方を少しカットしてデカールを貼る位置に合わせます。 
③位置が決まったら少しずつ台紙を剥がしながら位置がずれないように貼っていきます。 
※デカールを貼る際に台紙を全部剥がしてしまうと気泡が入ったりシワの原因になります。 
● Applying the decals 
① Include the decal backing when cutting out the decals. 
② Remove a small piece of backing from one corner of the decal. Position the decal and press the unbacked portion onto the body. 
③ Once in position, slowly remove the remaining backing from the decal, and slowly press the decal onto the body. 
※ Applying the decals with the backing completely removed may cause bubbles and/or wrinkles to form. 

●ボディの塗装
ボディの内側(塗装面)を中性洗剤で油分やホコリを洗い流します。油分やホコリが付着していると、塗装後の剥がれの原因となりますので必ず洗ってください。洗浄後は水分を
しっかり拭取ってください。
塗装する前にウインド部分を塗装しないようボディ裏側からマスキングシートを貼ります。その際にマスキングシートがボディに密着していないとにじみの原因になるので注意し
てください。
塗料はポリカーボネイト専用(パクトラ製カラースプレーなど)を使用してください。スプレー塗料は1回で厚塗りしてしまうと塗料がたれたり、塗りムラができるので、全体に
薄く塗って乾かし2〜3回に分けて塗装するようにしてください。
※ボディ表面の保護シートは塗装後に剥がすようにしてください。
● Painting the body
Wash the inside of the body with luke warm water and a mild soap or detergent (such as liquid dishwashing soap) prior to painting. Oil residue or dust 
will prevent the paint from adhering to the painting surface, and possibly cause the paint to peel later on. After washing, thoroughly dry the body to 
allow the paint to adhere properly.
Before painting, apply the pre-cut masking decals to the window and light areas on the inside of the body. Press down the edges of the masking tape 
to prevent paint from seeping through.
Use a spray paint formulated for use on polycarbonate bodies (such as Pactra brand spray paint). Spray several light coats, as evenly as possible. For 
best results, allow each coat to dry before spraying the next coat. Avoid spraying thick, heavy coats. This may cause the paint to run, preventing the 
paint from looking uniform in color.
Remove the outer protective film from the body after painting has been completed.

24 

B2-101
マスキングシート
Masking Decal

B2-101
マスキングシート
Masking Decal

Front

Side R

Side L

Summary of Contents for B-Max 2

Page 1: ...1 10 SCALE ELECTRIC 2WD OFF ROAD CAR KIT ...

Page 2: ...ving drivetrain components Make sure that all wires are properly connected to prevent shorting Unnecessary modifications may be unsafe and hinder performance Always paint in a well ventilated area away from flames PRECAUTIONS BEFORE RUNNING Yokomo R C cars are built for competition use and some models may exceed speeds of 40km per hour Practice common sense and run the car in open safe places or R C...

Page 3: ... WRENCH 六角レンチ 1 5 2 0 ALLEN WRENCH 性能を十分に発揮させる為にイラス トをしっかり参照し 説明書の順番に従って確実に組み上げて下さい For assembly follow the figures and the instructions closely so that your machine will perform at its best ニッパー SIDE CUTTER カッター HOBBY KNIFE 瞬間接着剤 QUICK DRYING GLUE ラジオペンチ NEEDLE NOSE PLIERS 組み立ての際に別途用意する工具 ASSEMBLING TOOLS REQUIRED NOT INCLUDED IN KIT ボックスレンチ 7 0 5 0 NUT DRIVER ハサミ SCISSORS プラス ドライバー 大 小 SCREW DRIV...

Page 4: ...B 84 4 4x8 ベアリング Bearing B2 201 ベルクランク L Bellcrank L ZC BH312 M3x12 ボタンヘッド BHS Screw 2 0 ZC 206MH ロッドエンドボール M Ball Stud M 2 0 ZC 206LH ロッドエンドボール L Ball Stud L 2 0 B2 201 ベルクランク R Bellcrank R B2 201BH センターリンクカラー Center Link Collar B2 201 センターリンク Center Link B2 201BH センターリンクカラー Center Link Collar ZC F310 M3x10 サラキャップ FHS Screw 2 0 B2 002 メインシャシー Main Chassis ZC N3P M3 ナット Nut ZC BH315 M3x15 ボタンヘッド 2...

Page 5: ...610 1mm アルミスペーサー 青 1mm Alminum Spacer Blue ZC A3610 1mm アルミスペーサー 青 1mm Alminum Spacer Blue B2 300U アッパーアームマウント S Upper Arm Mount Standard Standard Narrow ZC N3P M3 ナット Nut 向きに注意 Note position F R O N T ZC BH312 M3x12 ボタンヘッド BHS Screw 2 0 ZC BH312 M3x12 ボタンヘッド BHS Screw B2 002F フロントバルクヘッド Front Bulkhead B2 300FL フロントサスマウント S Front Suspension Mount Standard 向きに注意 Note position このパーツは袋 15 に入っています Thi...

Page 6: ...ew ZC N3P M3 ナット Nut 2 0 ZC BH322 M3x22 ボタンヘッド BHS Screw YS 8BH アルミ製ショックキャップボール Aluminum Shock Cap Ball ZC N3P M3 ナット Nut B2 017 フロントショックタワー Front Shock Tower FRONT REAR ZC BH310 M3x10 ボタンヘッド BHS Screw 2 0 ZC N3P M3 ナット Nut YS 8BH アルミ製ショックキャップボール Aluminum Shock Cap Ball ZC N3P M3 ナット Nut 2 0 ZC BH322 M3x22 ボタンヘッド BHS Screw 2 0 ZC BH322 M3x22 ボタンヘッド BHS Screw B2 017 リヤショックタワー Rear Shock Tower ZC 20...

Page 7: ...Inner Sus Arm Pin Long ZC F312 M3x12 サラビス 6 FH Screw B2 300RS リヤサスマウントブッシュ1 Rear Suspension Mount Bush 1 deg B2 009BR インナーサスアームピン L Inner Sus Arm Pin Long B2 009BR インナーサスアームピン L Inner Sus Arm Pin Long B2 008R リヤロアサスアーム L Rear Lower Suspension Arm L B2 008R リヤロアサスアーム R Rear Lower Suspension Arm R B2 300RS リヤシャシー Rear Chassis リヤサスマウントブッシュ 0 5 Rear Suspension Mount Bush 0 5 deg リヤサスマウントブッシュ1 Rear Sus...

Page 8: ... Hub Carrier Assmebly ZC 206LH ロッドエンドボール L Ball Stud L 2 0 BB 105 2 5x10 ベアリング Bearing B2 010BC リヤ ベアリングカラー 青 Rear Bearing Collar Blue BB 135 2 5x13 ベアリング Bearing B2 010R ユニバーサルドライブシャフト リヤ Universal Driveshaft Rear B2 011S ホイルスペーサー 4 5 青 Wheel Spacer 4 5 Blue 平らな面 Flat side B2 415R リヤハブキャリア 0 L Alminum Rear Hub Carrier L BM 011 ホイルハブピン Wheel Hub Pin 向きに注意 Note position L R ユニバーサルドライブシャフトの組み立て方 Uni...

Page 9: ...L 2 0 1 5 ZC BH268N M2 6x8 ボタンヘッド BH Screw B2 010F フロントアクスル Front Axle ZC A3610 1mm アルミスペーサー 青 1mm Alminum Spacer Blue B2 415S ステアリングブロックL Steering Block L L R 向きに注意 Note position B2 009AF アウターサスアームピン S Outer Suspension Arm Pin Short BM 415C ハブキャリアスペーサー 黒 Hub Carrier Spacer Black B2 009AF M2x4 トラスタッピング BH Tapping Screw 右側も同様に組立てます Assemble the right side in the same manner ステアリングブロックは袋 4 に入っています T...

Page 10: ...0FBN フロントブレース N 1 Front Brace Narrow Standard Narrow 袋 5 の内容 Bag 5 Contents B2 009B インナーサスアームピン S 2 Inner Sus Arm Pin Short ZC F318 M3x18 サラビス 2 FH Screw B2 300FBS フロントブレース S 1 Front Brace Standard B2 001 バンパー 1 Bumper このページで使用するパーツ Parts used on this page 6 フロントサスアームの組み立てのつづき Front Suspension Arm Assembly このパーツは袋 15 に入っています This part are included in bag 15 サスマウント ナロー装着時にご使用下さい Install when using ...

Page 11: ...nt Left B2 506 デフリング Diff Ring B2 508T M2 6 ナイロンナット Nylon Nut BM 508 デフスプリング Diff Spring B2 508T デフナット Diff Nut しっかりレンチを押さえ デフギヤが回らなくなるまでデフスクリューを 少しずつ締め込みます ここでの調整は目安ですので実走行で滑らないポイントまで締めこんでください When tightening the diff use two allen keys to test the tightness of the diff Slowly tighten the diff screw until the diff gear cannot be turned by hand Tighten the diff screw until the diff does not slip when the c...

Page 12: ...B2 303I アイドラーシャフト 1 Idler Shaft B2 302 ギヤボックスL Gear Box L B2 302 ギヤボックス R Gear Box R B2 303T トップシャフト Top Shaft B2 303I アイドラーシャフト Idler Shaft B2 503 アイドラーギヤ Idler Gear BB 1510 10x15 ベアリング Bearing BB 105 2 5x10 ベアリング Bearing BB 105 2 5x10 ベアリング Bearing B2 304 モータープレート Motor Plate B2 001WM ウイングマウントスペーサー Wing Mount Spacer B2 001WM ウイングマウントスペーサー Wing Mount Spacer B2 001WM ウイングマウント L Wing Mount L B2 001...

Page 13: ...Key onto the main drive cup B2 670S BM N4F M4 フランジナイロンナット 1 Nylon Nut ZC BH312 M3x12 ボタンヘッド 4 BHS Screw ZC F315 M3x15 サラビス 2 FH Screw ZC F38 M3x8 サラビス 2 FH Screw B2 001 モーターガード 1 Motor Guard 袋 7 の内容 Bag 7 Contents このページで使用するパーツ Parts used on this page 10 ギヤボックスの取付け Ball Diff Arm Installation ZC BH312 M3x12 ボタンヘッド BHS Screw 2 0 ZC BH312 M3x12 ボタンヘッド BHS Screw 2 0 ZC F315 M3x15 サラビス FH Screw 2 0 ZC F...

Page 14: ...nch 14 フロント アッパーロッド 2 52 ターンバックル Front Upper Rod 2 52 Turnbuckle 34 ステアリングロッド 2 52 ターンバックル Steering Rod 2 52 Turnbuckle 33 リヤアッパーロッド 2 45 ターンバックル Rear Upper Rod 2 45 Turnbuckle 25 チタンターンバックル Titanium Turnbuckle 袋 8 の内容 Bag 8 Contents BM 206 ロッドエンド 10 Ball Cup BM 206 ロッドエンド オフセット 2 Rod End Offset ZC TB45 45 チタンターンバックル 2 45 Titanium Turnbuckle ZC TB52 52 チタンターンバックル 4 52 Titanium Turnbuckle BM 206 ショッ...

Page 15: ...k ends are included in bag 8 B2 S2L リヤショックシャフト Rear Shock Shaft B2 S2S フロントショックシャフト Front Shock Shaft B2 S2S B2 S2L E リング 2mm E Ring B2 S9 リヤピストン 2 Rear Piston 向きに注意 Note position B2 S9 フロントピストン 1 Front Piston 平らな面が下 Flat side 平らな面が上 Flat side YS 7A O リング φ12 O Ring B2 S4AJ O リング φ14 O Ring B2 S4AJ アジャストナット Adjusting Nut B2 S4S フロントショックボディ Front Shock Body B2 S4L リヤショックボディ Rear Shock Body B2 S4B ボ...

Page 16: ...リュー 4 SHC Screw ショックシャフトをゆっくりいっぱい まで押し上げ 溢れた余分なオイルを 拭き取りビスを締め込みます Slowly push the shock shaft all the way up wipe away any excess oil that has seeped out and screw in the bleeder screw 1 5 六角レンチ 1 5mm Allen Key 1 5mm ZC C25 M2x5 キャップスクリュー SHC Screw 1 5 オイルは溢れるギリギリ まで入れます Fill to the rim with shock oil ショックオイルを入れ ショック シャフトをゆっくり動かして気泡を 抜きます Slowly move up and down to remove air bubbles ショックオイル Shock...

Page 17: ...nt Shock Assembly リヤショック Assy Rear Shock Assembly ZC N3L M3 ナイロンナット Nylon Nut ZC BH312 M3x12 ボタンヘッド BHS Screw 2 0 ZC N3L M3 ナイロンナット Nylon Nut ZC BH312 M3x12 ボタンヘッド BHS Screw 2 0 ZC N3L M3 ナイロンナット Nylon Nut ZC BH318 M3x18 ボタンヘッド BHS Screw 2 0 ZC BH318 M3x18 ボタンヘッド BHS Screw 2 0 ZC BH318 M3x18 ボタンヘッド 2 BHS Screw ZC BH312 M3x12 ボタンヘッド 2 BHS Screw ZC N3L M3 ナイロンナット 4 Nylon Nut ...

Page 18: ...Be careful as too much play will cause the gears to strip Please adjust the gear mesh carefully as insufficient clearance between the teeth will cause excessive gear noise as well as causing a drag in the drivetrain 0 3 m m ピニオンギヤは 20T 30T まで装着できます Capable of fitting pinion gears from 20T to 30T ZC BH36 M3x6 ボタンヘッド BHS Screw 2 0 ZC S37 ワッシャー Washer モーター 別途ご用意下さい Motor Sold Separately 20T 21T 22T 23T ...

Page 19: ... L 1 Battery Holder Mount B2 118 バッテリーホルダーマウント R 1 Battery Holder Mount B2 118 バッテリーストッパー 1 Battery Holder Stopper B2 118H バッテリーホルダーピン 1 Battery Holder Pin B2 118H バッテリーホルダージョイントピン 1 Battery Holder Joint Pin ZR BP スポンジテープ 1 Foam Tape B2 118BP バッテリースペーサー 3 Battery Spacer ZR BP スポンジテープ Foam Tape B2 118 バッテリーホルダー Battery Holder B2 118BP バッテリースペーサー Battery Spacer バッテリースペーサーはバッテリー搭 載時に 後方に入れてご使用下さい 使用 ...

Page 20: ...t Spacer B2 201 サーボマウント Servo Mount 凹凸を合わせる Key together ZC BH312 M3x12 ボタンヘッド BHS Screw 2 0 B2 201SH M3 ワッシャー Washer B2 201SH サーボセイバースプリング Servo saver Spring ZC BH318 M3x18 ボタンヘッド BHS Screw 2 0 B2 201SH M2 6 ワッシャー Washer ZC BH2618 M2 6x18 ボタンヘッド BHS Screw 1 5 B2 201SH 3x5 シム Sim サーボセイバーを取り付ける M3 M2 6 ビス ワッシャーは使用するサーボにより選びください When attaching the servo saver use the screw M3 or M2 6 and washer that...

Page 21: ... 5mm allen key to remove the burrs 2 0 六角レンチ 2 0mm Allen Key 2 0mm ZC F38 M3x8 サラキャップ FHS Screw 2 0 42 DRB 206 ロッドエンド Ball Cup DRB 206 ロッドエンド Ball Cup ZS SS315 M3x15 セットスクリュー Set Screw 1 5 袋 12 の内容 Bag 12 Contents ZC F38 M3x8 サラキャップ 2 FHS Screw ZS SS315 M3x15 セットスクリュー 1 Set Screw DRB 206 ロッドエンド 2 Ball Cup このページで使用するパーツ Parts used on this page ZC SS34 M3x4 セットスクリュー 1 Set Screw ZR 200A アンテナパイプ 1 Ant...

Page 22: ...in between the tire bead and rim 瞬間接着剤 別途ご用意下さい CA Cyanoacrylate glue sold separately ホイルの溝とホイルハブピンを合わせて ナットで固定します Mount the wheel onto the wheel hub pin and use the 4mm locknut to secure it tightly 反対側も同様に固定します Secure each side in the same manner 22 BM N4F M4 ナイロンナット Nylon Nut 袋 13 の内容 Bag 13 Contents BM N4F M4 ナイロンナット 2 Nylon Nut BB 105 2 5x10 ベアリング 4 Bearing ZC BH36 M3x6 ボタンヘッド 2 BHS Screw このペー...

Page 23: ...ーマー 2800 Recommended items for preparing the body YT CS2 Curved Scissors for cutting YT BMR Body Reamer for opening holes B2 101 ボディ Body カットラインに沿ってカットします Cut along the cutting line B2 101 B MAX2 ボディ 1 B MAX2 Body ZS GWB ごくらくオフロードウイング 1 OFF ROAD Wing ラウンドタイプ Round Type ストレートタイプ Straight Type ウイングはお好みでお選びください Choose from three wing types φ8mm アンテナ Antenna φ5mm ボディポスト Body post ...

Page 24: ...クトラ製カラースプレーなど を使用してください スプレー塗料は1回で厚塗りしてしまうと塗料がたれたり 塗りムラができるので 全体に 薄く塗って乾かし2 3回に分けて塗装するようにしてください ボディ表面の保護シートは塗装後に剥がすようにしてください Painting the body Wash the inside of the body with luke warm water and a mild soap or detergent such as liquid dishwashing soap prior to painting Oil residue or dust will prevent the paint from adhering to the painting surface and possibly cause the paint to peel later on Af...

Page 25: ...ZC 105 マジックテープ Velcro Tape ZC 105 マジックテープ Velcro Tape ZC 105 マジックテープ Velcro Tape 25 反対側にも同様にボディ内側に貼ります For the opposite side apply in the same manner to the inside of the body RC 313M フードピン Body Clip RC 313M フードピン Body Clip RC 313M フードピン 3 Body Clip ZC 105 マジックテープ 各 1 Velcro Tape One of each このページで使用するパーツ Parts used on this page ...

Page 26: ...この作業はデフ単体で調整するより力が掛かり易いため デフリングやデフボール等を傷める恐れがあるので締め込み過ぎにご注意下さい As it is much easier to apply strength using this method please be careful not to tighten the diff too much as this may cause damage to the diff rings and diff balls ボールデフの調整 Ball Diff Adjustment スリッパーの調整 Slipper Adjustment スリッパーは路面コンディションに合わせて効き具合を調整します 走行中 スロットル全開時にフロントが浮き気味だったり ウイリーしてしまう場合や 立ち上がりでホイルスピンする場合は調整ナットを緩め ジャンプで飛距離が出ない スロットルの反...

Page 27: ...合わせてご使用下さい Use to help reduce understeer on high grip surfaces and for a more linear steering When installing the narrow front suspension mount make sure to also install the narrow front brace and narrow upper arm mount サスマウント ナロー使用時は内側の穴を使用します When using the narrow front suspension mount the inner holes are used センターリンク Center Link B2 300FL フロントサスマウント N Front Suspension Mount Narrow B2 300U アッパーア...

Page 28: ...N3P ZC A3610 ZC BH318 ZC BH318 B2 201BH B2 201BH B2 201 B2 201 B2 201 BB 84 4 BB 84 4 B2 201BH BB 84 4 BB 84 4 ZC 206LH ZC 206MH ZC F38 B2 118 B2 201SH B2 201 ZC 206MH DRB 206 ZC SS315 ZC 206LH ZC A3610 ZC N3P B2 300U B2 002F ZC BH312 B2 118H B2 118 B2 201 ZC S37 ZC BH312 B2 017 ZC BH315 ZC BH322 ZC N3P YS 8BH ZC N3P YS 8BH B2 300U ZC 206LH ZC A3610 B2 002 B2 017 ZC N3P YS 8BH ZC BH310 ZC BH322 BM...

Page 29: ...670S B2 670C BM 670C B2 SG80 B2 670C BM 670C B2 670P B2 303T B2 304 B2 001WM B2 302 ZC BH312 B2 001WM BB 105 2 ZC BH312 ZC BH312 B2 302 B2 001WM B2 300RS B2 300RF ZC F312 ZC F312 ZC F315 ZC BH312 ZC BH312 B2 008R B2 008R B2 010R B2 010R B2 009RB B2 300RS ZC F38 B2 009AR B2 009AR BB 105 2 BM 415C BM 415C B2 010BC BB 135 2 B2 011S BM 011 B2 010BC BB 135 2 B2 011S BM 011 BB 105 2 B2 415R B2 415R B2 0...

Page 30: ...MMENT 2011 Japan Nationals 2011 11 13 NAOTO サーボ背面に10g S N 1 2 3 OIL 32 5 19 5 BLUE DRIVE MOTOR NOSRAM 8 5 GEAR Spur 80 T Pinion 23 T 2 6 BATTERY YB P242BN MAX POWER 4200 ESC NOSRAM F RONT TIRE INSERTS WHEELS R EAR TIRE INSERTS WHEELS TOE IN OUT 1 21 2 2 23 TIRE x FULL RIP Bonded Sintered SPRING 1 2 3 OIL 27 5 BLUE x 3 0 0 5 1 2 Ver 01 2 CAMBER S N 2 CAMBER 15 g 0 1 2 ...

Page 31: ...TROTURF 3 3 5 4 SPRING FRONT REAR OTHER DRIVER DA TE CIRCUIT COMMENT S N 1 2 3 OIL BLUE DRIVE MOTOR GEAR Spur T Pinion T 2 6 BATTERY ESC NOSRAM F RONT TIRE INSERTS WHEELS R EAR TIRE INSERTS WHEELS TOE IN OUT TIRE x FULL RIP Bonded Sintered SPRING 1 2 3 OIL BLUE x 0 0 5 1 Ver 01 CAMBER S N CAMBER g 0 1 2 ...

Page 32: ......

Reviews: