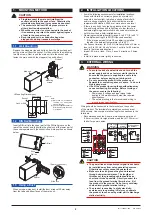


4. PART NAMES OF FRONT PANEL
The figure below shows the MA7D with its front panel (cover)
being open.
For Output-1
For Output-2
Zero-adjustment volume
Span-adjustment volume
Zero-adjustment volume
Span-adjustment volume
Power indicator lamp
Turns on at power on.
5. MAINTENANCE
The product starts running immediately when the power is turned
on; however, it needs 10 to 15 minutes of warm-up before it
meets the specified performance.
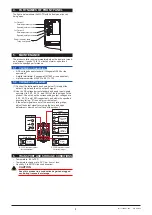
5.1 Calibration Apparatus
•
A DC voltage/current standard (Yokogawa GS200 or the
equivalent)
•
A digital multimater (Yokogawa DM7560 or the equivalent)
•
A precision resistor of 250 Ω ± 0.01%, 1 W
5.2 Calibration Procedure
(1) Connect the instruments as shown below. First adjust the
output-1 signal and then the output-2 signal.
(2) Use the DC voltage/current standard and apply input signals
equivalent to 0, 25, 50, 75, and 100% of the input span to the
product. Check to see the corresponding output voltages are
0, 25, 50, 75, and 100% respectively and within the specified
accuracy rating. “R” is used for current output.
• If the output signals are out of the accuracy rating range,
adjust the output signal level using the zero and span
adjustment volumes on front face of the product.
10 11
1 2
3
9
8 7
6 5
4
9
7
8
1
2
R
10
11
R
4
5
5
6
R: 250
Ω
precision resistor
for current output
R: 250
Ω
precision resistor
for current output
Power supply
Output-2
Input
With SINK current
Without SINK current
Output-1
2
1
2
1
2
1
L1
N2
GND
DC voltge/
current
standard
DC voltge/
current
standard
Digital
multimater
2
1
Digital
multimater
6. TRANSPORT AND STORAGE CONDITIONS
•
Temperature: -25 to 70°C
•
Temperature change rate: 20°C per hour or less
•
Humidity: 5 to 95%RH (no condensation)
CAUTION
Keep this product in a conductive bag when plugged
out, during transport or storage.
3
IM 77J04A07-02E
4th Edition
Summary of Contents for JUXTA MA7D
Page 4: ...Blank Page ...


