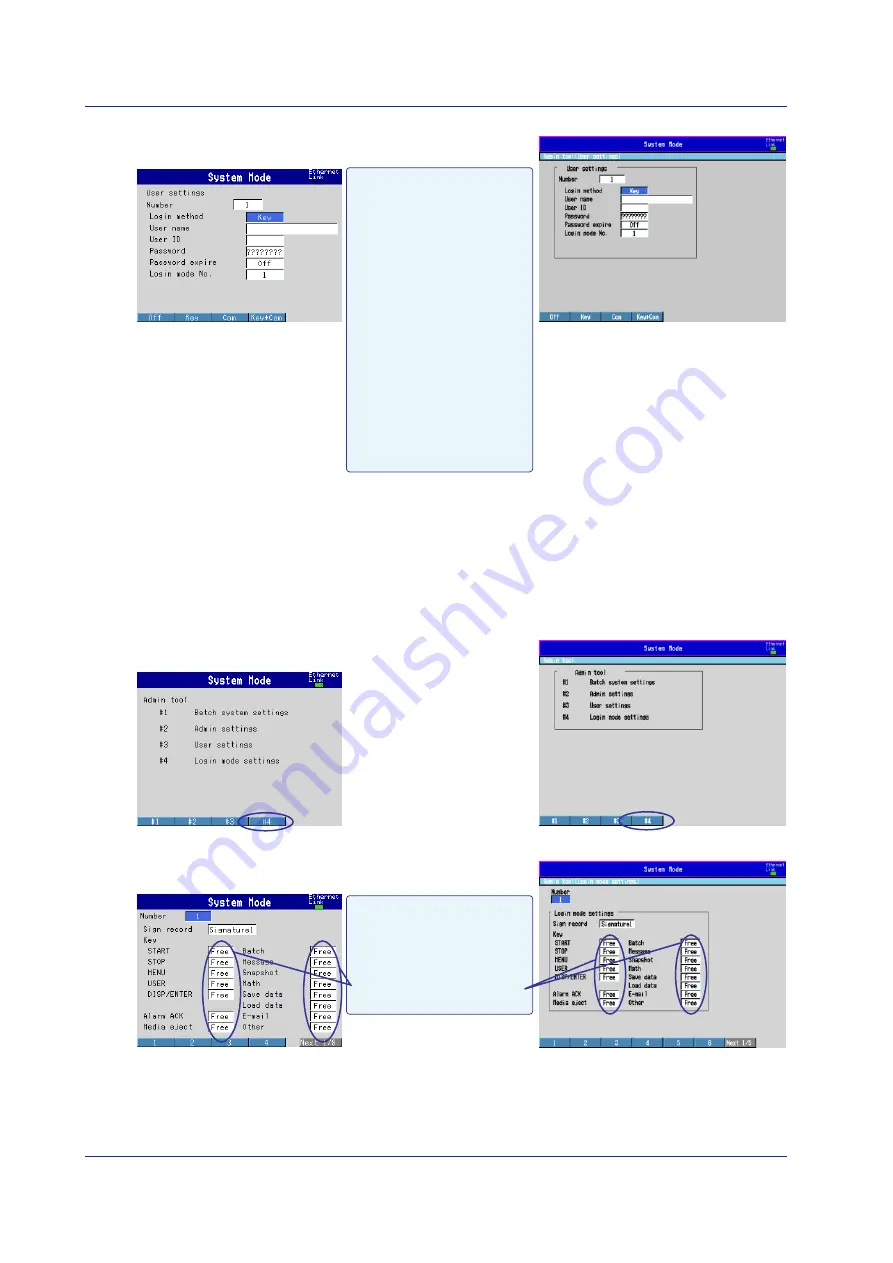
YOKOGAWA DAQSTATION DX100P Operation Manual Download Page 24

24

IM 04L05A01-02E

5.

Set each item.

DX200P

DX100P

Login method
Key: 
Key operation
Key+Com: Key operation and 
via communications
Com: via communications
User name
Up to 20 characters.
User ID
Up to 8 characters.
Password
??????: 
Set to the default pass-
word as defined by the DXP.  The 
password cannot be changed.    
Password expired
After a specified time elapses, 
the user will be requested to 
change the password.
Login mode
Set the operations that the user 
is allowed to carry out using the 
login mode number (see step 8).

6.

Press 

DISP/ENTER

.

The settings are confirmed.

7.

Press 

ESC 

to return to the screen used to select the registration number.

Set users using the same method as steps 4 through 7.

8.

Press 

ESC 

to return to the Admin tool menu.

9.

Press the 

#4 soft key

.

The login mode setting screen appears.

DX200P

DX100P

10.

Set each item.

DX200P

DX100P

Key: Operation of keys.
Alarm ACK: Resets alarm indications and alarm relay output.
Media eject: Ejects the Zip disk from the drive.
Batch: Sets batch numbers, lot numbers and enter comments.
Message: Enters messages.
Snapshot: Saves screen image data.
Math: Starts and stops computation and resets computed results 
(/M1 option).

Save data: Saves the measurement data file to the external storage 
medium.
Load data: Loads and displays the measurement data on the 
external storage medium.
E-mail: Starts/stops the e-mail function and executes e-mail 
transmission tests.
Other: See section 4.4 of IM04L05A01-01E or IM04L06A01-01E. 

Number: 1 to 30
Sign record
Set the sign authority level from 
[Signature1], [Signature2], and 
[Signature3].

Select [Free] for operations 
allowed.

Setting the DXP by the Administrator

Summary of Contents for DAQSTATION DX100P

Page 1: ...Operation Guide Yokogawa Electric Corporation IM 04L05A01 02E 2nd Edition Model DX102P DX104P DX106P DX112P DX204P DX208P DX210P DX220P DX230P DAQSTATION DX100P DX200P 4 L 5 A 1 0 2 E 0 2...

Page 2: ...dministrator 20 Logging in as an Administrator 20 Setting the Date Time 22 Registering Users 23 Setting Other System Mode Items 25 Logging Out Exiting System Mode 26 Setting Conditions and Making Meas...

Page 3: ...functions Every effort has been made in the preparation of this manual to ensure the accuracy of its contents However should you have any questions or find any errors please contact your nearest YOKO...

Page 4: ...ed voltage for the power cord itself Power Cord and Plug Desktop Type To prevent an electric shock or fire be sure to use the power cord supplied by YOKOGAWA The main power plug must be plugged into a...

Page 5: ...urchase another copy of the software if you are to use the software on another PC Copying the software for any purposes other than backup is strictly prohibited Please store the original media contain...

Page 6: ...memory Save data to storage medium Time Start measurement Stop measurement Time Predetermined period Continuous process Batch process Start measurement Save data to storage medium Types of acquired da...

Page 7: ...t is in reclined position with its front feet up as it may damage the feet Handling Precautions of External Storage Media Take special care in handling external storage media as they are delicate prod...

Page 8: ...sely affect the DXP Avoid such locations Near strong magnetic field sources Do not bring magnets or instruments that produce electromagnetic fields close to the DXP Operating the DXP in strong magneti...

Page 9: ...ength approximately 5 mm Take measures to prevent noise from entering the measurement circuit Move the measurement circuit away from the power cable power circuit and ground cable It is desirable that...

Page 10: ...directly on the terminals fasten all wiring cables to the rear of the mounting panel Do not apply input signals that exceed the following values This can damage the DXP Maximum input voltage Voltage r...

Page 11: ...max wire The resistance of the three wires should be approximately equal A b B B Extension leadwire Power Supply Wiring Power Supply Use a power supply that meets the following conditions Item except...

Page 12: ...for the DXP that is supplied by YOKOGAWA Always use protective earth terminal to prevent electric shock Connect the power cord of the DXP to a three pole power outlet that has a protective earth termi...

Page 13: ...o place Zip disk Eject button Eject button ATA flash memory card Used to remove the storage medium 3 Close the front cover Closing the front cover causes the DXP to detect the existence of an external...

Page 14: ...Administrator sets the DXP Once an administrator is registered you are required to log in to operate the DXP Apply electronic signature using DAQSIGNIN An administrator logs in Start measurements Log...

Page 15: ...value or execute a function displayed on the soft key menu see page 17 DISP ENTER key Used when confirming settings or when executing an operation see pages 17 and 32 Arrow keys 4 keys Used to select...

Page 16: ...ns below Confirm the character entered On the DX200P Pressing the Input soft key displays a window used to enter numbers and characters Carry out the following procedure Select a character by pressing...

Page 17: ...mode menu appears 2 Press the Next soft key to show the menu with System Mode DX200P DX100P Next 3 Press the soft key that corresponds to System Mode A confirmation window opens DX200P DX100P The scr...

Page 18: ...pressing a soft key The selection is entered to the box of the item DX200P DX100P UserID Use Not Use Use the user ID when logging in Auto Logout Automatically logs out when there is no key operation f...

Page 19: ...to 8 characters Password Set to the default pass word as defined by the DXP The password cannot be changed Password expired After a specified time elapses the administrator will be reques ted to chan...

Page 20: ...P ENTER A window appears for you to enter the user ID DX200P DX100P 3 Enter the user ID and press DISP ENTER A window appears for you to enter the password DX200P DX100P 4 Enter the default password a...

Page 21: ...past cannot be specified Set the password using at least six characters Spaces cannot be used for the password 6 Reenter the password you entered in step 5 and press DISP ENTER The window disappears...

Page 22: ...e user is disabled and you are logged out You can no longer log in using the same user name To enable the user so that you can log in again have the administrator set a default password and reset the...

Page 23: ...m mode menu see steps 2 to 4 on page 17 2 On the DX100P press the 4 soft key On the DX200P press the 3 soft key The Admin tool menu appears DX200P DX100P 3 Press the 3 soft key A screen used to select...

Page 24: ...the Admin tool menu 9 Press the 4 soft key The login mode setting screen appears DX200P DX100P 10 Set each item DX200P DX100P Key Operation of keys Alarm ACK Resets alarm indications and alarm relay...

Page 25: ...the data and whether tags or channel numbers are used Application Memory Application Application Memory Memory Application Memory Memory and Trend Memory timeup Application Memory Type of process Batc...

Page 26: ...ng Out Exiting System Mode 1 If an item setting screen is displayed press ESC to return to the system mode menu 2 Press the Next soft key to show the menu with End 3 Press the End soft key A confirmat...

Page 27: ...ms see chapter 5 in IM04L05A01 01E DX100P or IM04L06A01 01E DX200P Logging in as a User The procedure is the same as for Logging in as an Administrator on page 20 Setting the Measurement Range 1 Press...

Page 28: ...DX200P DX100P 3 Set each item DX200P DX100P Lot number Use Not Use Use lot numbers Auto increment On Increment the lot number by 1 when a batch of measurements is completed set to the next lot number...

Page 29: ...neering Mode Items 1 On the engineering mode menu press the soft key corresponding to the item to be entered to display the setting screen 2 Set each item 3 Press DISP ENTER to confirm the settings 4...

Page 30: ...be saved Up to 8 characters Directory name on the external storage medium in which measured data is to be saved AUX CON PRN NUL CLOCK and strings containing spaces cannot be specified Exiting the Engi...

Page 31: ...ER DX200P DX100P Batch number Up to 32 characters 4 Select Lot No using the arrow keys and press the Input soft key 5 Enter the lot number and press DISP ENTER DX200P DX100P Lot number Up to 8 numeric...

Page 32: ...lection menu 2 Select the menu item using the up and down arrow keys 3 Press the right arrow key to display the sub menu To close the sub menu that you opened press the left arrow key 4 Select the sub...

Page 33: ...s the same as for Logging in as an Administrator on page 20 Writing Messages 1 Press FUNC The soft key menu is displayed 2 Press the Message soft key Soft keys for free message and message groups 1 th...

Page 34: ...lay and written to the internal memory Setting and writing the message string when you selected the Free soft key 4 Press the soft key corresponding to the message you wish to write A window appears f...

Page 35: ...w keys and press DISP ENTER Acquisition of measured data to the internal memory stops The icon of the status display section is displayed in red If batch stop sign record is specified see page 18 the...

Page 36: ...sign record confirmation window appears 4 Select Yes using the arrow keys and press DISP ENTER If the use of the user ID is enabled see page 18 a window appears for you to enter the user ID Proceed to...

Page 37: ...the password according to Logging in for the First Time 7 Select Pass or Fail using the arrow keys and press DISP ENTER A window appears for you to enter a comment DX200P DX100P 8 Enter the comment u...

Page 38: ...SIGNIN see IM04L05A01 61E Operation Flow First confirm the location of the measurement data file Import the data Display the data on the Viewer Confirm the data Apply electronic signature Importing th...

Page 39: ...in the following cases Signature 1 to 3 are already applied Files that make up the batch data is missing Continuous data is being displayed by file linking File is corrupt If you repeat the operation...

Page 40: ...20 Amersfoort 3821 AL THE NETHERLANDS Phone 31 334 64 1611 Fax 31 334 64 1610 Branch Sales Offices Wien Austria Zaventem Belgium Ratingen Germany Madrid Spain Runcorn United Kingdom Milano Italy Veli...

Reviews: