background image

ENGLISH 

25


HELPFUL HINTS


1.  Do not overfill the bag. Always leave at least 3 inches of bag material between bag contents and top of 

bag. 

2.  Clean  the  open  end  of  the  bag  inside  and  out.  Make  sure  the  open  end  is  free  of  food  material  and 

wrinkles. 

3.  When vacuum packaging a large item, to prevent wrinkles in the seal, gently stretch bag flat before placing 

it into the vacuum chamber. 

4.  Make sure the bag is dry. It will be difficult to make a tight seal if the bag is wet. 

5.  For best results, perishables still need to be frozen or refrigerated after vacuum sealing process. 

6.  When you are vacuum sealing items with sharp edges (such as dry spaghetti, silverware, etc.), protect the 

bag from punctures by wrapping the item in soft cushioning material, such as a paper towel. You may use a 

canister instead of a bag. 

7.  When using canisters, always leave 2.5 cm of space at the top of canister. 

8.  Pre-freeze fruits vegetables before vacuum sealing for the best results. 

9.  Allow the appliance to cool for 1 minute between uses. 

10. If you are not sure whether your bag was sealed properly, simply reseal the bag. 

11. For best results, use bags and canisters produced by the manufacturer. 

12. Do not reheat your food in the bag in microwave oven. It is dangerous. 

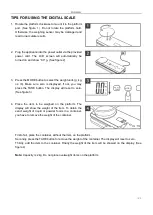
13. When weighing a large item, place a tray or container on the platform. Do not forget to press the TARE 

button to remove the weight of the tray or container before adding the item. 

14. When finished using sealer, press silver touch bar to open unit, then unplug unit and store it properly. 


CLEANING AND MAINTENANCE 

1.  Unplug the appliance before cleaning. 

2.  Remove the trip tray for cleaning. 

3.  Wipe the outer surface with a soft, soapy cloth. Wipe away any food or liquid on the vacuum chamber with 

a paper towel. 

4.  The weighing sensor is a high-precision part. Do not press on the platform hard. Gently wipe the platform 

when cleaning. You can remove it for cleaning. 

5.  Dry the appliance thoroughly before using it again. 

6.  Do not immerse the appliance in water or other liquids. Prevent water or other liquids from entering the AC 

power port on the appliance. 

7.  Do not clean the appliance with abrasive cleaning agent to avoid damaging the surface. 


Summary of Contents for Fresh Food VSS01BK

Page 1: ...Zgrzewarka pr niowa Vacuum sealer VSS01BK FRESH FOOD PL EN...

Page 2: ......

Page 3: ...ktowa si z najbli szym autoryzowanym serwisem producenta w celu naprawy i konserwacji 4 Podczas pracy z urz dzeniem nie korzystaj z przed u acza 5 Nie korzystaj z urz dzenia na mokrych lub gor cych po...

Page 4: ...IA 1 PORT PLATFORMY WAGI Obracaj platform w kierunku zgodnym z ruchem wskaz wek zegara w celu jej monta u Obracaj platform w kierunku przeciwnym do ruchu wskaz wek zegara w celu jej demonta u 2 WY WIE...

Page 5: ...m uruchomieniem funkcji zgrzewania Uwaga Tryb inteligentnej ochrony zostanie aktywowany przy ci g ym u ywaniu funkcji uszczelniania W tym trybie funkcja zgrzewania nie mo e zosta uruchomiona dop ki ws...

Page 6: ...Wci nij przycisk VACUUM MARINATE aby rozpocz prac przy u yciu pojemnik w pr niowych i korka do butelek migaj ce wiat o Przytrzymaj przycisk przez 3 sekundy aby aktywowa funkcj marynowania pr niowego w...

Page 7: ...elu opr nienia po prostu zdejmij j Komora pr niowa Umie otwarty koniec worka w komorze pr niowej Urz dzenie zosta o zaprojektowane w taki spos b aby zapewni bezpieczne umieszczenie worka w komorze pr...

Page 8: ...zasilaj cego Ekran i wska nik pracy urz dzenia za wiec si Patrz rysunek 1 2 Dotknij czujnika aby otworzy pokrywk Patrz rysunek 2 3 Przeczy i wyprostuj otwarty koniec worka Upewnij si e na otwartym ko...

Page 9: ...dan jednostk wagi g kg oz lb Upewnij si e wy wietlana warto jest r wna zeru Je li nie mo esz wcisn przycisk TARE Warto na wy wietlaczu zresetuje si do zera Patrz rysunek 3 4 Umie na platformie wagi p...

Page 10: ...aga jest w czona odczekaj co najmniej 30 sekund przed jej u yciem Temperatura w kt rej urz dzenie mo e pracowa wynosi 10 30 oC INSTRUKCJA U YCIA KORKA DO BUTELEK Wci nij korek do butelki kt ra zosta a...

Page 11: ...i nie masz pewno ci czy worek zosta w a ciwie zamkni ty powt rz proces zamykania 11 W celu uzyskania najlepszych rezultat w nale y u ywa work w i pojemnik w pr niowych wyprodukowanych przez producenta...

Page 12: ...eby u yj nowego worka Sprawd zgrzew Zagniecenia i fa dy wzd u zgrzewu mog spowodowa ponowne wnikni cie powietrza do worka Je li wzd u zgrzewu znajduje si fa da odetnij nieszczeln kraw d i ponownie prz...

Page 13: ...ch Napoje musuj ce lub gazowane nie mog by zamykane pr niowo poniewa utleniaj cy si gaz spowoduje e butelka zdeformuje si podczas pracy urz dzenia Pojemniki do przechowywania pr niowego sprzedawane od...

Page 14: ...rmalny czas przechowywania Czas przechowywania z wykorzystaniem akcesori w Mi so 3 5 miesi cy 1 rok Ryby i owoce morza 3 5 miesi cy 1 rok Temperatura pokojowa 25 2oC Normalny czas przechowywania Czas...

Page 15: ...POLSKI WYPOSA ENIE Lp Nazwa Zdj cie Ilo 1 Zgrzewarka pr niowa 1 2 Platforma wagi 1 3 Przew d zasilaj cy AC 1 4 Instrukcja obs ugi 1 5 W yk pr niowy 1 6 Worki 5 7 Rolka folii 1...

Page 16: ...fikowane naprawiane lub w jakikolwiek spos b naruszane przez nieupowa nion do tego osob ani te uszkodzone w wyniku nieprawid owego u ycia lub transportu Gwarancja nie obejmuje naturalnego zu ycia si e...

Page 17: ...rer or service agent to replace it with a new one 4 Do not use an extension cord with the appliance 5 Do not use the appliance on wet or hot surfaces or near high power electric appliances 6 Do not im...

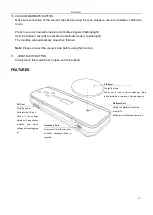
Page 18: ...tton Mode button Seal button Dry moist food settings button Vac seal button One touch button Normal gentle speed settings button Stop button Vacuum marinate button Scale in Standby mode Scale in weigh...

Page 19: ...Y MOIST FOOD SETTINGS BUTTON Seal time depends on the type of the food It will take a longer time if you choose MOIST FOOD setting For the optimal vacuuming and sealing for the moist or juicy foods ch...

Page 20: ...t the vacuum tube before using this function 11 ONE TOUCH BUTTON Simply touch this metallic bar to open and close the lid FEATURES Platform Weigh the food When not in use or before cleaning rotate ant...

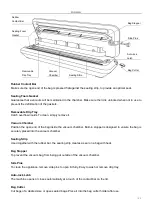
Page 21: ...e the bag is securely placed into the vacuum chamber Sealing Strip Used together with the rubber bar the sealing strip creates a seal on a bag with heat Bag Stopper To prevent the vacuum bag from bein...

Page 22: ...al or wrinkles on the open end Insert the open of the bag into the vacuum chamber until it is stopped by the built in stopper See figure 3 4 Press the SEAL or VAC SEAL button and the corresponding ind...

Page 23: ...layed If not you may press the TARE button The display will reset to zero See figure 3 4 Place the item to be weighed on the platform The display will show the weight of the item To obtain the exact w...

Page 24: ...H BOTTLE STOPPERS Stick the cork back in the wine bottle that have been opened The wine is easily oxidized and lose its flavor Insert the accessory hose to the vacuum nozzle and the bottle stopper Pre...

Page 25: ...minute between uses 10 If you are not sure whether your bag was sealed properly simply reseal the bag 11 For best results use bags and canisters produced by the manufacturer 12 Do not reheat your food...

Page 26: ...the bag It may be punctured by sharp items Use a new bag if necessary Check the seal A wrinkle along the seal may cause air to re enter the bag If there is a wrinkle along the seal simply cut the sea...

Page 27: ...sparkling beverages cannot be vacuum packaged because gas removal will cause the bottles to go flat during the vacuum sealing process Vacuum Storage Canisters Sold Separately Our vacuum storage canist...

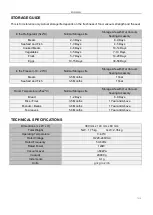
Page 28: ...al Storage Life Storage Life with Our Vacuum Sealing Accessory Meats 3 5 Months 1 Year Seafood and Fish 3 5 Months 1 Year Room Temperature 25 2oC Normal Storage Life Storage Life with Our Vacuum Seali...

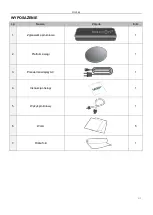
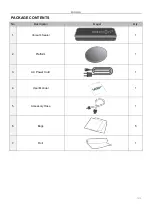
Page 29: ...ENGLISH PACKAGE CONTENTS No Description Imaget Qty 1 Vacuum Sealer 1 2 Platform 1 3 AC Power Cord 1 4 User Manual 1 5 Accessory Hose 1 6 Bags 5 7 Roll 1...

Page 30: ...material or manufacturing defects This warranty is only valid if the appliance has been used in accordance with the instructions and provided that it has not been modified repaired or interfered with...

Page 31: ......
Page 32: ...YOER Polska Producent MediaSam Bernardy ska 2 64 000 Ko cian Polska www yoer pl www yoer pl VSS01BK FRESH FOOD...

Reviews: