


3
SAFETY PRECAUTIONS
You can make your farm a safer place to live and work if you observe the safety precautions given. Study these
precautions carefully and insist those working with you and for you follow the precautions.
Finally, remember this an accident is usually caused by someone’s carelessness, neglect or oversight.
A brief description of signal words that may be used in this manual:
CAUTION:
Used as a general reminder of good safety practices or to direct attention to unsafe practices.
WARNING:
Denotes a specific potential hazard.
DANGER:
Denotes the most serious specific potential hazard.
CAUTION
Con
sult your implement and tractor operator’s manual for correct and safe operating practices. Be aware of towed
implement width and allow safe clearance.
CAUTION: SAFETY SIGNS
Safety decals are placed on the implement to alert the operator and others to the risk of personal injury or unsafe
operation during normal operations and servicing.
1. The safety decals must be kept clean and in good condition to ensure that they are legible.
2. Safety decals must be replaced if they are missing or illegible.
3. When components are replaced during repair or servicing, check that the new components include the necessary
safety signs.
4. Replacement safety decals may be obtained from your local dealer.
WARNING
Read these instructions carefully to acquaint yourself with the Equipment. Working with unfamiliar equipment can lead
to accidents.
Never park the equipment on a steep incline or leave the equipment running unattended.
Never clean, lubricate or adjust a machine that is in motion.
Always check that straps are secure.
Make sure latches are in pinned position when moving equipment.
Do not allow children to operate this equipment.
Do not allow riders on the equipment, trailer and/or pick-up.
Use speed and caution dictated by the terrain being traversed. Do not operate on any slope steep enough to cause
tipping or loss of control.
Read and understand the operator’s manual and require all other persons who will operate the equipment to do the
same.
If operating on public roadways, where legal, be certain all lighting is operating properly and observe all traffic laws.
Beware of increased stopping distances and control effort when operating with implements attached.
Be familiar with all controls and be prepared to stop equipment quickly in an emergency.
FAILURE TO HEED MAY RESULT IN PERSONAL INJURY OR DEATH.
Summary of Contents for MAX SEALER PLUS 2920 Series
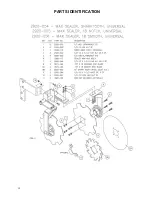
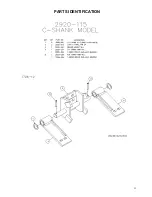
Page 9: ...9 PARTS IDENTIFICATION...
Page 10: ...10 PARTS IDENTIFICATION...
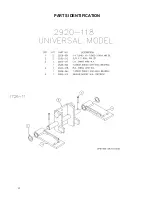
Page 11: ...11 PARTS IDENTIFICATION...
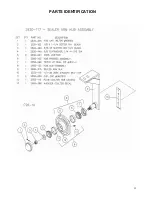
Page 12: ...12 PARTS IDENTIFICATION...
Page 13: ...13 PARTS IDENTIFICATION...
Page 14: ...14 PARTS IDENTIFICATION...
Page 16: ...16 2565 727_REV_C 09 2023...


