background image

22.

23.

assembly

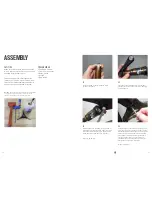
Slide the swingarm over the main pivot bore, 
using the grooves in the swingarm to properly 
align over the bore.

use the fox guide pin to align and hold the 
seatstays, dogbone, and shock together. use a 
dead blow hammer to push the pin through the 
above mentioned components.

Prep the main pivot pin (shaft) and bolt (threads) 
with grease. Install the female pivot pin from the 
drive side of the bike. use a dead blow hammer 
to push the pin into place. Once in place, install 
and tighten the male pivot bolt with two 5mm 
allen keys.

Torque to 115-125 in/lb.

use the fox guide pin tool  and a dead blow 
hammer to install a 46.5mm female Ti bolt 
through the seatstays, dogbone, and shock. use 
a Ti male bolt prepped with blue loctite on the 
non-drive side and tighten with two 5mm allen 
keys.

Torque to 90-95 in/lb

05.

06.

08.

07.

chip system

use a 2.5mm allen key to loosen the two 
M4x9mm flat head bolts holding the QR insert 
derailleur hanger in place. Remove the bolts and 
the QR insert from the frame. Repeat the process 
for the bolts and the non drive QR insert.

Fit the 12MM insert hanger into the groove on 
the inside of the drive side chainstay. The hanger 
should be flush with the chainstay. next, insert 
the 12mm drive cap through the chainstay and 
into the hanger from the outside of the drive 
side chainstay. To finish, use a 3MM allen key to 
attach the two dropout pieces to the swingarm 
with two M4x15MM cap bolts. Prep the bolts with 
loctite and insert them into the drive cap, through 
the swingarm and into the hanger.

Fit the 12MM non-drive insert into the groove on 
the inside of the non-drive side chainstay.  The 
insert should be flush with the chainstay. next, fit 
the non-drive 12mm cap through the chainstay 
and into the insert from the outside of the non-
drive side chainstay. To finish, use a 2.5MM 
allen key to attach the two dropout pieces to the 
swingarm with two M4x10MM flat head bolts.  
Prep the bolts with loctite and insert them into 
the non-drive cap, through the swingarm and into 
the insert.

Insert the M4x6MM custom cap bolt into the top 
of the drive cap. This bolt will be used to set the 
position of the Shimano 142x12MM axle. Refer to 
Shimano specifications for exact instructions on 
proper axle operations. 

Torque for all chip system bolts: 15-20 in/lb

02.

04.

01. 

03.

Summary of Contents for 2012 asr 5

Page 1: ...YETI CYCLES 600 Corporate Circle Unit D Golden CO 80401 888 576 9384 www yeticycles com owner smanual 2012yetiasrc ...

Page 2: ...ures 08 Geometery 10 Maintenance Schedule 12 setup overview 14 Shock Setup rp23 15 Quick start guide rp23 16 Cable Line Setup 18 technical Assembly Overview 20 chip system 23 Exploded Views 24 REBUILD KITS 26 legal Warranty 28 Contact Information 29 ...

Page 3: ...pate every situation or condition that may occur during the assembly setup and maintenance of your bicycle Yeti recommends that all service and repairs be performed by your local authorized Yeti Dealer This manual contains many Warnings and Cautions concerning the consequences of failure to maintain or inspect your bicycle The word Warning indicates a potentially hazardous situation in which if no...

Page 4: ...ess 4 The carbon dogbone helps create the ideal shock rate and provides a solid connection between the front and rear of the bike 5 The ASR5 uses a 1 5 inch stroke 6 5 inch eye to eye shock by Fox Racing Shox 6 The Yeti chip system allows for an easy switch between a standard 135mm QR or the142mm x 12mm Shimano thru axle system 7 Custom chain slap guards on the seatstay and chainstay keep things q...

Page 5: ... 16 9 16 9 F 42 8 43 8 44 9 G 13 0 13 0 13 0 H 27 8 27 8 28 1 I 4 0 4 5 5 3 J 19 3 19 3 19 3 K 1 5 1 5 1 5 Small 5 3 160 CM 5 8 173 CM Medium 5 8 173 CM 6 0 183 CM Large 6 0 183 CM 6 4 193 CM SM MD LG A 18 0 19 0 21 0 B 22 4 23 4 24 4 C 69 0 69 0 69 0 D 73 0 73 0 73 0 E 16 9 16 9 16 9 F 42 5 43 5 44 6 G 12 8 12 8 12 8 H 27 4 27 4 27 7 I 4 0 4 5 5 3 J 18 5 18 5 18 5 K 1 5 1 5 1 5 ...

Page 6: ...dual parts on the ASR C are listed below as well as in the step by step assembly instructions later in the manual For general bicycle maintenance please consult the torque specifications of the manufacture s component you are adjusting Clean and lube chain Check tire pressure Clean bike of mud and debris Check brake function Check shock pressure if applicable Check for loose bolts and tighten if n...

Page 7: ...ine air pressure you need to measure the sag To measure the sag slide the travel indicator O Ring up against the shock body With a friend supporting the bike sit on the saddle do not bounce and allow your body weight to compress the shock Once you have compressed the shock get off the bike and measure the distance between the shock body and the new position of the travel indicator O Ring This is y...

Page 8: ...ing sensation Adjustments that are too slow clockwise adjustment will cause packing of the rear wheel indicated by a sluggish ride feeling ride Slower rebound turn the knob clockwise Faster rebound turn the knob counter clockwise All clicks are counted clockwise rotating from the all the way out or counter clockwise dial position adjustment setting air spring setting PSI rider weight less 20 30 ps...

Page 9: ... break points in the line of your shifter housing This allows riders to experience better overall shifting performance by reducing the entrance of unwanted elements such as sweat and sediment Use of full cable housing helps prevent corrosion from the elements and keeps the shifting smoother for a longer period of time yeti tips 01 rear derailleur Fit a piece of housing from the front shifter acros...

Page 10: ... two 23 5mm reducers into the lower portion of the shock Install the shock on the frame Insert a 34 0mm Ti female bolt through the drive side of the frame for the shock Prep an alloy male bolt with blue loctite and tighten with two 5mm allen keys Torque to 90 95 in lb Install the dogbone onto the frame Insert a 40 5 mm Ti female bolt with washer through the drive side of the frame and the dogbone ...

Page 11: ...non drive QR insert Fit the 12MM insert hanger into the groove on the inside of the drive side chainstay The hanger should be flush with the chainstay Next insert the 12mm drive cap through the chainstay and into the hanger from the outside of the drive side chainstay To finish use a 3MM allen key to attach the two dropout pieces to the swingarm with two M4x15MM cap bolts Prep the bolts with locti...

Page 12: ...300020001 bearing 6903 max 2 10 300030189 PIVOT PIN BOLT M10 X 1 X 22 1 11 300030110 BOLT ti MALE M6X1 12 MM 3 12 300030069 WASHER 8 5X12 5X0 5 MM 3 13 300030062 WASHER 6 5X12 5X0 5 MM 3 14 300030112 BOLT TI FEMALE 8 0X46 5MM 1 15 300030190 BOLT ti FEMALE 8 0X40 5MM 1 16 300030111 BOLT ti FEMALE 8 0X34 0MM 1 17 300020036 bearing 698max ext race 1 5 4 18 300040386 QR INSERT NON DRIVE 1 19 300060061...

Page 13: ... 8 0X40 5MM 1 300030111 BOLT ti FEMALE 8 0X34 0MM 1 300030112 BOLT TI FEMALE 8 0X46 5MM 1 300030110 BOLT ti MALE M6X1 12 MM 3 300030188 PIVOT PIN 17X7 5 10X1THRD 52 4 1 300030189 PIVOT PIN BOLT M10 X 1 X 22 1 300020034 REDUCER FOX 8X22MM 2 300020037 reducer fox 8x23 5mm 2 300030062 WASHER 6 5X12 5X0 5 MM 3 300030069 WASHER 8 5X12 5X0 5 MM 3 200020139 asr c 08 12 mounting hardware 1 300030062 WASHE...

Page 14: ...include the cost of travel or shipment to and from an authorized Yeti dealer In order to exercise your rights under these limited warranties the bicycle or frameset must be presented to an authorized Yeti dealer together with proof of purchase The above warranties have been in effect since January 2012 For warranty information on Yeti frames sold prior to that date please consult your local author...

Reviews: