background image


4.1 Installation and Removing the Battery   

4.1.1 Installation of the battery 

To install battery, slide up the battery towards the top of the radio until battery latch is locked. 


4.1.2 Removing the Battery 
  - Slide the battery latch located on the bottom of radio to the open position as shown in   

Figure 4-2. 

- The battery is removed by pressing it against and sliding it towards the bottom of the radio 


Figure 4-2) Installation and Removing the Battery


4.2 

Installation and Removing the Belt Clip 

- To attach belt clip to radio, align belt clip rails with the grooves in radio and slide the belt 

clip onto the mounting rails until it latches into place. 

- To remove belt clip from radio, push up on tab of belt clip with flat bladed screwdriver and 

at the same time, slide the belt clip towards the top of Radio (Figure4-3). 


Figure 4-3) Installation and Removing the Belt Clip 

Summary of Contents for XR-2400

Page 1: ...1 XR 2400 User s Manual Zigbee UHF Transceiver This Service manual is subject to change according to improvement of XR 2400 Portable Radio without notice Version 1 2011 08 14...

Page 2: ...s 1 XR 2400 Features 3 2 Components of XR 2400 Series Radio 4 3 Appearance of XR 2400 Radio 5 4 Basic Operation of XR 2400 6 5 Operating XR 2400 Radio 8 6 Operating Instructions of XR 2400 Radio 11 7...

Page 3: ...nments as well as public places XR 2400 series have following functions 16 Channels are selectable High Quality Audio Output 40 Speaker PLL synthesizer type Signal Strength Meter Battery Status Indica...

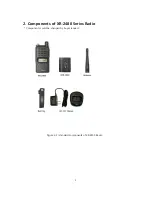
Page 4: ...4 2 Components of XR 2400 Series Radio Components could be changed by buyer request Figure 2 1 standard components of XR 2400 Radio...

Page 5: ...5 3 Appearance of XR 2400 Radio Figure 3 1 Appearance of XR 2400 Radio...

Page 6: ...6 Figure 3 2 XR 2400 Series LCD Indication 4 Basic Operation of XR 2400 Pease read this manual carefully before using XR 2400 series Radio This manual contains important information about using Radio...

Page 7: ...pressing it against and sliding it towards the bottom of the radio Figure 4 2 Installation and Removing the Battery 4 2 Installation and Removing the Belt Clip To attach belt clip to radio align belt...

Page 8: ...volume level 5 2 PTT Button Push To Talk Button You can transmit by pressing PTT button And then Red LED will be ON and your voice will be transmitted 5 3 Channel Buttons Channel Buttons have 2 functi...

Page 9: ...Radio 2 Please charge the battery before using the radio for best performance and safety 1 When you charge the battery that is installed in the Radio please turn off the radio first to charge the bat...

Page 10: ...ot 3 After completion of the charging the green LED on the charger will light However please continue the charging for 30 more minutes for the complete full charge status LED indication status LED ind...

Page 11: ...n on the radio by above way 6 2 Transmission Method For transmission press PTT button on the left side of the radio As soon as the user presses keys according to the setting DTMF ID will be transmitte...

Page 12: ...interference to radio communications However there is no guarantee that interference will not occur in a particular installation If this equipment does cause harmful interference to radio or televisi...

Page 13: ...to minimize these hazards This transceiver is not intended for use by the general public in uncontrolled environments Uncontrolled environment exposure limits are applicable to situations in which the...

Reviews: