background image

16

17

Base Unit

Base Unit

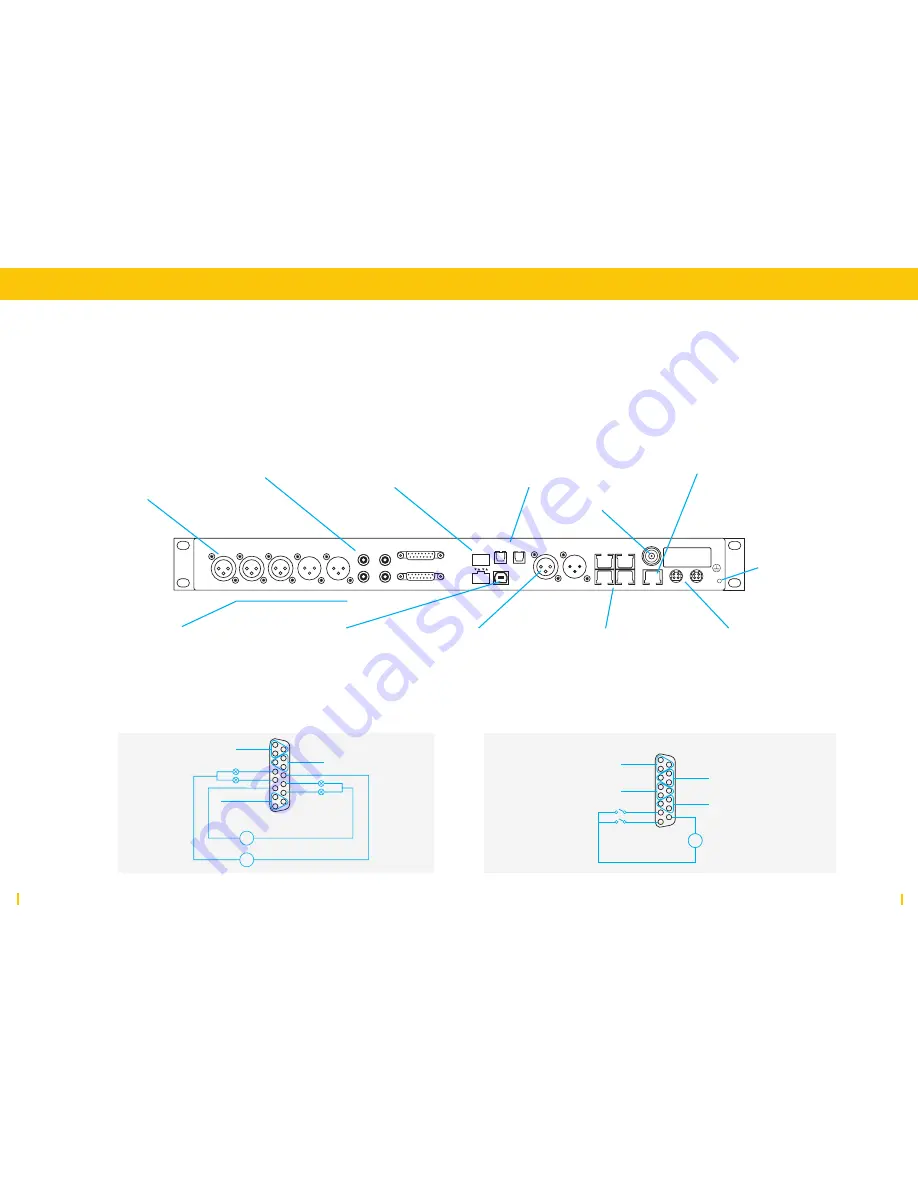
Base Unit: Rückseite

An der Base Unit findest du alle Audio I/Os, Erweiterungsslots, Netz-

werkanschlüsse und die GPIOs. Nutze die Skizze, um die verfügbaren 

Anschlüsse zu identifizieren. 

AES3 out 1

Line out 2

Line out 1

Line in 2

AES3 in 1

in

  MADI -2

  MADI -1

Line in 4

Line in 3

Line out 3

Multi I/O 2

Multi I/O 1

Line out 4

PUC-16

out

SPDIF/

ADAT

APC 1

APC 2A

PC 4

Sync

E1/AoIP

PSU 1

Extension-1

PSU 2

APC 3

Line in 1

Mic 2

Der 

Mic 2 Eingang kann 

entweder als Mikrofon- 

oder Line-Eingang  

konfiguriert werden.  

Analoge Line-Eingänge 

und -Ausgänge sind immer 

mono.

USB bietet dir ein 16-Kanal 

I/O, das zur Verbindung mit 

8 Stereo- oder 16 Mono-

Kanälen nutzbar ist.

SPDIF/ADAT dient als 

TOS-Link für SPDIF I/O oder 

ist als ADAT Interface 

konfigurierbar.

APC 1 Hier wird die CU  

angeschlossen. 

APC 2-4 

sind PoE-Anschlüsse zur 

Anbindung der optionalen 

Kanal I/O-Erweiterungen.

E1/AoIP DANTE 4x4  

Interface bzw. für  

PC-Verbindung zur Konfi-

guration des Intelllimix.

AES3 dient zur Anbindung 

einer digitalen Stereo-

Quelle und eines digitalen 

Stereo-Ausgangs. 

PSU1/PSU2 Netzteil- 

Anschluss mit 

Redundanzeingang.

SYNC In/Out

PE zur direkten 

Verbindung mit 

der Schutzerde.

Line 3/4 sind 

asymmetrische Ein- 

und Ausgänge für 

Prosumer-Geräte.

MADI GA1 und MADI 

GA2 dienen dem  

Anschluss des optiona-

len OPTO-Kopplers für 

die MADI Erweiterung.

1

81

5

9

Analog Out 5

1

2

9

Line out 5+

Line out 5-

SHIELD

HP 1

7

8

15

HP 1 L

HP 1 R

HP COM

Analog Out 6

10

11

3

Line Out 6+

Line Out 6-

SHIELD

5 ... 30V

+ or -

- or +

+ or -

- or +

GPO 1

GPO 2

GPO 3

GPO 4

5DC

5DC

1

81

5

9

Digital in 2

1

2

9

AES3/EBU in 2+

AES/EBU in 2-

SHIELD

Digital out 2

4

5

12

AES3/EBU out 2+

AES/EBU out 2-

SHIELD

Digital in 3

10

11

3

AES3/EBU in 3+

AES/EBU in 3-

SHIELD

Digital out 3

13

14

6

AES3/EBU out 3+

AES/EBU out 3-

SHIELD

GPI 1

GPI 2

5 ... 24V

+ or -

- or +

5DC

Multi I/O 1

Multi I/O 2

Je 2 symmetrische 

analoge mono

Line Ins + Line Outs.

Summary of Contents for intellimix

Page 1: ...briefing book DE EN...

Page 2: ...funktionen des Intellimix vertraut gemacht wirst Dank der intuitiven an ein Smartphone angelehnten Bedienphilosophie kommst du auch ohne das Lesen eines 300 seitiges Handbuchs an den Start Bitte beach...

Page 3: ...cksicht auf die Umwelt und entsorge das Verpackungsmaterial angemessen Wichtige Hinweise Stelle sicher dass der Lieferumfang vollst ndig ist Pr fe ob das passende Netzkabel f r dein Land beigelegt is...

Page 4: ...e externe Netzfreischaltung HINWEIS Intellimix ist f r den professionellen Gebrauch entwickelt und setzt Nutzerkenntnisse f r die Ein Ausschaltung von Systemen voraus Um Auswirkungen auf angeschlossen...

Page 5: ...l ON OFF CUE und weitere Funktionen sorgen f r schnelle und sichere Bedienung und schaffen durch ihre taktile R ck meldung maximale Sicherheit Drehregler Der Drehregler dient zur Einstellung des selek...

Page 6: ...siehe Manual TALKBACK Sendet dein Mikrofonsignal an den ausgew hlten Monitor Ausgang Funktionstasten F r die meist genutzten Funktionen des Intellimix findest du feste Funktionstasten berall dort wo e...

Page 7: ...Display einstellen 5 Best tige deine Einstellung mit dem Drucktaster des Drehreglers Anschlie end bernimmt der Drehregler wieder die Regelung der Monitor Lautst rke Pegelanzeige Dashboard Der Touchscr...

Page 8: ...von oben ber den Display rand Zur Zuordnung eines neuen Parameters zu deinen Fab Four 1 Suche in den Settings deinen gew nschten Parameter aus 2 Ber hre und halte das entsprechende Drehelement bis ein...

Page 9: ...zur Anbindung der optionalen Kanal I O Erweiterungen E1 AoIP DANTE 4x4 Interface bzw f r PC Verbindung zur Konfi guration des Intelllimix AES3 dient zur Anbindung einer digitalen Stereo Quelle und ei...

Page 10: ...line Wir helfen dir gern weiter Kontaktiere unsere Helpline falls du Fragen haben solltest Wir werden dir so schnell wie m glich antworten Einzelhei ten und Anweisungen zur opti malen Kontaktaufnahme...

Page 11: ...Wizard App und Anwendungshinweise zuzugreifen www yellowtec com intellimix downloads Zum Start der Wizard Nutzung 1 Lade das Wizard ZIP File IMX2_WIZARD ZIP auf deinen Windows PC Windows 7 oder neuer...

Page 12: ...n for using the product This guide is intended to make you familiar with the overall design and the principal functions of Intellimix Thanks to its easy smartphone like operation you will like to save...

Page 13: ...ake sure to discard all packing material in an environmentally responsible manner Important Notice Make sure all parts are included in the box Make sure you identify that you have the right mains cabl...

Page 14: ...net cable free to avoid wobbling The BU can be rack mounted 1RU or located next to the CU The supplied PoE Ethernet cable is 10ft 3m but you can separate them by up to 90ft 30m with an extension cable...

Page 15: ...racks your finger Feel the travel and the upper and lower endpoints G Touch is impervious to dust and dirt and will not wear out Hardkeys Physical buttons control channel ON OFF CUE and other function...

Page 16: ...KBACK Routes the mic signal to the selected monitor bus Home Monitor Shift Talkback ON CUE Hardkeys For some functions Intellimix offers hardkeys Where you need the physical sensation and feedback off...

Page 17: ...y pushing the center of the knob The rotary control automatically reverts to its normal function as your monitor level control Level indicator Dashboard The touchscreen has four channel displays and a...

Page 18: ...ntry to your Fab Four 1 Locate the desired parameter in Settings 2 Touch and hold the desired rotary element until the assignment prompt appears Only rotary elements can be assigned to the Fab Four 3...

Page 19: ...l in 2 1 2 9 AES3 EBU in 2 AES EBU in 2 SHIELD Digital out 2 4 5 12 AES3 EBU out 2 AES EBU out 2 SHIELD Digital in 3 10 11 3 AES3 EBU in 3 AES EBU in 3 SHIELD Digital out 3 13 14 6 AES3 EBU out 3 AES...

Page 20: ...o help If you have any questions please contact our helpline We do our best to reply as soon as possible For details go to Support on our website and find instructions on how to get in contact with us...

Page 21: ...e link below to locate the Wizard app and the guide that describes how to begin using it www yellowtec com intellimix downloads To begin using the Wizard 1 Download the Wizard ZIP file IMX2_WIZARD ZIP...

Page 22: ...Declaration of Conformity This device complies with Part 15 Subpart B of the FCC rules ANSI C63 4 2014 in execution to the FCC regulations rules and limits of FCC 47 CFR 15 101 and 15 109 Operation i...

Page 23: ...www yellowtec com intellimix Intellimix BB v1 0...

Reviews: