background image


Yeastar  S50  Installation  Guide 


  4/13 

Before You Start 

 
Before you begin to  install the S50 IP Phone System, please check the package contents to verify 

that you have received the items below. If there is any problem, please contact your provider.  

Package Contents 

1* S50 PBX 

1* Ethernet Cable 

1* Power Cord 

2 Rack Mounting Kits 

1* Grounding Stud & Nut 

4* Rubber Feet 

1* Warranty card 

1* Quick Start Guide 
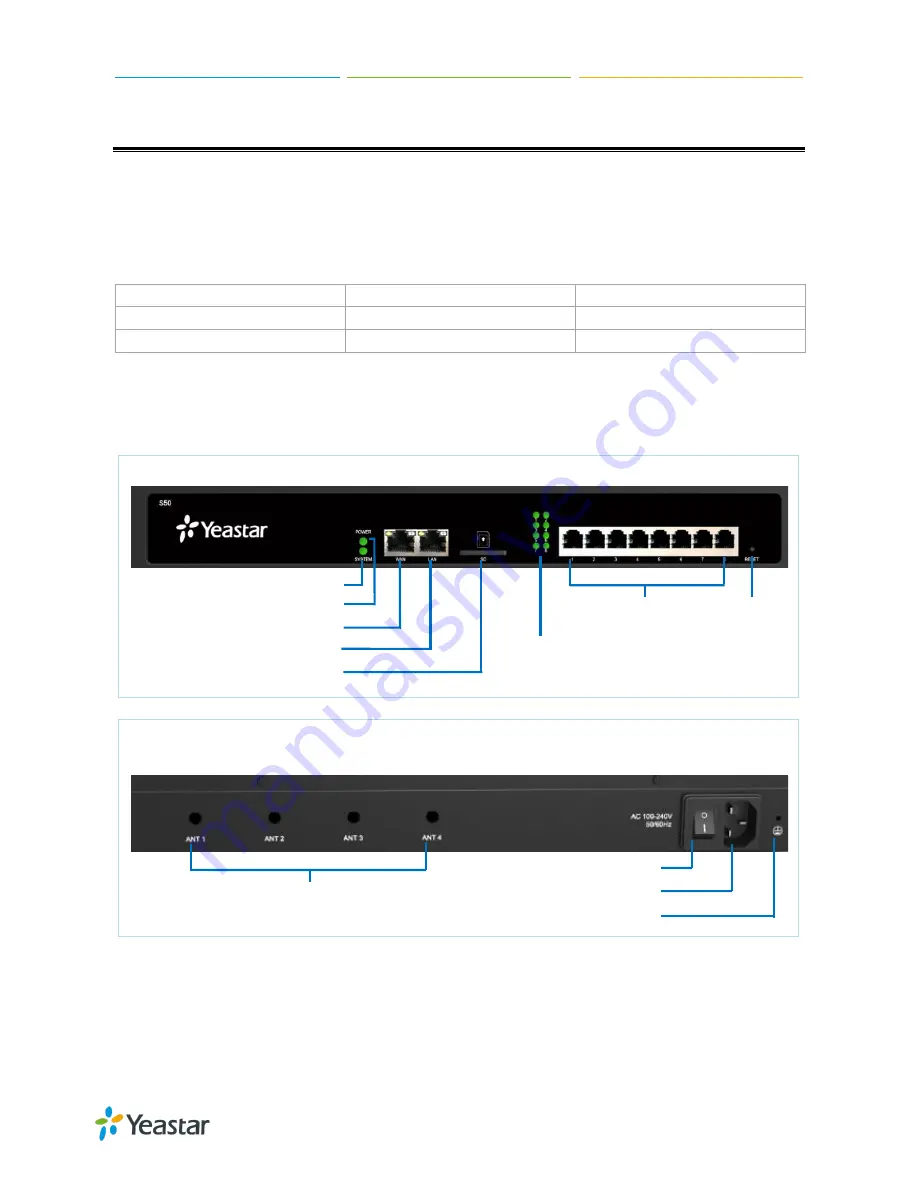
 

Hardware Overview 


Front Panel 


System Indicator                                                                                     


      Power Indicator                                                                              RJ11 Port              Reset 

                                                  WAN                                               

                                                  LAN                                                Port Status 

                                            SD Slot 

Rear Panel 


Power Switch


ANT Sockets                                                              Power Inlet                                                                 

                                                                                                                        Protective Earth                                                                             


Summary of Contents for S50

Page 1: ...Yeastar S50 VoIP PBX Installation Guide Version 1 2 Date 2016 09 02...

Page 2: ...ackage Contents 4 Hardware Overview 4 LED Indicators and Ports 5 Installation 7 Safety Disclaimers and Installation Warnings 7 Module Installation 7 Desktop Installation 10 Rack Installation 10 Ground...

Page 3: ...ions on how to perform configurations on the system Related Documents This Installation Guide only explains the installation of Yeastar S50 IPPBX For more functionality and advanced settings please re...

Page 4: ...below If there is any problem please contact your provider Package Contents 1 S50 PBX 1 Ethernet Cable 1 Power Cord 2 Rack Mounting Kits 1 Grounding Stud Nut 4 Rubber Feet 1 Warranty card 1 Quick Sta...

Page 5: ...ic The port is idle Blinking There is an ongoing call on the port GSM 3G Red light Static the trunk is idle Blinking slowly there is no SIM card inserted Blinking rapidly the trunk is in use BRI Orang...

Page 6: ...s for the system The default mode is Single Single LAN port interface will be used for uplink connection WAN port is disabled Bridge LAN port interface will be used for uplink connection WAN port inte...

Page 7: ...ated on the back panel of the device To avoid the electric accident do not open or remove the cover of IP PBX when it is working as well as off the power Before cleaning the device cut off the power s...

Page 8: ...STEP 1 Loosen the screws on the enclosure and then remove the upper cover STEP 2 Insert the module to the Module Slot STEP 3 Insert a SIM card on the GSM 3G module following the instructions Skip this...

Page 9: ...Yeastar S50 Installation Guide 9 13 STEP 4 Close the cover and fix the screws STEP 5 Rotate the antenna into the Antenna Socket Skip this step if no GSM 3G module installed...

Page 10: ...acking paper from the rubber feet STEP 3 Turn over the device and attach the supplied rubber feet to the recessed areas on the bottom at each corner of the device Rack Installation WARNING Be careful...

Page 11: ...reduce the risk to the user of electrocution or protect the PBX from the bad effects of external noise in the case of a lightning strike A permanent connection between ground and the ground terminal...

Page 12: ...YSTEM LED starts to blink STEP 3 Connect the telephony line to the RJ11 port of the device RJ11 Port Description FXS Connect one end of a RJ11 phone cable to the port Connect the other end to the anal...

Page 13: ...word password STEP 1 Connect your PC to the same network as Yeastar S50 STEP 2 Start the browser on PC In the address bar enter the IP address click Enter key and then you can see the web GUI login pa...

Reviews: