background image

Yealink EXP50 User Guide 

36


If you leave this field blank, the LCD screen of the EXP50 color-screen expansion module 
will display the default label “DTMF”.


5.


Click 

Confirm

 to accept the change. 

Prefix 

You can configure an Ext key as the prefix key. If you press the prefix key when the phone is idle, 
the phone will enter into the dialing screen and display the prefix number which you specified. 
You can enter other digits and then dial out. 

To configure an Ext key as the prefix key: 

1.


Click on 

Dsskey

->

Ext Key

2.


In the desired Ext key field, select 

Prefix

 from the pull-down list of 

Type

3.


Enter the prefix number you want to add before the entered number in the 

Value

 field (e.g., 

0592). 

4.


Enter the desired value in the 

Label

 field or leave it blank. 


Summary of Contents for EXP50

Page 1: ......

Page 2: ...ECOMMENDATIONS IN THIS GUIDE ARE BELIEVED TO BE ACCURATE BUT ARE PRESENTED WITHOUT WARRANTY OF ANY KIND EXPRESS OR IMPLIED USERS MUST TAKE FULL RESPONSIBILITY FOR THEIR APPLICATION OF PRODUCTS YEALINK XIAMEN NETWORK TECHNOLOGY CO LTD MAKES NO WARRANTY OF ANY KIND WITH REGARD TO THIS GUIDE INCLUDING BUT NOT LIMITED TO THE IMPLIED WARRANTIES OF MERCHANTABILITY AND FITNESS FOR A PARTICULAR PURPOSE Ye...

Page 3: ...e user is encouraged to try to correct the interference by one or more of the following measures 1 Reorient or relocate the receiving antenna 2 Increase the separation between the equipment and receiver 3 Connect the equipment into an outlet on a circuit different from that to which the receiver is connected 4 Consult the dealer or an experienced radio TV technician for help WEEE Warning To avoid ...

Page 4: ......

Page 5: ...ceptionists administrative assistants call center agents power users and executives who need to monitor and manage a large volume of calls on a regular basis This guide provides everything you need to quickly set up and use the EXP50 color screen expansion module Be sure to read the Packaging Contents in this guide before you set up and use your color screen expansion module This guide takes the w...

Page 6: ...Yealink EXP50 User Guide vi ...

Page 7: ...Pictures 14 Changing the Wallpaper 15 Power Saving 19 Enabling the Power Saving via Web User Interface 20 Configuring the Office Hour via Web User Interface 20 Configuring the Idle Timeout via Web User Interface 21 Adjusting the Backlight 22 Configuring the Yealink EXP50 Color screen Expansion Module 25 Line 26 Speed Dial 27 Busy Lamp Field BLF 28 Voice Mail 30 Direct Pickup 31 Group Pickup 32 Cal...

Page 8: ...p Listening 51 Private Hold 52 Hot Desking 53 ACD 54 Zero Touch 55 URL 56 Phone Lock 57 Retrieve Park 58 Directory 59 Using the Yealink EXP50 Color screen Expansion Module 61 Using the Line Key 61 Using the Busy Lamp Field 62 Resetting the Yealink EXP50 Color screen Expansion Module 62 ...

Page 9: ...information for obtaining the best performance with the EXP50 color screen expansion module The topics include Packaging Contents Physical Features Icon Instructions LED Instructions Installation Startup Packaging Contents The following items are included in your package Expansion Module Stand ...

Page 10: ...Yealink EXP50 User Guide 2 Connecting Sheet USB Cable USB 2 0 One Screw Screwdriver Quick Start Guide Check the list before installation If you find anything missing contact your reseller ...

Page 11: ...hows key feature label and key feature icon For more information refer to Icon Instructions on page 4 Page Keys Press these keys to navigate to corresponding page to view additional keys USB Jack Connects the supplied cable to the Mini USB jack on the next expansion module Connects the Wi Fi USB dongle WF40 USB headset or USB flash drive Mini Jack Connects the supplied cable to the USB jack on the...

Page 12: ...ns Description Hold Private Hold DND Voice Mail SMS Direct Pickup Group Pickup DTMF Prefix Local Group XML Group LDAP XML Browser Conference Forward Transfer ReCall Record URL Record Recording starts successfully Record URL Record Multicast Paging Group Listening Paging List Hot Desking Zero Touch ...

Page 13: ...ine registers successfully Registering Register failed DND is enabled on this line Call forward is enabled on this line Icon indicator associated with call park retrieve park Icons Description Call Park Park successfully Call park idle state Call Park Park failed Call Park Call park ringing state Retrieve Park Icon indicator associated with ACD Icon Description Logged in the ACD system ...

Page 14: ... associated with intercom Icons Description Intercom idle state Intercom ringing state Intercom callout talking state Intercom failed state Icon indicator associated with BLF BLF List Icons Description BLF BLF List idle state BLF BLF list ringing state BLF BLF list callout state BLF BLF list talking state BLF hold state BLF list call park state BLF BLF List failed state ...

Page 15: ...e The shared line is seized The shared line receives an incoming call The shared line is dialing The shared line is in conversation The shared line conversation is placed on public hold for local SCA phone for monitoring SCA phone The shared line conversation is placed on private hold The shared line conversation is barged in by the other shared line party For a multi party call all the shared lin...

Page 16: ...g call The bridged line is dialing The bridged line is in conversation The bridged line conversation is placed on hold LED Instructions Page key LED LED Status Description Solid green Current page Off Non current page Fast flashing Red The BLF monitored user receives an incoming call on the non current page Ext key LED configured as a line key LED Status Description Solid green The line is in conv...

Page 17: ...S T56A T58A T58V media IP phones To easily connect the EXP50 to the phone please unplug the phone stand from the IP phone Note To unplug the stand from the IP phone 1 Unplug the power adapter and Ethernet cable from the IP phone 2 Unplug the handset attached to the IP phone 3 Turn the IP phone over and lay it on a non slip flat surface 4 Unplug the stand from the IP phone To connect the EXP50 colo...

Page 18: ...ng sheet and screw If you want to connect two or more expansion modules pull out the silica gel and connect two expansion modules as below Connecting two expansion modules on a single host phone is shown as below 4 Connect the USB jack on the host phone and the mini USB jack on the expansion module using one supplied cable ...

Page 19: ...n modules on a single host phone is shown as below Note To attach the stand of the expansion module Power is automatically transferred from the host phone to the expansion module s upon connection If you want to use more than one expansion modules on a single phone you need to connect an additional Yealink power adapter 5V 2A to any one of the expansion modules The power adapter should be purchase...

Page 20: ...xpansion module is powered on the LCD screen of the EXP50 color screen expansion module will display Welcome Loading Please wait After a short time the loading screen will disappear and then you can assign the desired feature to the EXP50 color screen expansion module ...

Page 21: ...per can be changed via host phone user interface or web user interface You can use a picture that is stored on your USB flash drives as wallpaper on your phone When you set one of your pictures as the wallpaper the picture will display on the wallpaper list You can only upload custom pictures as wallpaper images via web user interface Uploading the Custom Pictures The color screen expansion module...

Page 22: ... Wallpaper and Wallpaper for expansion modules synchronously Deleting the Custom Pictures You can delete the custom wallpaper via phone user interface or via web user interface To delete the custom picture via phone user interface 1 Press Menu Basic Display EXP Wallpaper 2 Press or or the Switch soft key to select the desired picture 3 Press the Delete soft key to delete the corresponding picture ...

Page 23: ...modules synchronously Changing the Wallpaper You can change the wallpaper via phone user interface or web user interface To change the EXP wallpaper via phone user interface 1 Press Menu Basic Display EXP Wallpaper 2 Press or or the Switch soft key to select the desired wallpaper image 3 Press the Save soft key to accept the change or the Back soft key to cancel If the wallpaper from the USB flash...

Page 24: ...screen saver will automatically start when the IP phone is idle for the preset waiting time The screen saver is used to blank the screen or fill it with moving images or patterns If you connect a color screen expansion module EXP50 to the IP phone the screensaver will start or stop on the phone and EXP50 synchronously Before uploading the custom picture from the USB flash drive please make sure th...

Page 25: ...phone whether to display the time date on the screen saver or not You can configure the screen saver of SIP T54S media IP phone and upload custom pictures to set up a screen saver of your picture via web user interface You can configure the screen saver wait time screen saver type and screen saver display clock via phone user interface or web user interface The SIP T54S media IP phone supports the...

Page 26: ...e via phone user interface 1 Press Menu USB Record Browse Photo 2 Press or or the Switch soft key to select the desired picture 3 Press the Preview soft key 4 Press the Set as soft key and then select Set as screensaver 5 Press the OK soft key to accept the change Note Before uploading the custom picture from the USB flash drive please make sure that the USB flash drive has been connected successf...

Page 27: ...omatically set the built in picture as the screen saver If you select Custom The IP phone will automatically set the custom pictures you upload as the screen saver and display these pictures alternately 5 Press the Save soft key to accept the change or the Back soft key to cancel Screen Saver is configurable via web user interface at the path Settings Preference Power Saving The power saving featu...

Page 28: ...ur and idle timeout minutes settings work only if the power saving feature is enabled Note Enabling the Power Saving To enable the power saving feature via web user interface 1 Click on Settings Power Saving 2 Select Enabled from the pull down list of Power Saving 3 Click Confirm to accept the change Configuring the Office Hour Office Hour specifies the starting time and ending time in the office ...

Page 29: ...nsion Idle TimeOut Configures idle timeout that applies after you use the IP phone for example press a key on the phone or pick up hang up the handset By default the Office Hours Idle TimeOut is much longer than the Off Hours Idle TimeOut If you use the IP phone the idle timeout that applies User Input Extension Idle TimeOut or Office Hours Off Hours Idle TimeOut is the timeout with the highest va...

Page 30: ...r guide Adjusting the Backlight You can adjust the backlight level on the LCD screen of the EXP50 color screen expansion module via the host phone The backlight level on the LCD screen of the EXP50 color screen expansion module is synchronized with that of the host phone To adjust the backlight via phone user interface 1 Press Menu Basic Display Backlight on the host phone 2 Press or or the Switch...

Page 31: ...Expansion Module 23 3 Press the Save soft key to accept the change or the Back soft key to cancel on the host phone For more information on adjusting the backlight on the phone refer to the Backlight section of Yealink phone specific user guide ...

Page 32: ...Yealink EXP50 User Guide 24 ...

Page 33: ...e setting screen of this key Web User Interface To log into the web user interface you should obtain the IP address of the host phone in advance Press the OK key when the phone is idle and the host phone will display the IP address and some other information Enter the IP address e g http 192 168 0 10 or 192 168 0 10 in the address bar of the web browser on your PC The default user name and passwor...

Page 34: ...ld For more information on using the line key refer to Using the Line Key on page 61 Quick access features like intercom and voice mail should be configured on your SIP server in advance to make sure they will work on your phone Contact your system administrator for more information If more than one expansion module is connected select the desired expansion module from the pull down list of Expans...

Page 35: ... down list of Line 5 Click Confirm to accept the change Speed Dial You can configure an Ext key as the speed dial key Then you can quickly dial out the pre defined number using the specified line by pressing the speed dial key To configure an Ext key as the speed dial key 1 Click on Dsskey Ext Key 2 In the desired Ext key field select SpeedDial from the pull down list of Type 3 Enter the desired n...

Page 36: ...er directly by pressing the BLF key For more information on using the Busy Lamp Field refer to Using the Busy Lamp Field on page 62 To configure an Ext key as the BLF key 1 Click on Dsskey Ext Key 2 In the desired Ext key field select BLF from the pull down list of Type 3 Enter the phone number you want to monitor in the Value field e g 1001 4 Enter the desired value in the Label field or leave it...

Page 37: ... system administrator enables BLF List and creates a BLF List URI e g BLFList example com including a list of user1 user2 on the server The BLF List keys on the IP phone can present the status of user1 and user2 Note To configure an Ext key as the BLF list key 1 Click on Dsskey Ext Key 2 In the desired Ext key field select BLF List from the pull down list of Type Before configuring a BLF list key ...

Page 38: ...fined voice mail access code and follow the voice prompt to listen to the voice mails To configure an Ext key as the voice mail key 1 Click on Dsskey Ext Key 2 In the desired Ext key field select Voice Mail from the pull down list of Type 3 Enter the voice mail access code in the Value field e g 4 4 Enter the desired value in the Label field or leave it blank If you leave this field blank the LCD ...

Page 39: ...ng call the call will be answered on your phone To configure an Ext key as the direct pickup key 1 Click on Dsskey Ext Key 2 In the desired Ext key field select Direct Pickup from the pull down list of Type 3 Enter the directed call pickup code followed by the specific extension you want to pick up calls from in the Value field e g 971003 4 Enter the desired value in the Label field or leave it bl...

Page 40: ...press the group pickup key to pick up the incoming call If the numbers within the group receive multiple incoming calls the first incoming call will be picked up To configure an Ext key as the group pickup key 1 Click on Dsskey Ext Key 2 In the desired Ext key field select Group Pickup from the pull down list of Type 3 Enter the group call pickup code in the Value field e g 98 4 Enter the desired ...

Page 41: ...k key Then you can park a call at an extension by pressing the call park key The current call is placed on hold and can be retrieved on another IP phone To configure an Ext key as the call park key 1 Click on Dsskey Ext Key 2 In the desired Ext key field select Call Park from the pull down list of Type 3 Enter the call park feature code in the Value field e g 68 4 Enter the desired value in the La...

Page 42: ...ey To configure an Ext key as the intercom key 1 Click on Dsskey Ext Key 2 In the desired Ext key field select Intercom from the pull down list of Type 3 Enter the remote extension number in the Value field e g 1006 4 Enter the desired value in the Label field or leave it blank If you leave this field blank the LCD screen of the EXP50 color screen expansion module will display the default label In...

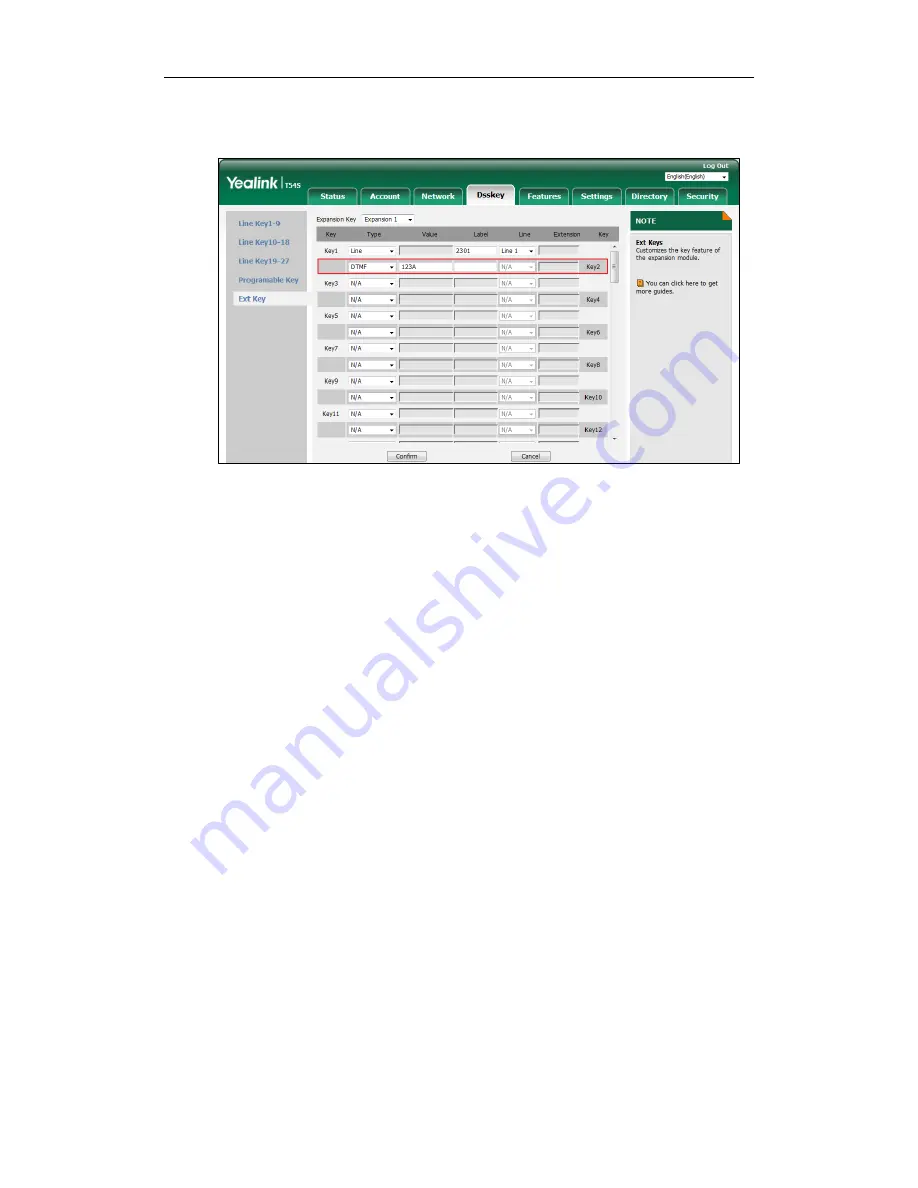
Page 43: ...rmation 7 Click Confirm to accept the change DTMF You can configure an Ext key as the DTMF key If you press the DTMF key during an active call the phone will send the pre defined DTMF digits To configure an Ext key as the DTMF key 1 Click on Dsskey Ext Key 2 In the desired Ext key field select DTMF from the pull down list of Type 3 Enter the desired DTMF digits in the Value field e g 123A 4 Enter ...

Page 44: ...ey when the phone is idle the phone will enter into the dialing screen and display the prefix number which you specified You can enter other digits and then dial out To configure an Ext key as the prefix key 1 Click on Dsskey Ext Key 2 In the desired Ext key field select Prefix from the pull down list of Type 3 Enter the prefix number you want to add before the entered number in the Value field e ...

Page 45: ...5 Click Confirm to accept the change Local Group You can configure an Ext key as the local group key Then you can press the local group key to access the pre defined contact group in the local directory quickly To configure an Ext key as the local group key 1 Click on Dsskey Ext Key 2 In the desired Ext key field select Local Group from the pull down list of Type 3 Enter the desired value in the L...

Page 46: ...e phone will automatically download the corresponding phone book from the server and display the entries of the phone book on the LCD screen of the phone To use this key feature you need to configure remote phonebook on the phone in advance To configure an Ext key as the XML group key 1 Click on Dsskey Ext Key 2 In the desired Ext key field select XML Group from the pull down list of Type 3 Enter ...

Page 47: ...user xml file and then download the xml file to a SIP phone by http https so as to realize a simple browser feature Using XML browser users can achieve the personalized features such as weather information stock information date of inquiry access to address book configuration of the terminal parameters and so on To configure an Ext key as the XML browser key 1 Click on Dsskey Ext Key 2 In the desi...

Page 48: ...directory server that supports LDAP You can configure an Ext key as the LDAP key If you press the LDAP key when the phone is idle the IP phone will download and display the LDAP entries on the LCD screen of the phone For more information on LDAP refer to LDAP Phonebook on Yealink IP Phones Note To configure an Ext key as the LDAP key 1 Click on Dsskey Ext Key 2 In the desired Ext key field select ...

Page 49: ... press the conference key to invite a third party to join a conference To configure an Ext key as the conference key 1 Click on Dsskey Ext Key 2 In the desired Ext key field select Conference from the pull down list of Type 3 Enter the phone number or extension of the destination party in the Value field or leave it blank If a phone number is configured you can dial out the number by pressing the ...

Page 50: ...ter the setting screen of the call forward feature When the phone receives an incoming call you can press the forward key to forward the incoming call to the pre defined number if configured To configure an Ext key as the forward key 1 Click on Dsskey Ext Key 2 In the desired Ext key field select Forward from the pull down list of Type 3 Enter the destination number you want to forward the incomin...

Page 51: ...igure an Ext key as the transfer key Then you can perform a Blind Semi Attended or Attended Transfer by pressing the transfer key during a call To configure an Ext key as the transfer key 1 Click on Dsskey Ext Key 2 In the desired Ext key field select Transfer from the pull down list of Type 3 Enter the phone number you want to transfer the call to in the Value field or leave it blank 4 Enter the ...

Page 52: ... Click Confirm to accept the change Hold You can configure an Ext key as the hold key You can hold a call or retrieve a held call by pressing the hold key To configure an Ext key as the hold key 1 Click on Dsskey Ext Key 2 In the desired Ext key field select Hold from the pull down list of Type 3 Enter the desired value in the Label field or leave it blank ...

Page 53: ...phone press the DND key when the phone is idle to activate or deactivate DND on a per phone basis If the DND key mode is configured to custom press the DND key when the phone is idle to enter the DND setting screen For more information on DND mode refer to the DND section of Yealink phone specific user guide To configure an Ext key as the DND key 1 Click on Dsskey Ext Key 2 In the desired Ext key ...

Page 54: ...nge ReCall You can configure an Ext key as the ReCall key Then you can place a call back to the caller of the last incoming call by pressing the ReCall key when the phone is idle To configure an Ext key as the ReCall key 1 Click on Dsskey Ext Key 2 In the desired Ext key field select ReCall from the pull down list of Type 3 Enter the desired value in the Label field or leave it blank ...

Page 55: ...eCall 4 Click Confirm to accept the change SMS You can configure an Ext key as the SMS key Then you can access the text message screen more quickly and easily by pressing the SMS key To configure an Ext key as the SMS key 1 Click on Dsskey Ext Key 2 In the desired Ext key field select SMS from the pull down list of Type 3 Enter the desired value in the Label field or leave it blank ...

Page 56: ...erver a SIP INFO message containing a specific header URL record is for the phone to send an HTTP URL to the server The server processes these messages and decides to start or stop a recording You can configure an Ext key as the record key Then you can record calls using the record method by pressing the record key For more information on URL record refer to URL Record on page 49 To configure an E...

Page 57: ...ange URL Record You can configure an Ext key as the URL record key Then you can record calls using the URL record method by pressing the call record key To configure an Ext key as the URL record key 1 Click on Dsskey Ext Key 2 In the desired Ext key field select URL Record from the pull down list of Type 3 Enter the URL in the Value field e g http 10 2 1 65 4 Enter the desired value in the Label f...

Page 58: ... to the pre configured multicast address es without involving SIP signaling To configure an Ext key as the multicast paging key 1 Click on Dsskey Ext Key 2 In the desired Ext key field select Paging from the pull down list of Type 3 Enter the multicast IP address and port number in the Value field e g 224 5 6 20 10008 The valid multicast IP addresses range from 224 0 0 0 to 239 255 255 255 4 Enter...

Page 59: ...tening key It is suitable for the group conversation which has more than one person at one side You are able to speak and listen using the handset headset meanwhile the others nearby can only listen using the speaker You can get back to the previous mode by pressing the group listening key again To configure an Ext key as the group listening key 1 Click on Dsskey Ext Key 2 In the desired Ext key f...

Page 60: ...ange Private Hold You can configure an Ext key as the private hold key Then you can private hold a shared call by pressing the Private hold key when using Shared Call Appearance To configure an Ext key as the private hold key 1 Click on Dsskey Ext Key 2 In the desired Ext key field select Private Hold from the pull down list of Type 3 Enter the desired value in the Label field or leave it blank ...

Page 61: ...r a very long time which means actual personal offices would be often vacant consuming valuable space and resources Hot Desking is a phone feature that allows users to login or logout an IP phone You can configure an Ext key as the hot desking key Press the hot desking key to delete all accounts on the IP phone and then register your account on line 1 To configure an Ext key as the hot desking key...

Page 62: ...alk to a specific person but who require assistance from any of multiple persons at the earliest opportunity The ACD feature on the IP phone allows the ACD system to distribute calls from large volumes of incoming calls to the registered IP phone users To use the ACD feature you should configure an Ext key as the ACD key in advance You can press the ACD key to log in the ACD system To configure an...

Page 63: ... the change Zero Touch You can configure an Ext key as the zero touch key Then you can configure auto provision and network parameters quickly by pressing the zero touch key when the phone is idle To configure an Ext key as the zero touch key 1 Click on Dsskey Ext Key 2 In the desired Ext key field select Zero Touch from the pull down list of Type 3 Enter the desired value in the Label field or le...

Page 64: ...n configure an Ext key as the URL key If you press the URL key the phone will send HTTP requests to a web server To configure an Ext key as the URL key 1 Click on Dsskey Ext Key 2 In the desired Ext key field select URL from the pull down list of Type 3 Enter the URL of the web server you want to access in the Value field e g http 192 168 0 1 4 Enter the desired value in the Label field or leave i...

Page 65: ...t the change Phone Lock You can configure an Ext key as the phone lock key Then you can press the phone lock key to immediately lock the keypad of your phone instead of long pressing the pound key To configure an Ext key as the phone lock key 1 Click on Dsskey Ext Key 2 In the desired Ext key field select Phone Lock from the pull down list of Type 3 Enter the desired value in the Label field or le...

Page 66: ...s the retrieve park key You can press the retrieve park key to retrieve a parked call To configure an Ext key as the retrieve park key 1 Click on Dsskey Ext Key 2 In the desired Ext key field select Retrieve Park from the pull down list of Type 3 Enter the desired value in the Label field or leave it blank If you leave this field blank the LCD screen of the EXP50 color screen expansion module will...

Page 67: ... press the directory key to quickly access the local directory call history LDAP and remote phone book To configure an Ext key as the directory key 1 Click on Dsskey Ext Key 2 In the desired Ext key field select Directory from the pull down list of Type 3 Enter the desired value in the Label field or leave it blank If you leave this field blank the LCD screen of the EXP50 color screen expansion mo...

Page 68: ...Yealink EXP50 User Guide 60 4 Click Confirm to accept the change ...

Page 69: ...en expansion module Incoming calls to the line can be distributed evenly among the available line keys both on the host phone and the connected EXP50 color screen expansion module Each line key on the connected EXP50 color screen expansion module can only handle one call For more information on configuring an Ext key as the line key refer to Line on page 26 You can use a line key to do the followi...

Page 70: ...n the monitored line is in use The BLF key LED illuminates solid green when the monitored line is idle For more information on BLF key LED indications refer to LED Instructions on page 8 You can press a BLF key to dial out the monitored phone number when the monitored line is idle and pick up calls that are received on the monitored line When there is an active call on the host phone you can trans...

Page 71: ... phone prompts the following warning 3 Press the OK soft key on the host phone The LCD screen of the host phone prompts Welcom Initializing Please wait The host phone and the EXP50 color screen expansion module will be reset to factory settings sucessfully after startup Note Reset of the EXP50 color screen expansion module can lead to resetting the host phone And then all custom settings on the ho...

Reviews: