

Registering the Repeater
www.yealink.com
To register a repeater automatically:
The repeater can be registered to a base station in two ways: Auto Registration and
Manual Registration. Before registering the repeater, you need to enable the repeater
mode on the handset. For more information on how to enable the repeater mode, refer
to
Yealink W52P User Guide
.
Auto Registration
Using the auto registration method, the repeater can be registered to a base station.
1. Switch off the repeater (disconnect the power adapter).
3. Switch on the repeater (connect the power adapter).
Manual Registration
The repeater, base station and handset must be accessible before performing the
registration. If you want to register more than one repeater, the registration must be
performed separately for each repeater.
The LED indicator on the repeater flashes. After a short while, the LED indicator stays on
permanently indicating that registration is completed, and the repeater is ready for use.
The first LED on the base station flashes after the registration is completed. You can
press the paging key to cancel the flash.
2. Set the base station in registration mode.
Long press the paging key on the base station till the first LED flashes.
To register a repeater manually:
Note:
If the registration is not successful, the LED indicator will flash continuously. In this case,
repeat the above procedures.
Note:
Auto
Registration cannot be performed if the repeater is already registered to one base
station. In this case, de-register the repeater before attempting auto registration. For more
information, refer to ”De-registration”.
DECT Repeater RT10 User Guide
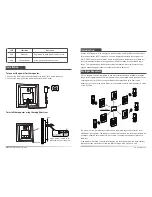
Placement
5. Assign a repeater number.
a) Press #*9 and the off-hook key on the handset. The LED indicator illuminates.
b) Press a number between 2 and 7. When the repeater has accepted the chosen
number, the LED indicator will flash a corresponding number of times.
If you miss the confirmation flash, press the number again.
c) Accept the registration by pressing the * key, and then press the on-hook key.
Note:
Each number can be only assigned once when using more than one repeater on a base
station. Repeater number and handset number are independent of each other.
De-registration
1. Switch off the repeater (disconnect the power adapter).
2. Switch it on for 1 to 5 seconds and switch it off again.
3. Switch it on for 25 to 35 seconds and switch it off again.
Now the repeater is ready for a new auto registration.
To achieve optimum performance for the repeater, it is important to find a good location.
Here are a few tips for placing repeaters:
Choose a rasied position for both the base station and repeater wherever possible.
When positioning the repeater, avoid obstacles that can interfere with radio
transmission such as thick wall and metal structures that may be in the coverage area
between the base station and repeater.
Avoid interference from other electrical appliances such as micro-wave ovens, Hi-Fi
equipment, computers etc.
Keep a minimum of 10 meters between multiple repeaters to avoid coverage areas
overlapping.
The repeater is now automatically restarted: the LED indicator goes off for 2 seconds,
flashes for a brief moment and then stays illuminated.
The registration of the repeater is completed. You can now disconnect the power
adapter and move the repeater to the selected location (disconnecting the power will
not clear the registration).
You must now assign a repeater number to the repeater (choose from 2 to 7, for up to
6 repeaters):
If you want to register the repeater to another base station using the auto registration
method, de-register the repeater beforehand as described below:
Note:
The LED indicator remains on constantly after the repeater has been switched on. If the LED
flashes, the repeater is too far away from the base station or reception is hindered by obstacles.
1. Set the repeater in registration mode.
The LED indicator on the repeater flashes slowly.
2. Set the base station in registration mode.
Long press the paging key on the base station till the first LED flashes.
Switch on the repeater for 1-5 seconds and then switch it off. Switch it on once more
and leave it there.
You now have five minutes to complete the registration. If the registration is not
completed within this period, you must start over again.
3. The LED indicator on the repeater flashes.
If the LED flashes fast without interruptions, go to step 5. If the LED flashes fast with
interruptions, go to step 4.
4. Registration of handset.
If the password of the base station has been changed, reset it to “0000”. You must
re-register the handset even if the handset used was already registered to the base
station. Now the LED indicator flashes fast without interruptions.


