


13
BLADE MAINTENANCE
For best results, the mower blade must be kept sharp. Always
replace a bent or damaged blade.
Removing the blade
1. Disconnect spark plug wire from spark plug and place wire
where it cannot come in contact with plug.
2. Turn lawn mower on its right side. (Make sure air
fi
lter and
carburetor are up).
3. Use a wood block between blade and mower deck to
prevent blade from turning when removing blade bolts.
NOTE:
Protect your hands with gloves and/or wrap the blade
with a heavy cloth.
4. Remove blade bolts by turning counter-clockwise with a
11/16” (17mm) wrench or socket.
Installing the blade
1. Position the blade with the bent corner of the blade (sail)
pointing towards the deck. Install the blade bolts.
Important:
Blade bolts are heat treated. If the bolts are worn
or damaged use only bolts available from Ybravo.com
2. Use a block of wood between blade and mower deck and
tighten the blade bolts. Always use a torque wrench.
The recommended tightening torque is 30 to 35 ft. lbs.
(40 to 45 Nm)
WARNING
Use only a replacement blade approved by Ybravo.
com. Using a blade not approved by Ybravo.com is
hazardous. It can damage your mower and cause
serious personal injury.
A worn or damaged blade can break and parts of the
blade could be thrown into the operators or bystanders
area, resulting in serious personal injury or death.
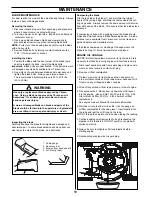
Inspecting the blade
Carefully examine the blade for straightness, damage and
abnormal wear. In some areas abrasive sand and dust can
wear away the metal of the blade - see illustration.
Sharpening the blade
File the top side of the blade (1) and maintain the original
angle of the cutting edge. Maintain the radius where the cut-
ting edge ends. Always remove the same amount of material
from both ends of the blade. This ensures that the blade stays
balanced.
If sharpening is done with a grinding stone the blade should
always be balanced using a blade balancing device. A blade
balance tool is available from Ybravo.com or most lawn and
garden dealers, and hardware stores.
If the blade shows wear or cracking at the edge where the
blade is bent up (3) it must immediately be replaced.
1. Cutting edge
2. Square corner
3. Erosion from sand and dirt
4. Air lift wing (sail)
1
2
3
4
1
2
3
4
1
3
4
MAINTENANCE
ENGINE OIL CHANGE
NOTICE: Before tipping lawn mower on its right side to drain
oil, empty fuel tank by running engine until fuel tank is empty.
1. Disconnect spark plug wire from spark plug and place wire
where it cannot come in contact with plug.
2. Remove oil
fi
ller cap/dipstick.
3. Tip lawn mower on its right side as shown and drain oil
into a suitable container. Rock lawn mower back and forth
to remove any oil trapped inside of engine.
4. Wipe off any spilled oil from lawn mower or side of engine.
5. Fill engine with oil. Slowly pour oil down the oil
fi
ll spout
into the engine. Use an SAE 10W-30 oil (22 Fl.Oz - 0.65
Liter without oil
fi
lter, 29 Fl.Oz - 0.85 Liter with oil
fi
lter
replacement).
See engine Owner’s Manual for complete information.
6. Wait one minute to allow oil to settle. Use the gauge on
oil
fi
ller cap/dipstick for checking level. Insert dipstick into
the tube and rest the oil
fi
ll cap on the tube.
DO NOT thread the cap into the tube when taking the reading.
7. Continue adding small amounts of oil and rechecking the
dipstick until it reads full. DO NOT over
fi
ll, or engine will
smoke on startup.
8. Always be sure to retighten oil
fi
ll cap/dipstick before
starting engine.
9. Reconnect spark plug wire to spark plug.


