background image

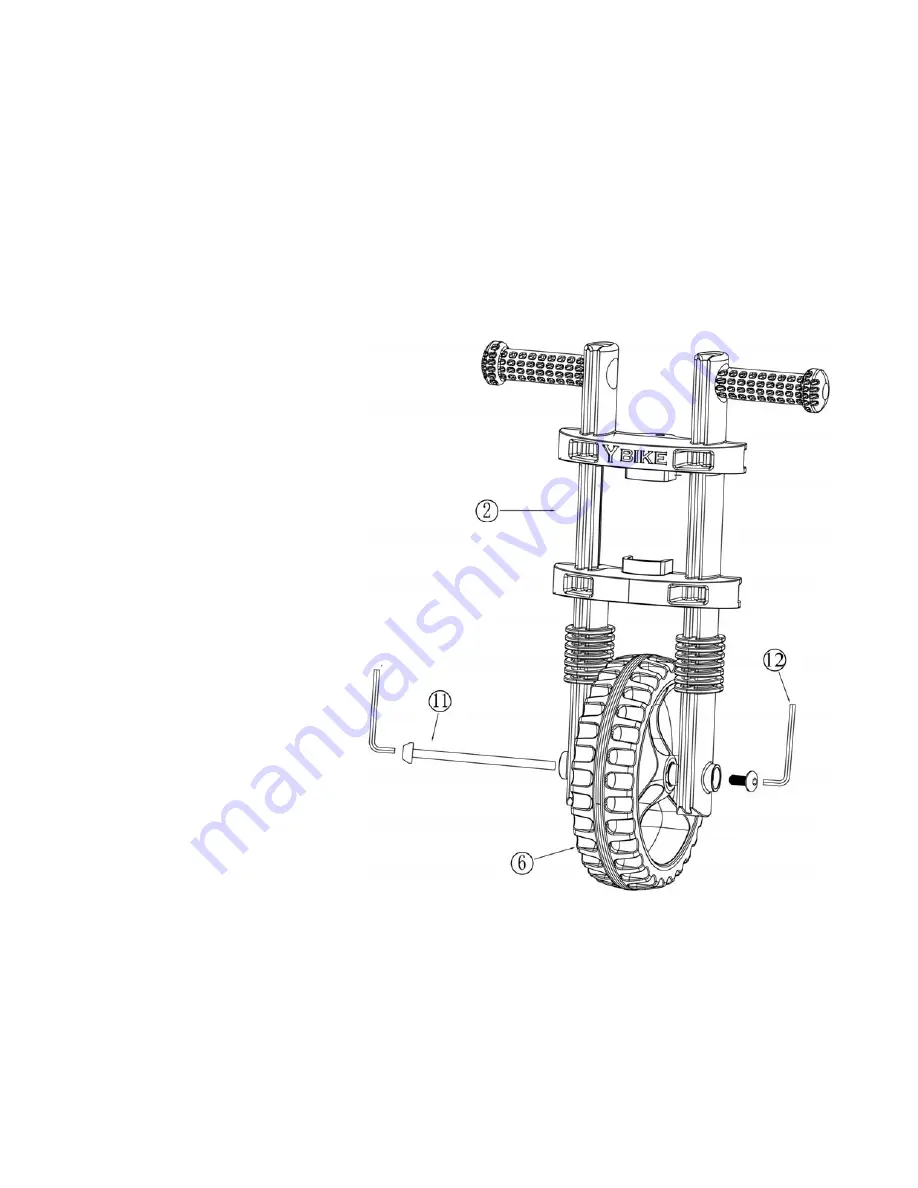
2. Front Wheel Assembly 


Assemble a wheel (No.6) onto the Handle 

Bar/fork (No.2) so that the holes provided in 

the fork and wheel align perfectly.  


Insert long thick bolt (No.11) through the fork 

legs and wheel.   


Securely fasten the bolt and screw using the  

Allen keys. 


(WARNING: Make sure screw sets  

are tightened and not loose)   


Summary of Contents for Kicker

Page 1: ...OWNER S MANUAL Kicker...

Page 2: ...and tightened to prevent accidents Always wear proper protective gear such as a helmet elbow and kneepads as well as appropriate clothing such as a long sleeve shirt gloves long pants and trainers or...

Page 3: ...e riding ALWAYS follow and obey the local traffic laws for a safe ride Never allow more than one child to ride on Kicker at any time Not to be used by children older than 4 years or weighing more than...

Page 4: ...her all parts and components are included No NAME 1 DECK 2 HANDLE BAR FORK 3 FRAME 4 HANDLE BAR PLASTIC CAPS 5 BOLT PROTECTION CAPS 6 WHEELS X 2 7 LONG BOLT SCREW 8 SHORT BOLTS SCREW X2 9 SHORT BOLT S...

Page 5: ...No 3 Now insert this into the c brackets on the handlebar fork frame No 2 as seen in picture A Insert the long bolt No 7 through the handle bar the plastic caps and frame as in picture B Securely fast...

Page 6: ...le Bar fork No 2 so that the holes provided in the fork and wheel align perfectly Insert long thick bolt No 11 through the fork legs and wheel Securely fasten the bolt and screw using the Allen keys W...

Page 7: ...perfectly Insert the bolt protection caps No 5 onto the medium thick bolt No 10 and bolt screw Now insert the Medium thick bolt with bolt protection caps through the deck legs and wheel Securely fast...

Page 8: ...gh the openings provided in the frame and front of deck Securely fasten the bolt and screw using the Allen keys Insert short bolts No 8 through deck and frame through the holes provided Securely faste...

Page 9: ...regularly after playing Use soap water to wipe the wheels Dry the wheels thoroughly after cleaning 2 Clean handle and deck regularly 3 Regularly check to see if all parts are securely fastened 4 Chec...

Page 10: ...Check that the wheels can spin smoothly and each part is securely fixed 4 Finally after checking the above points you can now start to ride WARNING This product must be assembled by an adult Read the...

Reviews: