YATO YT-83016 Original Instructions Manual Download Page 9

9

GB

O R I G I N A L   I N S T R U C T I O N S

Do not ever start the engine while charging the accumulator.

Before each use check the conditions of the rectifier, including the conditions of the power cord and the charging conductors. 

Should any damage be detected, stop using the rectifier. Damaged cables and conductors must be replaced with new ones in a 

professional workshop.

Before any maintenance of the rectifier is executed, make sure the plug of the power cord has been disconnected from power 

supply socket.

The rectifier must be stored away from unauthorised persons, particularly children. Also during work make sure the rectifier is 

placed outside the reach of unauthorised persons, particularly children.

Before connecting the terminals of the rectifier, make sure the terminals of the accumulator are clean and free from corrosion. 

Provide the best possible electric contact between the terminal of the accumulator and the terminal of the rectifier.

Do not ever charge a frozen accumulator. Before you commence charging, move the accumulator to a place in which the electro-

lyte may totally defrost. Do not heat accumulators in order to accelerate defrosting.

Preclude any leakage from accumulators. Any leakage from the accumulator on the rectifier may cause a short-circuit and thus an 

electric shock, which may be dangerous for health and life.  

OPERATION OF THE RECTIFIER

Preparation of the battery for charging

Get acquainted with the charging instructions provided along with the battery and observe them. In the case of the so called „wet” 

acid-lead batteries” it is necessary to check the level of electrolyte and, if required, replenish it with distilled water to the level 

indicated in the documentation of the battery. While replenishing the level of electrolyte, observe strictly the recommendations 

indicated in the documentation of the battery. 

The rectifier has been designed uniquely for charging the so called „wet”, gel or AGM acid-lead batteries. 

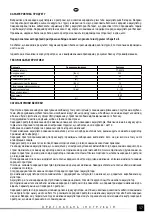
The rectifier is equipped with exchangeable connections: 

- alligator clamps – to charge most batteries,

- eye clamps – to fix the terminals of the rectifier to the battery terminals,

- vehicle electrical installation socket – to feed devices equipped with an adequate plug,

- vehicle electrical installation plug – to charge batteries through vehicle electrical installation socket or to maintain the power 

supply in the vehicle electrical installation once the battery has been dismounted. Before operation in this mode commences, it is 

necessary to get acquainted with the documentation of the vehicle.

Connect the selected terminals to the socket of the rectifier. The plug of the terminals and the socket of the rectifier have a protru-

sion permitting a correct connection.  

Connect the terminals of the rectifier to the terminals of the battery, make sure the terminal of the rectifier marked with a „+” is 

connected to the terminal of the battery marked with a „+”, and the terminal of the rectifier marked with a „-” is connected to the 

terminal of the battery marked with a „-”. 

Connect the plug of the power cord to the power supply socket. For a moment all the diodes of the control panel will go on, and 

then only the diode below the power supply symbol should remain lit. 

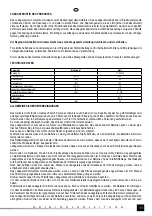
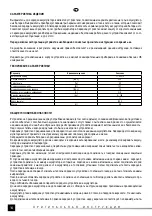
Using the „MODE” switch, select the required mode of operation, which is confirmed with a diode over the corresponding symbol.

Attention! Before the charging parameters are selected, get acquainted with the indications of the manufacturer of the battery.

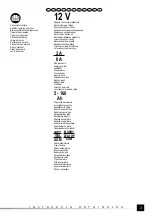
Motorcycle symbol - to charge batteries whose capacity is lower than 40 Ah. Rated voltage 14.4 V; rated current 2.0 A.

Car symbol – to charge batteries whose capacity is lower than 160 Ah. Rated voltage 14.4 V; rated current 8.0 A.

Snowflake symbol – this mode is recommended for charging batteries in low temperatures. The mode of operation recommended 

to charge in temperatures below +5°C and to charge many AGM batteries. Rated voltage 14.7 V; rated current 8.0 A. It is not 

recommended to use this mode of operation to charge batteries in temperatures exc 5°C.  

Key symbol – desulfurization of batteries. When the rectifier detects the rated voltage of the battery is lower than 10.5 V, it starts 

desulfurization of the battery. The voltage on the terminals of the battery will be automatically increased to 17 V. Desulfurization 

may last between 0.5 to 2 hours. If the process fails, it will be interrupted and the diode indicating failure will go on – the exclama-

tion mark.

Vehicle electrical installation symbol - the mode of operation with the vehicle electrical installation plug connected. Rated voltage 

13.5 V; rated current 5.0 A. Maximum output power 72 W.

Explanation of the indicator lights 

Power supply symbol – if the diode is lit, the rectifier is connected to the power supply network.

Exclamation mark – if the diode is lit, the rectifier is functioning incorrectly (short circuit, incorrect polarization or damaged bat-

tery)

Symbol of the battery (half full) – indicates the process of charging of the battery

Symbol of the battery (full) – indicates the battery is completely charged

Once charging has concluded, take the power cord out of the socket and then disconnect the terminals of the charging cables.

Summary of Contents for YT-83016

Page 1: ...CTRONIC BATTERY CHARGER ELEKTRONISCHES LADEGER T ELEKTRONINIS KROVIKLIS ELEKTRONISKAIS L D T JS ELEKTRONICK NAB JE KA ELEKTRONICK NAB JA KA ELEKTRONIKUS AKKUMUL TORT LT REDRESOR ELECTRIC RECTIFICADOR...

Page 2: ...nel SK CZ 1 l d t js 2 elektr bas vads ar kontaktdak u 3 l d anas vads ar spaili 4 vad bas panelis LV 1 2 3 4 1 kroviklis 2 maitinimo laidas su ky tuku 3 krovimo laidas su gnybtu 4 valdymo panelis UA...

Page 3: ...ccumulator s capacity Kapazit t der Batterie Akumuliatoriaus talpa Akumulatora tilpums Kapacita akumul toru Kapacita akumul tora Az akkumul tor kapacit sa Capacitate acumulator Capacidad del acumulado...

Page 4: ...ho sb ru opot ebovan ch elektrick ch a elektronick ch za zen Opot ebovan elektrick za zen jsou zdrojem druhotn ch surovin je zak z no vyhazovat je do n dob na komun ln odpad jeliko obsahuj l tky nebe...

Page 5: ...enie elektrycznego niebezpiecznego dla zdrowia i ycia Zabronione jest adowanie baterii nie przeznaczonych do ponownego adowania Podczas adowania akumulator musi znajdowa si w dobrze wentylowanym miejs...

Page 6: ...akumulatora przez gniazdo samochodowej instalacji elek trycznej lub podtrzymanie zasilania w samochodowej instalacji elektrycznej po wymontowaniu akumulatora Przed rozpocz ciem pracy w tym trybie nal...

Page 7: ...ow nale y czy ci za pomoc mi kkiej ciereczki lub strumieniem spr onego powietrza o ci nieniu nie wi kszym ni 0 3 MPa Przed i po ka dym u yciu nale y sprawdzi stan zacisk w przewod w Nale y je oczy ci...

Page 8: ...mended to charge the accumulator at a room temperature The rectifier has been designed to be operated in interiors and it is prohibited to expose it to humidity including atmospheric precipitation Ele...

Page 9: ...it is necessary to get acquainted with the documentation of the vehicle Connect the selected terminals to the socket of the rectifier The plug of the terminals and the socket of the rectifier have a p...

Page 10: ...he conditions of the terminals of the conductors before and after each use Remove any signs of corrosion which might disturb the flow of the electric current Avoid contamination of the terminals with...

Page 11: ...lag f hren der gesundheitsgef hrdend und lebensbedrohlich ist Das Laden von Batterien die nicht zum Nachladen vorgesehen sind ist verboten W hrend des Ladens muss sich die Batterie an einer gut bel ft...

Page 12: ...richten YT 83016 Das Ladeger t dient nur zum Laden der S ure Blei Akkumulatoren der sog nassen Gelatineakkus und AGM Das Ladeger t wurde mit austauschbaren Verbindungselementen ausger stet Krokodilkl...

Page 13: ...deutet den Ladeprozess des Akkumulators Symbol des Akkumulators voll gef llt bedeutet dass der Akku voll aufgeladen ist Nach Beendigung des Ladeprozesses muss man zuerst den Stecker des Stromversorgun...

Page 14: ...14 RUS YT 83016 a c 230 50 127 d c 12 2 8 5 160 II IPX0 0 8 O I...

Page 15: ...15 RUS AGM MODE 40 14 4 2 0 160 14 4 8 0 A 5 C AGM 14 7 8 0 5 C...

Page 16: ...16 RUS 10 5 17 0 5 2 13 5 5 0 A 72 0 3 M a...

Page 17: ...17 UA YT 83016 a c 230 50 127 d c 12 2 8 5 160 II IPX0 0 8 A...

Page 18: ...18 UA AGM MODE 40 14 4 2 0 160 14 4 8 0 A 5 C AGM 14 7 8 0 5 C 10 5 17 0 5 2 13 5 5 0 A 72...

Page 19: ...19 UA 0 3 M a...

Page 20: ...mas dr gm s bei tuo labiau atmosferini krituli poveik yra draud iamas krovikliai su I klas s elektros izoliacija turi b ti jungiami su tinklo rozet mis turin iomis apsaugin laid Akumuliatori esan i au...

Page 21: ...ina tik taisyklingo sujungimo galimyb Prijungti lygintuvo gnybtus prie akumuliatoriaus poli sitikinti kad lygintuvo gnybtas pa enklintas enklu yra sujungtas su akumuliatoriaus poliumi pa ym tu enklu b...

Page 22: ...Prie ir po kiekvieno panaudojimo reikia patikrinti gnybt ir laid b kl Gnybtus reikia nuvalyti nuo galim korozijos p dsak nes jos gali sutrikdyti elektros srov s tek jim Reikia vengti gnybt suter imo e...

Page 23: ...n atmosf risko nokri u ietekmes L d t jus ar elektrisk s izol cijas I klasi dr kst piesl gt tikai pie ligzd m apg d t m ar aizsardz bas vadu Gad jum kad tiek uzl d ti akumulatori automa nas instal cij...

Page 24: ...na diode zem baro anas simbola Ar MODE p rsl dz ju uzst d t attiec gu darba re mu ko apliecin s diode zem attiec ga simbola Uzman bu Pirms l d anas parametru izv l anas iepaz ties ar akumulatora ra ot...

Page 25: ...olace I je dovoleno p ipojit v hradn k z suvk m vybaven m ochrann m vodi em V p pad nab jen akumul toru p mo ve vozidle p ipojen ho k elektrick instalaci automobilu je t eba svorku nab je ky p ipojit...

Page 26: ...m nap jen P ep na MODE p epn te na po adovan provozn re im Zvolen provozn re im se potvrd rozsv cen m diody nad p slu n m symbolem Upozorn n P ed volbou parametr nab jen je t eba se sezn mit s pokyny...

Page 27: ...nom mieste odpor a sa nab ja akumul tor pri izbovej teplo te Nab ja ka je ur en na pou vanie vn tri miestnost a je zak zan vystavova ju p sobeniu vlhkosti vr tane atmosf rick ch zr ok Nab ja ky s trie...

Page 28: ...eniu Svorky nab ja ky pripojte ku p lom akumul tora a skontrolujte i je svorka nab ja ky ozna en pripojen k p lu akumul tora ozna en mu a svorka nab ja ky ozna en k p lu akumul tora ozna en mu Pripojt...

Page 29: ...nedo lo k zne isteniu svoriek elektrolytom z akumul tora Ten ur ch uje proces kor zie Zariadenie skladujte na suchom a chladnom mieste ktor je nepr stupn nepovolan m osob m a najm de om Po as skladov...

Page 30: ...zni Az akkumul tort lt belt ri haszn latra k sz lt tilos kitenni nedvess gnek bele rtve ebbe a l gk ri csapad kokat is Az akkumul tort lt I szigetel si oszt ly v d ramk rrel ell tott dugaszol aljzatba...

Page 31: ...t dugaszol aljzat ba A csatlakoz k dugaszai s a t lt dugaszol aljzata megfelel b tyk kkel van ell tva a helyes csatlakoztat s rdek ben Csatlakoztassa az akkumul tor sarkaihoz az akkumul tort lt kapcsa...

Page 32: ...n lat el tt s ut n ellen rizni kell a vezet kek csatlakoz inak llapot t Meg kell ket tiszt tani a korr zi nyoma it l ami akad lyozhatja az elektromos ram foly s t El kell ker lni hogy a csatlakoz k be...

Page 33: ...care nu sunt re nc rcabile n timpul nc rc rii acumulatorul trebuie s fie situat ntr un loc bine ventilat se recomand nc rcarea acumulatorului la tempe ratura camerei Redresorul este conceput pentru a...

Page 34: ...umulatorului nainte de a folosi acest mod trebuie s citi i documenta ia ma inii Cupla i tipul selectat de cleme la soclul redresorului techerul clemei i soclul redresorului sunt dotate cu proeminen e...

Page 35: ...lizare trebuie s verifica i starea bornelor de pe cabluri Trebuie s le cur a i de toate urmele de coro ziune care ar putea mpiedica fluxul de curent electric Trebuie s evita i murd rirea bornelor cu e...

Page 36: ...as no recargables Durante la carga el acumulador debe estar colocado en un lugar adecuadamente ventilado se recomienda cargar el acumulador en la temperatura del ambiente El rectificador ha sido dise...

Page 37: ...e la instalaci n el ctrica de coche para alimentar los dispositivos con una clavija adecuada clavija de la instalaci n el ctrica de coche para cargar bater as a trav s del enchufe de la instalaci n el...

Page 38: ...nchufe de la red y luego los bornes de los cables de carga MANTENIMIENTO DEL DISPOSITIVO El dispositivo no requiere de ning n mantenimiento especial La caja debe limpiarse con un trapo suave o la corr...

Page 39: ...I N S T R U K C J A O R Y G I N A L N A 39...

Page 40: ...I N S T R U K C J A O R Y G I N A L N A 40...

Reviews: