Shanghai
Yatai
–
NTT-2000(N)
4.1
The order of calling out the various functions
After the instrument is power on, the upper row displays InP and the lower row displays the calibration mark of the
sensor to express the input type. 4 seconds later, the upper row displays the upper limit of the measuring range and the
lower row displays the lower limit of the measuring range then the measurement range is determined. Again after 4
seconds, the upper row displays the measuring value and the lower row displays the setting value. And then the system
enters its normal working state.
Setting of the temperature: Push the key X, the upper row displays the value of SP and push
or
key to make the
lower row display its needed value. And push the
key to promote the system to the ST setting mode.
Setting of Timing: The upper row displays ST and push
or
key to make the lower row display the needed value.
Again push the
key to promote the system return to its standard mode.
Setting of the control parameters: Push the
key above 4 seconds, the upper row shows the prompt code of the
parameter (detail can see the schedule table of the control parameters) and than push
or
key to make the lower row
display its needed value. Continue push the
key can make the upper row display the prompt code of each of another
parameter in turn. Again push
or
Key to update the value of parameter to its needed value, and again push the X
key above 4 seconds, the system returns back to its standard mode. (If no key has pushed down, after 1 minute the
system will come to its standard mode).
If under the red display the
“
ooo
”
is appeared, the thermocouple is in reverse connection, else above the red display
the
“
ooo
”
is appeared
,
the thermocouple is in open current or the measuring temperature exceeds the measurement
range.
The Auto-tuning function of the instrument
’
s parameters: After 20 seconds of pushing down the
key, the AT
indicator is twinkle and the controller begins to start its Auto-tuning. The temperature goes through one to two times of
oscillation and the AT indicator extinguishes. The instrument will control the process with the updated parameters,
which will be permanently persevered.
The switch function of Celsius and Fahrenheit temperature: Hold down the key
or
simultaneously, the upper
row shows LK, again push the X key to prompt the upper row appears Sn and lower row appears K-C (Celsius
temperature) or K-F (Fahrenheit temperature) and push
or
key to carry out the transform of the scale of
temperature.
Selection of the measurement range: Hold down the key
or
simultaneously, the upper row shows LK, again
push the X key to prompt the upper row appears rL and lower row appears 0, and again push
key to make the upper
row appear rH, at that time the rower row appears the needed measurement range.
Selection of the Time Mode: Hold down the key
or
simultaneously, the upper row shows LK, set rower row as
88, then push
key to make the upper row appear M-S, at that time set the rower row:
“
0
”
as Second,
“
1
”
as minute.
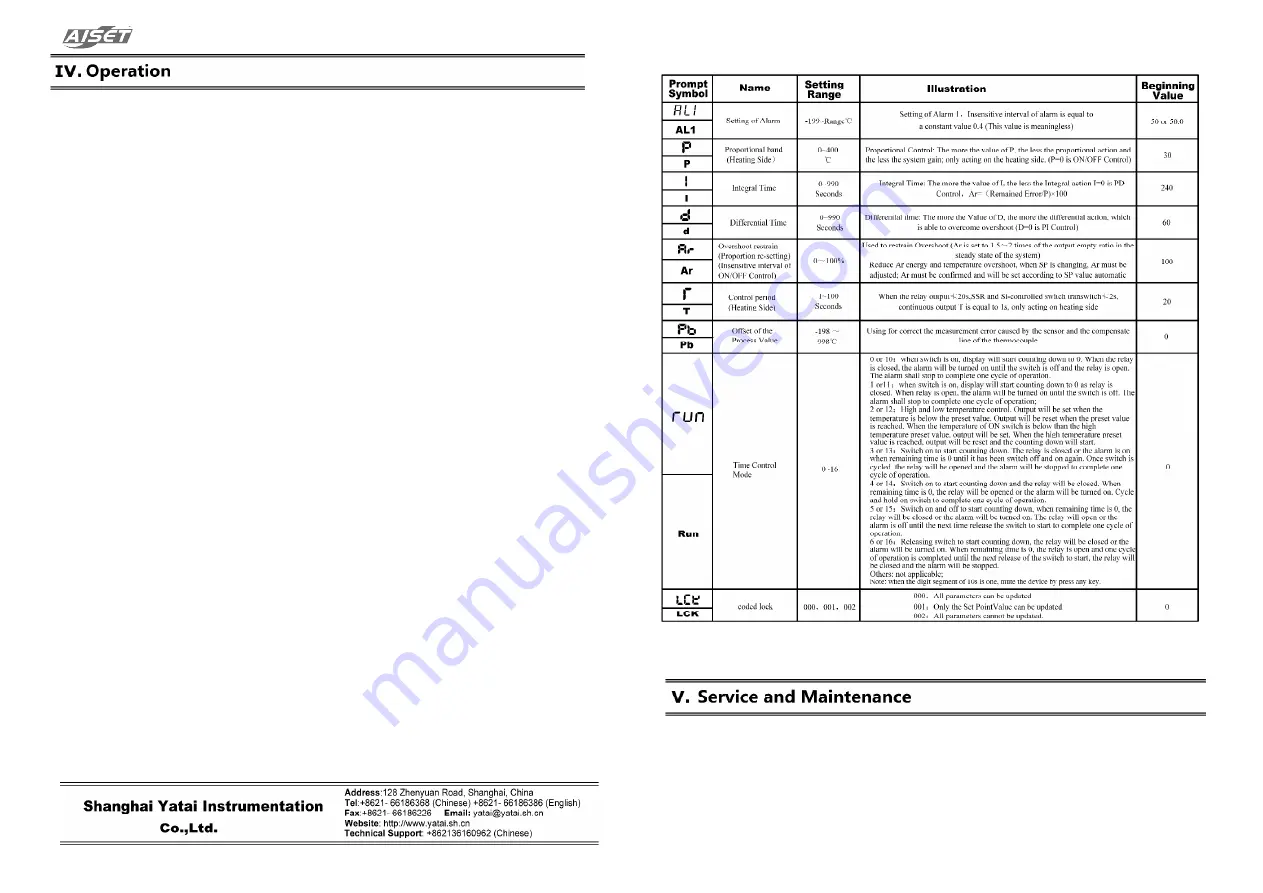
4.2 The schedule table of the control parameter
Notice:
Change of each function parameter in the table may alter the control effect of the system.
This controller is under warranty for 12 months since the day of purchase (the warranty only stands if the problem is
caused by the malfunction due to manufacturing). Any repairment for damages caused by improper use of the controller
will be charged. The controller is provided with lifetime maintenance and repair on cost.
Please keep the controller in a dry place with air and NO corrosive gas.


