background image

9.2  Notes on Maintenance Procedures

9-11

9.2.4

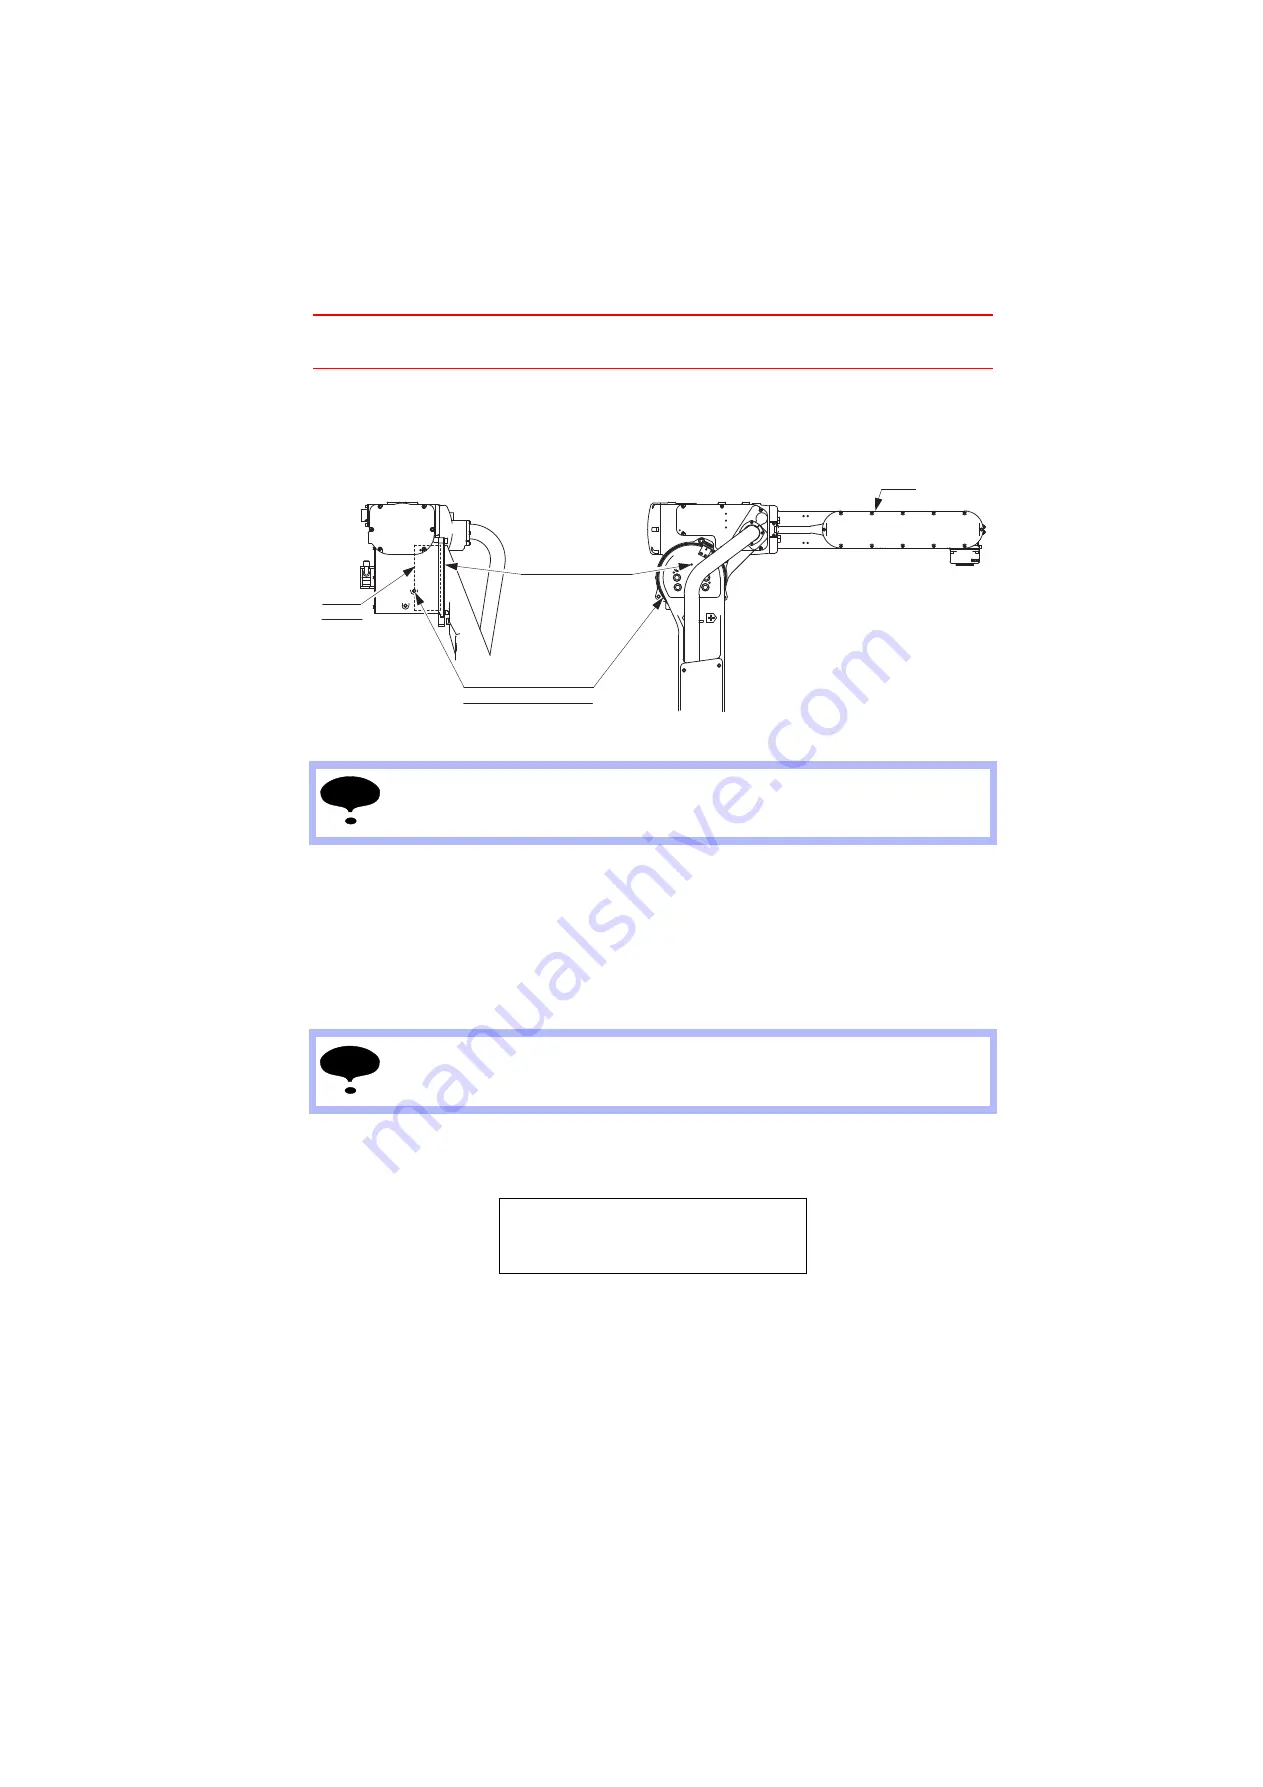
Grease Replenishment/Exchange for U-axis Speed 
Reducer

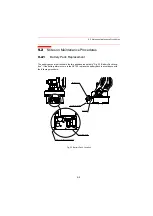
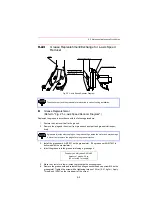
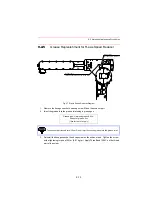
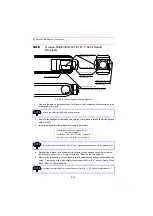
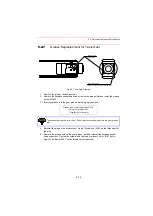
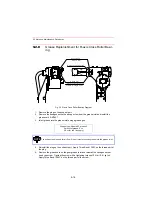
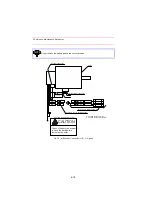
Fig. 26  U-axis Speed Reducer Diagram

Grease Replenishment 
(Refer to "Fig. 26  U-axis Speed Reducer Diagram".)

Replenish the grease in accordance with the following procedure:

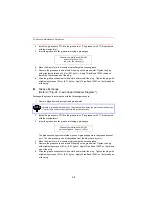
1. Posture the U-arm as shown in "Fig. 26  U-axis Speed Reducer Diagram".
2. Remove the screw and the plug from grease exhaust port and grease inlet respec-

tively.   

3. Install the grease zerk A-MT6X1 on the grease inlet.  (The grease zerk A-MT6X1 is 

delivered with the manipulator.)

4. Inject the grease into the grease inlet using a grease gun.

5. Move the U-axis for a few minutes to discharge the excess grease.
6. Remove the grease zerk and reinstall the hexagon socket head plug on the grease 

inlet. Tighten the plug with a tightening torque of 5 N·m (0.51 kgf·m).  Apply Three 
Bond 1206C on the thread part of the plug. 

7. Wipe the grease exhaust port with a cloth and reinstall the hexagon socket head cap 

screw.  Tighten the screw with a tightening torque of 5 N·m (0.51 kgf·m).  Apply Three 
Bond 1206C on the thread part of the screw.

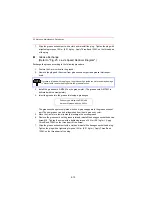
The exhaust port and the grease inlet are inverted in case of ceiling installation.

If grease is injected with the screw on, the grease will go inside the motor and may damage 
it.  Never fail to remove the screw before the grease injection.

Grease type: Molywhite RE No.00

Amount of grease: 30 cc

(60 cc for the 1st supply)

U-arm

U-axis 
speed 
reducer

Grease inlet

Grease exhaust port

(Hexagon socket head 
cap screw M6)

(Hexagon socket head 
plug PT1/8)

NOTE

NOTE

Summary of Contents for MOTOMAN-HP20

Page 1: ...receipt of the product and prior to initial operation read these instructions thoroughly and retain for future reference MOTOMAN INSTRUCTIONS MOTOMAN HP20 INSTRUCTIONS NX100 INSTRUCTIONS NX100 OPERAT...

Page 2: ...photos in this manual are representative examples and differences may exist between them and the delivered product YASKAWA may modify this model without notice when necessary due to product improveme...

Page 3: ...potentially hazardous situation which if not avoided could result in death or serious injury to personnel Indicates a potentially hazardous situation which if not avoided could result in minor or mod...

Page 4: ...op Observe the following precautions when performing teaching operations within the P point maximum envelope of the manipulator View the manipulator from the front whenever possible Always follow the...

Page 5: ...ssing has been performed Check for problems in manipulator movement Check for damage to insulation and sheathing of external wires Always return the programming pendant to the hook on the NX100 cabi n...

Page 6: ...anipulator confirm the contents Warning label A Warning label B Warning label B Nameplate WARNING Do not enter robot work area WARNING Moving parts may cause injury Warning Label A Warning Label B Nam...

Page 7: ...hod 3 4 3 3 1 S axis Operating Range 3 4 3 3 2 Fixing the Manipulator Base 3 4 3 3 3 Precautions to Prevent the Manipulator from Falling 3 4 3 3 4 IP International Protection for Main Part of the Mani...

Page 8: ...cer 9 7 Grease Replenishment Refer to Fig 24 S axis Speed Reducer Diagram 9 7 Grease Exchange Refer to Fig 24 S axis Speed Reducer Diagram 9 8 9 2 3 Grease Replenishment Exchange for L axis Speed Redu...

Page 9: ...Pack Connection for S L U axes Motors 9 17 Battery Pack Connection for R B T axes Motors 9 19 10 Recommended Spare Parts 11 Parts List 11 1 S axis Driving Unit 11 1 11 2 L axis Driving Unit 11 3 11 3...

Page 10: ...our items information for the content of optional goods is given separately Manipulator NX100 Programming pendant Manipulator cable Confirm that the manipulator and the NX100 have the same order num b...

Page 11: ...MANIPULATOR AND THE CONTROLLER SHOULD HAVE SAME ORDER NUMBER ORDER NO Check that the manipulator and the NX100 have the same order number Label Enlarged View a NX100 Front View b Manipulator Top View...

Page 12: ...vibration or shock during transportation The system consists of precision components so failure to observe this caution may adversely affect performance Check that the eyebolts are securely fastened T...

Page 13: ...2 1 Transporting Method 2 2 Fig 2 Transporting Position F E A B D Eyebolt M12 2 eyebolts Delivered with the manipulator View E View F C Eyebolt M12 2 eyebolts Delivered with the manipulator...

Page 14: ...bolts and brackets as shown in Fig 3 Using the Forklift Insert claws under the pallet and lift it The pallet must be strong enough to support the manipulator Transportation of the manipulator must be...

Page 15: ...ket head cap screws M6 A rubber cushion is respectively wedged at the sections C and D Before turning ON the power check to be sure that the shipping bolts brackets and rubber cushions have been remov...

Page 16: ...ury or damage When mounting the manipulator on the ceiling or wall the base section must have sufficient strength and rigidity to support the mass of the manipulator Also it is necessary to consider c...

Page 17: ...d be firmly mounted on a base or foundation strong enough to support the manipulator and withstand repulsion forces during acceleration and deceleration Refer to Table 1 Maximum Repulsion Forces of th...

Page 18: ...or base securely fix the manipulator to the baseplate using 4 hexagon head screws M16 60 mm long is recommended Tighten the hexagon head screws and anchor bolts firmly so that they will not be loosene...

Page 19: ...is operating range must be 30 Adjusted prior to the shipment 3 3 2 Fixing the Manipulator Base For the wall or ceiling mounted types be sure to use 4 hexagon socket head cap screws M16 tensile strengt...

Page 20: ...vironmental conditions 0 to 45 C ambient temperature 20 to 80 RH no moisture at constant temperature Free from dust soot or water Free from corrosive gases or liquid or explosive gases Free from exces...

Page 21: ...e wiring make sure to turn the primary power supply OFF and put up a warning sign ex DO NOT TURN THE POWER ON Failure to observe this warning may result in fire or electric shock Wiring must be perfor...

Page 22: ...o Fig 7 Manipulator Cables 1BC and 2BC Connect these cables respec tively to the connectors at the manipulator base and the NX100 Refer to Fig 8 a Manipu lator Cable Connection to the Manipulator and...

Page 23: ...serting the cables lower each lever until it clicks 4 2 2 Connection to the NX100 Before connecting the manipulator cables to the NX100 verify the numbers 1BC and 2BC on both the cables and the NX100...

Page 24: ...4 2 Manipulator Cable Connection 4 4 Fig 8 a Manipulator Cable Connection to the Manipulator Fig 8 b Manipulator Cable Connection to the NX100 2BC 1BC 3BC Connector details Manipulator side X11 X21...

Page 25: ...S axis turning 180 L axis lower arm 155 110 U axis upper arm 255 165 R axis wrist roll 200 B axis wrist pitch yaw 230 50 T axis wrist twist 360 Maximum Speed S axis 2 96 rad s 170 s L axis 2 96 rad s...

Page 26: ...5 2 Part Names and Working Axes 5 2 5 2 Part Names and Working Axes Fig 9 Part Names and Working Axes L arm Rotary head Manipulator base U arm Wrist Wrist flange T T B B R R L U U L S S...

Page 27: ...r Base Dimensions Fig 10 Manipulator Base Dimensions 395 5 195 5 60 0 1 60 200 200 0 1 260 170 0 1 335 375 A 25 250 313 335 375 Fitting surface Fitting surface 0 1 for manipulator fixing View 18 dia h...

Page 28: ...s and P point Maximum Envelope R 3 1 4 C A 180 180 P point View A Units mm P point maximum envelope 1717 2072 R1717 150 807 356 421 0 R 4 2 1 288 514 635 459 1323 1417 455 264 1003 135 776 505 328 105...

Page 29: ...e of the S axis can be altered according to the operating conditions as shown in Table 4 S axis Working Range If alteration is necessary contact your Yaskawa representative in advance Table 4 S axis W...

Page 30: ...arm rating shown in Fig 12 Moment Arm Rating The allowable inertia is calculated when the moment is at the maximum Contact your Yas kawa representative when only load inertia or load moment is small...

Page 31: ...e 5 mm or less Fig 13 Wrist Flange Wash off anti corrosive paint yellow color on the wrist flange surface with thinner or light oil before mounting the tools Mount the attachment with the mounting bol...

Page 32: ...owable load on the U axis is a maximum of 31 kg including the wrist load For instance when the mass installed in the wrist point is 20 kg the mass which can be installed on the upper arm is 11 kg 7 1...

Page 33: ...pins 1 to 16 are assigned as shown in Fig 17 Detailed Drawing of Connector Pin Numbers Wiring must be performed by users following the conditions below The allowable current for cables 3 A or less fo...

Page 34: ...p JL05 6A20 29P Exhaust port air flow Tapped hole PT3 8 with pipe plug A Air inlet Tapped hole PT3 8 with pipe plug View A Connector for internal user I O wiring harness JL05 2A20 29PC pin connector w...

Page 35: ...Refer to Fig 18 Location of Limit Switch for location A manip ulator type with the S or L axis overrun limit switch or the LU axes interference limit switch is YR HP20 A01 Fig 18 Location of Limit Sw...

Page 36: ...of the manipulator are shown in Fig 20 a Internal Connection Diagram and in Fig 20 b Internal Connection Diagram Fig 19 Location and Numbers of Connectors Table 6 List of Connector Types Name Type of...

Page 37: ...BAT OBT 3 FG4 P P 24CN 1 No 23CN 23CN 1 BAT FG2 0V OBT 5V BAT OBT 7 9 4 5 BAT OBT 2 3 4 0V FG3 3 2 5V DATA 3 DATA 3 5CN 1 6CN 1 No 6CN No 5CN P BAT OBT 8 2 7 DATA 5 DATA 5 P 7CN 1 No 7CN P P P P A FOR...

Page 38: ...E ME6 MW6 7 8 BA5 BB5 2 12CN 1 BB6 3 4 BA6 MU6 MW6 ME3 ME4 MV6 BA3 ME6 BA5 BA6 BA4 BB4 ME5 PE MW5 MV6 U AXIS R AXIS S AXIS L AXIS No 25CN No 26CN B AXIS T AXIS No 18CN No 19CN No 35CN No 37CN No 36CN...

Page 39: ...n power sup ply OFF and put up a warning sign ex DO NOT TURN THE POWER ON Failure to observe this warning may result in electric shock or injury Maintenance and inspection must be performed by specifi...

Page 40: ...mounting screws Phillips screw driver wrench Tighten loose bolts Replace if necessary Connector base Manual Check for loose con nectors BT axes timing belts Manual Check for belt tension and wear Wire...

Page 41: ...LU axes speed reducers Grease Gun Check for malfunc tion Replace if nec essary Supply grease 6000H cycle 3 See Par 9 2 3 and 9 2 4 Exchange grease 12000H cycle 3 See Par 9 2 3 and 9 2 4 RBT axes speed...

Page 42: ...Inspection Parts and Inspection Numbers Manipurator in Home Position 4 11 1 14 4 14 16 15 1 2 8 8 4 5 1 13 10 1 9 7 13 12 11 S axis Note The manipulator is in the home position S axis T axis B axis U...

Page 43: ...e battery packs are attached in the two positions indicated in Fig 22 Battery Pack Loca tion If the battery alarm occurs in the NX100 replace the battery pack in accordance with the following procedur...

Page 44: ...tery pack to an unconnected connector 5 Remove the old battery pack from the circuit board 6 Mount the new battery pack to the battery holder 7 Reinstall the plate Connect the new battery pack before...

Page 45: ...re 1 Remove plugs from exhaust port and grease inlet For ceiling mounted manipulators the exhaust port and the grease inlet are inverted If grease is injected with the plug on the grease will go insid...

Page 46: ...l the grease zerk PT1 8 to the grease inlet The grease zerk PT1 8 is delivered with the manipulator 3 Inject the grease into the grease inlet using a grease gun The grease exchange is completed when n...

Page 47: ...et using a grease gun 5 Move the L axis for a few minutes to discharge the excess grease 6 Remove the grease zerk and reinstall the hexagon socket head cap screw M6 on the grease inlet Tighten the scr...

Page 48: ...e grease exchange is completed when new grease appears in the grease exhaust port The new grease can be distinguished from the old grease by color 5 Move the L axis for a few minutes to discharge the...

Page 49: ...6 Remove the grease zerk and reinstall the hexagon socket head plug on the grease inlet Tighten the plug with a tightening torque of 5 N m 0 51 kgf m Apply Three Bond 1206C on the thread part of the...

Page 50: ...se can be distinguished from the old grease by color 5 Move the U axis for a few minutes to discharge the excess grease 6 Remove the grease zerk and reinstall the hexagon socket head plug on the greas...

Page 51: ...ease gun 3 Reinstall the hexagon socket head cap screw on the exhaust port Tighten the screw with a tightening torque of 5 N m 0 51 kgf m Apply Three Bond 1206C on the thread part of the screw Grease...

Page 52: ...erk on the grease inlet and reinstall the hexagon socket head cap screw Tighten the screw with a tightening torque of 5 N m 0 51 kgf m Apply Three Bond 1206C on the thread part Remove the cover for th...

Page 53: ...e exhaust port Apply Three Bond 1206C on the thread part of the plug 5 Remove the grease zerk on the gear grease inlet and reinstall the hexagon socket head cap screw Tighten the screw with a tighteni...

Page 54: ...exhaust port Apply Three Bond 1206C on the thread part of the plug 5 Remove the grease zerk on the gear grease inlet and reinstall the hexagon socket head cap screw Tighten the screw with a tightenin...

Page 55: ...ect the battery packs HW9470932 A with the battery backup connectors located at the end point of the cables for the encoder Under this condition remove the encoder connector and carry out the maintena...

Page 56: ...0BT CAUTION label Encoder connector Motor power connector Battery pack HW9470932 A Motor Connector for the battery backup a Crimped contact pin pin b Crimped contact pin socket Connect battery to enc...

Page 57: ...er the maintenance check verify that all the connectors are connected and remove the battery pack Install the caps attached to the battery backup connector of the motor Fig 32 b Encoder Connector for...

Page 58: ...to contact your Yaskawa representative Table 9 Spare Parts for the MOTOMAN HP20 Rank Parts No Name Type Manufacturer Qty Qty per Unit Remarks A 1 Grease Molywhite RE No 00 Yaskawa Electric Corporation...

Page 59: ...A Yaskawa Electric Corporation 1 1 B 18 Wire Harness in Manipulator for B and T axes HW0270954 A Yaskawa Electric Corporation 1 1 C 19 AC Servomotor for S axis HW0382155 A SGMRS 12A2B YR1 Yaskawa Elec...

Page 60: ...1011 1001 6005 Zeroing Option 6006 Zeroing Option 6007 Zeroing Option 1002 1003 1004 1005 1006 1015 1016 1040 1041 1042 1041 1021 1023 1022 1024 1026 1031 1035 1038 1019 1018 6001 Zeroing Option 6002...

Page 61: ...5 Shoulder 1 1021 HW0400645 1 Lever 1 1022 M5X10 APS Bolt 6 1023 HW0100545 1 S head 1 1024 HW9381641 B Reduction gear 1 1025 M10X40 Socket screw 12 2H 10 Spring washer 12 1026 HW0100544 1 Base 1 1027...

Page 62: ...roing Option 6011 Zeroing Option 2011 2012 2013 2015 2019 2020 6008 Zeroing Option 6009 Zeroing Option 6010 Zeroing Option 2031 2033 2002 2003 2029 2029 2032 2034 2027 2028 2028 2004 2030 2008 2014 20...

Page 63: ...381641 A Reduction gear 1 2021 M10X35 Socket screw 12 2022 2H 10 Spring Washer 12 2023 M12X40 Socket screw 2 2024 2H 12 Spring Washer 2 2025 HW0404196 4 Washer 2 2026 FCD 31 Saddle 1 2027 M5X12 Socket...

Page 64: ...3006 3018 3007 3008 3009 3020 3034 3021 3016 3002 3019 3022 3033 3004 2019 3011 3010 3015 3004 3018 3020 3019 6016 Zeroing Option 6015 Zeroing Option 6017 Zeroing Option 6018 Zeroing Option 6019 Zeroi...

Page 65: ...er 6 3015 M6X10 Socket screw 1 3016 SGMRS 06A2B YR2 Motor 1 3018 HW0404196 2 Washer 2 3019 M10X40 Socket screw 2 3020 2H 10 Spring Washer 2 3021 ARP568 258 O ring 1 3022 M10X20 Socket screw 1 3033 2H...

Page 66: ...4027 4040 4011 4043 4044 4039 3005 4005 4037 4045 4046 4030 4032 4012 4029 4033 4008 4071 4056 4003 4009 4074 4006 4007 4029 4010 4031 4001 4002 4065 4067 4017 4018 4070 4019 4020 4021 5046 4015 4062...

Page 67: ...403 1 Shaft 1 4031 AE1314J1 Oil seal 1 4032 HW1300789 1 M base 1 4033 HW0404402 1 Shaft 1 4034 2H 4 Spring Washer 2 4035 HW0404900 1 N base 1 4036 M4X10 Screw with spring washer 4 4037 M5X16 Socket sc...

Page 68: ...5048 5049 5057 5067 5047 5061 5017 5036 5011 5043 5044 5045 5045 5037 5038 3005 5033 5034 5042 5063 5062 5009 5014 5015 Zeroing Option Zeroing Option Zeroing Option 5019 5020 5021 5022 5013 5053 5050...

Page 69: ...1 5032 HW0304086 1 Housing 1 5033 HW9381659 A Gear 1 5034 HW9482726 A Pulley 1 5035 M5X20 Socket screw 1 5036 6002ZZ Bearing 1 5037 6901ZZ Bearing 1 5038 6814ZZ Bearing 1 5039 HW9482668 A Oil seal 1...

Page 70: ...ROBOT CO LTD No 7 Yongchang North Road Beijing E T Development Area Beijing 100076 China Phone 86 10 6788 2858 Fax 86 10 6788 2878 http www ysr motoman cn YASKAWA ELECTRIC KOREA CORPORATION 35F Three...

Reviews: