background image

8  Specifications

YASKAWA ELECTRIC

 TOBP C730600 41E 1000-Series Option DO-A3 Installation Manual

 29

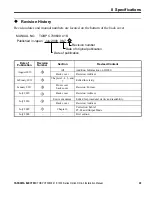
Revision History

Revision dates and manual numbers are located on the bottom of the back cover.

Date of 

Publication

Revision 

Number

Section

Revised Content

August 2012

All

Addition: Information on D1000

Back cover

Revision: Address

February 2011

Chapters 3, 4, 5, and 

7

Edited for clarity.

January 2011

Front cover, 

back cover

Revision: Format

July 2010

Back cover

Revision: Address

July 2010

Entire document

Edited for procedural clarity and readability.

Back cover

Revision: Address

July 2009

Chapter 6

Correction: Table 5
F5-09 and Output Mode

July 2008

First edition

MANUAL NO.

 TOBP C730600  41B

Published in Japan   July 2009  08-7

Date of publication

Date of original publication

1

Revision number

DO

6

5

4

3

2

1

Summary of Contents for 1000-Series

Page 1: ...n Manual Type DO A3 To properly use the product read this manual thoroughly and retain for easy reference inspection and maintenance Ensure the end user receives this manual MANUAL NO TOBP C730600 41E...

Page 2: ...e prior written permission of Yaskawa No patent liability is assumed with respect to the use of the information contained herein Moreover because Yaskawa is constantly striving to improve its high qua...

Page 3: ...00 Series Option DO A3 Installation Manual 3 Table of Contents 1 PREFACE AND SAFETY 4 2 PRODUCT OVERVIEW 7 3 RECEIVING 8 4 OPTION COMPONENTS 9 5 INSTALLATION PROCEDURE 10 6 RELATED PARAMETERS 23 7 TRO...

Page 4: ...warranty only as to the quality of its products in conforming to standards and specifications published in the Yaskawa manual NO OTHER WARRANTY EXPRESS OR IMPLIED IS OFFERED Yaskawa assumes no liabili...

Page 5: ...messages could cause fatal injury or damage products and related equipment and systems Note Indicates supplemental information that is not related to safety messages Option Yaskawa 1000 Series Option...

Page 6: ...the manual When ordering new copies of the manual contact a Yaskawa representative or the nearest Yaskawa sales office and provide the manual number shown on the front cover DANGER Heed the safety mes...

Page 7: ...pand the number of available digital outputs to monitor unit run status The option has the following features Six photocoupler outputs 48 V 50 mA or less Two relay outputs 250 Vac 1 A or less 30 Vdc 1...

Page 8: ...ng model or the option does not function properly Option Package Contents Tools Required for Installation A Phillips screwdriver M3 metric 1 2 U S standard size 1 is required to install the option A s...

Page 9: ...locks TB1 and TB2 Refer to Table 4 on page 22 for details on TB1 and TB2 terminal functions and signal levels A Connector CN5 D Model number B Installation hole E Ground terminal and installation hole...

Page 10: ...ed off WARNING Electrical Shock Hazard Do not remove the front covers of the unit while the power is on Failure to comply could result in death or serious injury The diagrams in this section may inclu...

Page 11: ...uit boards Failure to comply may result in ESD damage to circuitry Never shut the power off while the unit is running or outputting voltage Failure to comply may cause the application to operate incor...

Page 12: ...anual Properly connect all pins and connectors Failure to comply may prevent proper operation and possibly damage equipment Check wiring to ensure that all connections are correct after installing the...

Page 13: ...struction manual packaged with the unit for information on wiring and connecting the unit Figure 2 shows an exploded view of the unit with the option and related components for reference Figure 2 Figu...

Page 14: ...ving the covers DANGER Electrical Shock Hazard Disconnect all power to the unit and wait at least the amount of time specified on the unit front cover safety label After all indicators are off measure...

Page 15: ...41E 1000 Series Option DO A3 Installation Manual 15 2 Insert the option card B into the CN5 A J CN5 B K or CN5 C L connector located on the unit and fasten it into place using one of the included scre...

Page 16: ...G Figure 5 Figure 5 Connect the Ground Wire Note 1 The option package includes three ground wires Use the longest wire when plugging the option into connector CN5 C on the unit side Use the next long...

Page 17: ...ightening torque may cause erroneous operation damage the terminal block or cause a fire NOTICE Heat shrink tubing or electrical tape may be required to ensure that cable shielding does not contact ot...

Page 18: ...ontrol use stable power supply for the voltage reference source Figure 8 Figure 8 Option Connection Diagram 1 Double check the polarity on the diode when connecting a DC relay 2 Install a surge absorb...

Page 19: ...r to the outside In these cases cut out the perforated openings on the left side of the unit front cover as shown in Figure 9 A and leave no sharp edges to damage wiring Route the wiring inside the en...

Page 20: ...ce the digital operator D Figure 10 Figure 10 Replace the Front Covers and Digital Operator Note Take proper precautions when wiring the option so that the front covers will easily fit back onto the u...

Page 21: ...Table 3 Ferrule Type Terminal Sizes Terminal signal Screw Size Tightening Torque Nxm inxlb Bare Cable Ferrule Type Terminals Wire Type Applicable Gauges mm2 Recomm Gauge mm2 Applicable Gauges mm2 Reco...

Page 22: ...n assigned to each output See the unit Instruction Manual for directions on setting parameters M1 Contact relay output 1 N O output Max voltage and current 250 Vac 1 A 30 Vdc 1 A M2 M3 Contact relay o...

Page 23: ...Binary Code Output F5 09 2 Multi Function Output Default when Installed to D1000 TB1 M1 M2 Zero speed During run Determined by F5 07 M3 M4 Speed agree Alarm excluding bb Determined by F5 08 TB2 P1 PC...

Page 24: ...tact output terminals M1 M2 M3 M4 and photocoupler output terminals P1 through P6 1 When installed to drive Default 0 Range 0 to 1A7 When installed to D1000 Default F Range 0 to 160 F5 02 39A Terminal...

Page 25: ...60 F5 07 39F Terminal M1 M2 Output Selection When installed to drive Default F Range 0 to 1A7 When installed to D1000 Default F Range 0 to 160 F5 08 3A0 Terminal M3 M4 Output Selection When installed...

Page 26: ...sible Solution Option at unit port CN5 A was changed during run Turn the power off and check the connectors between the unit and option Digital Operator Display Fault Name oFb01 Option Fault CN5 B Opt...

Page 27: ...length of wiring under 50 m 164 ft Separate the control wiring to the option main circuit wiring and power lines Interface Circuit Figure 11 Figure 11 Output Interface Circuit Digital Operator Display...

Page 28: ...llowable voltage current 48 Vdc 50 mA Contact Relay Output 2 outputs independent Maximum allowable voltage current 250 Vac max 1 A 30 Vdc max 1 A Ambient Temperature 10 C to 50 C 14 F to 122 F Humidit...

Page 29: ...Back cover Revision Address February 2011 Chapters 3 4 5 and 7 Edited for clarity January 2011 Front cover back cover Revision Format July 2010 Back cover Revision Address July 2010 Entire document Ed...

Page 30: ...w yaskawa com sg YASKAWA ELECTRIC CHINA CO LTD 12F Carlton Bld No 21 HuangHe Road HuangPu District Shanghai 200003 China Phone 86 21 5385 2200 Fax 86 21 5385 3299 http www yaskawa com cn YASKAWA ELECT...

Reviews: