background image

Instruction Manual |  06

Yaro Hug

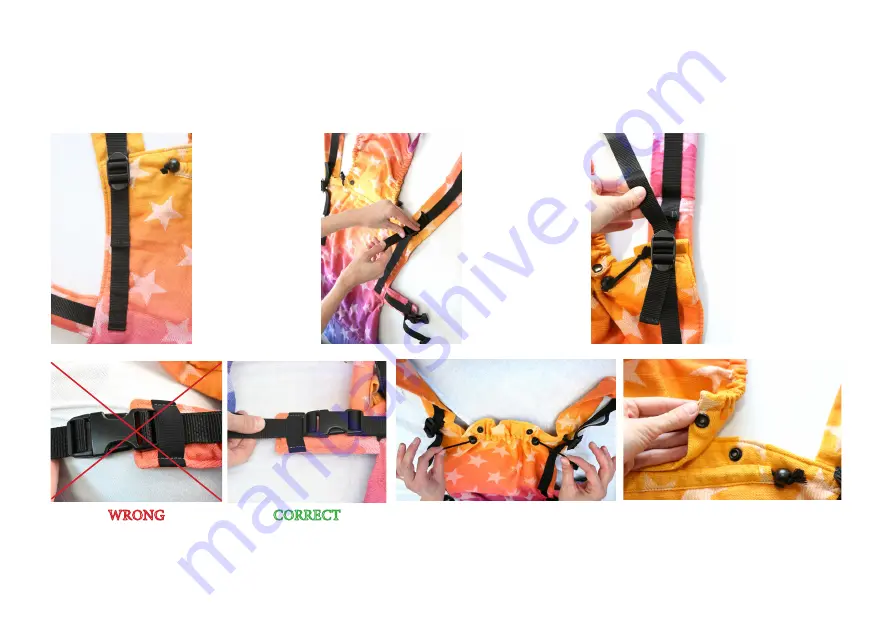
Yaro Hug Adjustment Features

to create a perfect fit for the child and the babywearer

7. 

The height 

of the back 

panel can be 

adjusted.

8.


Pull the 

webbing down 

to shorten the 

height of the 

back panel as 

needed.

9.

 The length 

of the shoul-

der straps can 

be adjusted as 

necessary. Pull 

the webbing up 

to shorten the 

straps. 

10.


The correct attachment of the shoulder straps to 

the side of the back panel with safety elastic.

11.


The neck width of the back 

panel can be adjusted with the help 

of the cords with stoppers. Adjust 

the cord equally from both sides. 

12. 

The head support cap is re-

movable. Use the head support cap 

to support the head of the sleeping 

child.

WRONG

CORRECT

Summary of Contents for Hug

Page 1: ...Yaro Hug INSTRUCTION MANUAL www yaro eu info yaro eu...

Page 2: ...IL ALL STRAPS ARE PROPERLY SECURED AND FASTENED IMPORTANT BABY MUST BE CARRIED IN FRONT CARRY POSITION UNTIL THEY ARE ABLE TO HOLD THEIR HEAD UPRIGHT THIS CARRIER IS NOT INTENDED FOR USE IN THE OUTWAR...

Page 3: ...justing the fit Don t let go of your child until the carrier is properly buckled and adjusted Make sure you hear all buckles click when con necting and test to make sure they are secure This carrier i...

Page 4: ...hes before washing do not wash your Yaro Hug too often as too frequent washing weakens the materials and seams individual stains can be removed with a damp sponge do not iron padded parts hip belt and...

Page 5: ...r the child and the babywearer 1 3 point safety buckle Press all 3 points to open the buckle 2 Removable cushion to reduce the pressure points 3 Correct placement of the buckle with safety elastic 4 6...

Page 6: ...th of the shoul der straps can be adjusted as necessary Pull the webbing up to shorten the straps 10 The correct attachment of the shoulder straps to the side of the back panel with safety elastic 11...

Page 7: ...e connection strap for the shoulder straps can slide up or down The connection strap can also be taken off and placed higher or lower on the black webbing depending on the needs of the wearer 14 16 Th...

Page 8: ...panel as necessary and take the baby Hold the baby in the middle of the back panel then lift the back panel Keep supporting the back of your child with one hand at all times 1 Close the hip band with...

Page 9: ...s and prevents them from falling apart The connection strap can slide up or down 9 The newborn straps should be placed under the legs of the child not above the legs of the child WRONG CORRECT 10 11 A...

Page 10: ...lift the back panel Keep supporting the back 6 7 Adjust the shoulder straps for the comfortable fit ensure the M position of the child but lower than the knies 8 9 Varia tion it is pos sible to cross...

Page 11: ...ith the carrier to your back 1 2 Follow steps 1 and 2 from the Front Carry Toddler then grab the shoulder straps in one hand while securing the child between the straps and the panel 6 8 Put both shou...

Page 12: ...considered manufacturing flaws and are not covered under the limited warranty Warranty does not extend if the product has been altered in any way from its original state The term altered is defined as...

Reviews: