model number 060-1744-0 | contact us: 1.866.523.5218
model number 060-1744-0 | contact us: 1.866.523.5218
10
11
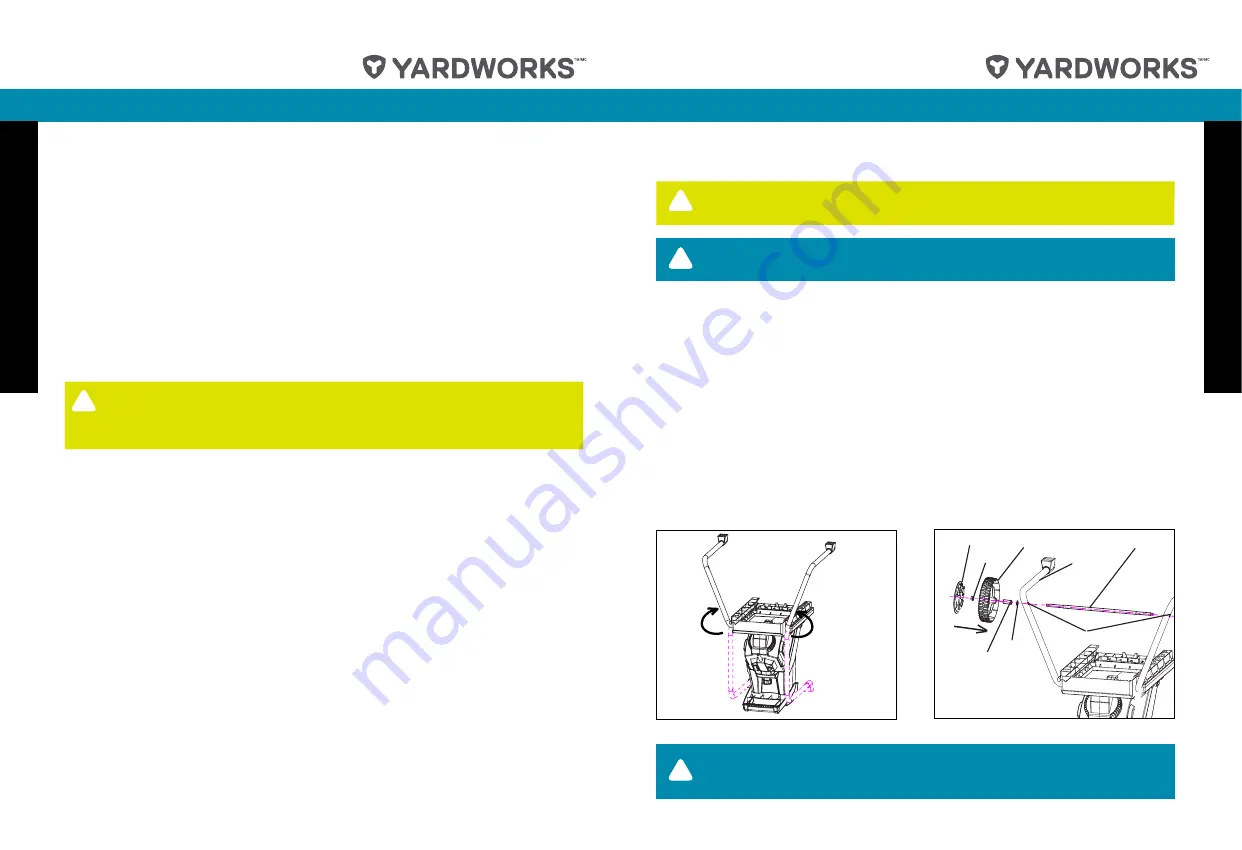
FITTING THE TRANSPORTATION WHEELS
Before using the garden shredder, some assembly is required.
1. Turn the machine upside down on a flat surface and rotate the two
brackets from the outside of the machine to the upright position (Fig. 1).
2. Attach the axle tube between the left and right brackets. Slide the axle
through the assembly hole in left bracket then through out the other
assembly hole in the right bracket.
3. Position the washers and wheel bushings on each end of the axle tube.
Then assemble the wheels onto each end of the axle end. Use the self-
locking nuts on each end of the axle and tighten both the self-locking nuts
using the wrench supplied (Fig. 2).
4. Attach the wheel cover and make sure everything is assembled in the
correct position.
Fig. 1
Assembly
!
WARNING!
You may need assistance to lift the machine out of the
box and assemble it.
NOTE:
before using the garden shredder, read the instruction
book carefully.
!
Fig. 2
NOTE:
The wheels must be fitted the correct way round to allow
the nuts to tighten on each end of the axle.
!
wheel cover
nut
wheel
washer
wheel bushing
axle tube
left bracket
assembly holes
WARNING!
1. Do not allow garden waste to accumulate before shredding as it will begin
to compost, become too damp and clog the cutting assembly. Dry material
will help most material to clear the ejection chute. Save some dry sticks
until last to help clean the blade area.
2. Frequently monitor the build-up of shredded material.
3. Do not allow shredded material to build up and fill the inside of the
shredder's discharge chute.
4. When the collection box is full, press the On/Off switch to turn the garden
shredder off before emptying.
General Safety Rules
!
WARNING!
Do not put your hands up inside the shredder's
discharge chute to clear away shredded material while the shredder
is switched on or connected to the power supply.


