Yard-Man 107 Operator'S Manual Download Page 10

10

SECTION 6:  MAKING ADJUSTMENTS

WARNING: 

Do not at any time make any

adjustment to your lawn mower without first
stopping the engine and disconnecting the
spark plug wire.

Handle Height 

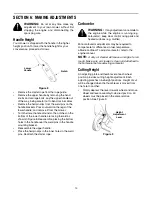
Your mower is shipped with the handle in the higher 
height position.To lower the handle height for your 
convenience, proceed as follows.

Figure 8

Remove the starter rope from the rope guide.

Remove the upper handle by removing the hand 
knobs and carriage bolts. Lay the upper handle out 
of the way, being careful not to bend or kink cables.

Remove the hairpin clips from the weld pins on the 
handle brackets. Press outward on the legs of the 
lower handle, and remove it from the mower.

Turn the lower handle around so the notches on the 
bottom of the lower handle are facing forward as 
shown in Figure 8. Reassemble, placing the bottom 
holes in the handle over the weld pins in the handle 
mounting bracket.

Reassemble the upper handle.

Place the hairpin clips in the inner holes in the weld 
pins. Reattach the starter rope.

Carburetor 

WARNING: 

 If any adjustments are made to

the engine while the engine is running (e.g.
carburetor), keep clear of all moving parts and
heated surfaces (e.g. muffler).

Minor carburetor adjustments may be required to 
compensate for differences in fuel, temperature, 
altitude and load. To adjust carburetor, refer to the 
engine manual.

NOTE: 

A dirty air cleaner will cause an engine to run

rough. Make sure air cleaner is clean and attached to
the carburetor before adjusting carburetor. 

Cutting Height 

An adjusting plate and thumb lever at each wheel 
position provides cutting height adjustment. Each 
adjusting plate has nine height positions. Height of cut 
will be changed when the thumb lever is moved from 
one hole to another. 

Simply depress the lever towards wheel and move 
wheel and lever assembly to desired position. All 
wheels must be placed in the same relative 
position. See Figure 9.

Figure 9

Notch

Lower

Handle

Height

Adjustment

Lever

Summary of Contents for 107

Page 1: ...plicable local or state laws if any If a spark arrester is used it should be maintained in effective working order by the operator In the State of California the above is required by law Section 4442...

Page 2: ...below For future reference please copy the model number and the serial number of the equipment in the space below ENGINE INFORMATION The engine manufacturer is responsible for all engine related issue...

Page 3: ...d keep bystanders helpers children and pets at least 75 feet from the machine while it is in operation Stop machine if anyone enters the area 6 Always wear safety glasses or safety goggles during oper...

Page 4: ...ep children away from hot or running engines They can suffer burns from a hot muffler 6 Never allow children under 14 years old to operate a power mower Children 14 years old and over should read and...

Page 5: ...nd operating the mower 8 Never attempt to make a wheel or cutting height adjustment while the engine is running 9 Grass catcher components discharge cover and trail shield are subject to wear and dama...

Page 6: ...LY Do not mow on inclines with a slope in excess of 15 degrees a rise of approximately 2 1 2 feet every 10 feet A riding mower could overturn and cause serious injury If operating a walk behind mower...

Page 7: ...the lower handle is seated securely into the handle mounting brackets Tighten the hand knobs on each side of the handle carriage bolts and saddle washers must be seated properly into the handle as sh...

Page 8: ...lade control handle must be depressed in order to operate the unit Release the blade control handle to stop the engine and blade WARNING This control mechanism is a safety device Never attempt to bypa...

Page 9: ...Grasp starter handle and pull rope out slowly until engine reaches start of compression cycle rope will pull slightly harder at this point Let the rope rewind slowly Pull rope with a rapid continuous...

Page 10: ...mounting bracket Reassemble the upper handle Place the hairpin clips in the inner holes in the weld pins Reattach the starter rope Carburetor WARNING If any adjustments are made to the engine while th...

Page 11: ...r cracks especially if you strike a foreign object Replace when necessary When sharpening the blade follow the original angle of grind as a guide It is extremely important that each cutting edge recei...

Page 12: ...eason Spark plug replacement is recommended at the start of each mowing season check engine manual for correct plug type and gap specifications Clean engine regularly with a cloth or brush Keep the co...

Page 13: ...6 Adjust carburetor Engine overheats 1 Engine oil level low 2 Air flow restricted 3 Carburetor not adjusted properly 1 Fill crankcase with proper oil 2 Remove blower housing and clean 3 Adjust carbure...

Page 14: ...14 SECTION 10 PARTS LIST MODEL 107 2 3 4 5 6 7 8 9 10 11 12 13 8 15 16 17 18 19 20 21 22 23 24 25 26 27 28 29 30 32 33 34 33 36 37 38 39 40 27 21 26 19 22 23 24 25 41 42 43 44 20 35 46 46 45 38 1...

Page 15: ...H 29 738 0585 Stake Bolt 30 732 0731 Torsion Spring 31 14578 Height Adjust Assembly RH 14579 Height Adjust Assembly LH 32 782 7006 Mounting Bracket 33 736 0270 Bell Washer 34 710 0599 Hex Washer Hd TT...

Page 16: ...such as lubricants filters blade sharpening tune ups brake adjustments clutch adjustments deck adjustments and normal deterioration of the exterior finish due to use or exposure d MTD LLC does not ext...

Reviews: