background image

vetus 

b.v.

FOKKERSTRAAT 571 - 3125 BD SCHIEDAM - HOLLAND - TEL.: +31 10 4377700
TELEFAX: +31 10 4372673 - 4621286 - E-MAIL: [email protected] - INTERNET: http://www.vetus.com

Printed in the Netherlands
030601.03  2016-05

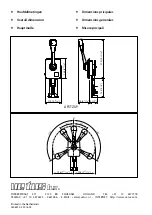
35°

35°

120°

120°

N

196 (7 

11

/

16

”)

196 (7 

11

/

16

”)

110 (4 

5

/

16

”)

274 (10 

13

/

16

”)

138 (5 

7

/

16

”)

133 (5 

1

/

4

”)

78 (3 

1

/

16

”) 51 (2”)

AFSTZIJY

9  Hoofdafmetingen

9  Overall dimensions

9  Hauptmaße

9  Dimensions pricipales

9  Dimensions generales

9  Misure pricipali

Summary of Contents for AFSTZIJY

Page 1: ...lisation Instrucciones de instalación y Manual de manejo Istruzioni per il montaggio e Manuale per l uso Copyright 2016 Vetus b v Schiedam Holland Mechanische motorafstandsbediening Mechanical remote engine control Mechanische Motor Fernbedienung Télécommande mécanique pour moteur Mando a distancia mecánico para motores Telecomandi meccanici per motori 2 6 10 14 18 22 AFSTZIJY ...

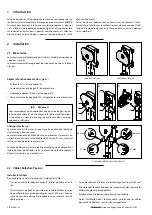
Page 2: ...uit Raadpleeg bij twijfel de motorleverancier wanneer niet duidelijk is hoe de bediening van de motor is wat betreft gas geven en schake len duwend of trekkend 2 Installatie 2 1 Mechanisme Het mechanisme voor de afstandsbediening wordt standaard gele verd voor trekkend gasgeven Het mechanisme kan worden omgebouwd om te worden toegepast voor drukkend gasgeven 31 mm 31 mm 38 mm 38 mm Zorg voor de ju...

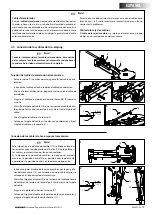
Page 3: ...het me chanisme liggen naar het mechanisme geleid worden om zo pro bleemloos te werken Koppelingskabel De koppelingskabel is in het mechanisme geborgd en kan daarom in een schot nabij het mechanisme worden vastgezet Let op Om te voorkomen dat de schakelhefboom 12 onbedoeld ge blokkeerd wordt mag nooit de knop 13 op de bedieningshendel worden ingedrukt in als het mechanisme en de kabels nog niet ge...

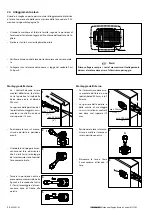
Page 4: ...nde De dikte van het schot of de montageplaat waarop de be diening gemonteerd wordt mag nooit meer dan 12 mm bedragen Zet de handel op het mecha nisme en schakel naar de stand vooruit Schakel terug naar de neutraal stand en ga te werk zoals in fi guur 4 en 5 is aangegeven zo dat alle 4 de bevestigingsgaten van het mechanisme zich voor het schot bevinden N Haal de handel eraf en trek het mechanisme...

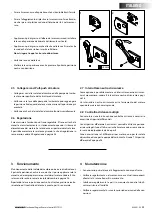
Page 5: ... rechtsom te draaien wordt de frictie verhoogd 2 7 Neutraalschakelaar Op het mechanisme kan als optie een neutraalschakelaar worden ge monteerd zie 6 Neutraalschakelaar op pag 26 Een neutraalschakelaar verhindert dat de motor kan worden gestart wanneer de keerkoppeling nog ingeschakeld is 2 8 Meerdere afstandsbedieningen Wanneer een motor is uitgerust met twee afstandsbedieningen die nen different...

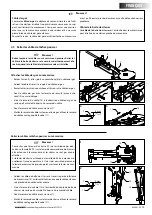
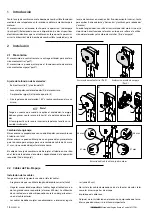
Page 6: ...en in doubt refer to the engine supplier if it is not clear how to op erate the engine as far as using the throttle and gear change push or pull is concerned 2 Installation 2 1 Mechanism The remote control mechanism is delivered standard for a pull throt tle The mechanism can be adjusted for operation with a push throttle 31 mm 31 mm 38 mm 38 mm Ensure the correct total cable length is used Make a...

Page 7: ...his reason the throttle cable must be fed to the mechanism with 1 or 2 loops close to the mechanism for problem free opera tion Gearbox cable The gearbox cable is secured in the mechanism and can be fixed in a bulkhead near the mechanism Note To prevent the gearbox lever 12 from being blocked unintention ally the knob 13 on the operating lever must never be pressed in if the mechanism and the cabl...

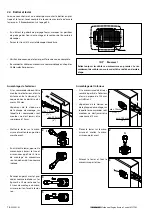
Page 8: ...oom is suf ficient The thickness of the bulk head or the mounting plate on which the controls are be ing mounted may never ex ceed 12 mm 1 2 Put the lever on the mecha nism and switch to the forward position Switch back to the neutral po sition and proceed as shown in figure 4 and 5 so that all 4 of the mechanism s mounting holes are in front of the bulk head N Remove the lever and pull the mechan...

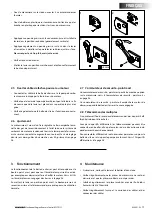
Page 9: ...turning the adjusting screw clockwise see 5 Ad justment on page 26 2 8 Neutral safety switch A neutral safety switch can be optionally mounted on the mecha nism see 6 Neutral safety switch on page 26 A neutral safety switch prevents the engine from being started when the gearbox is still engaged 2 9 Multiple remote controls If an engine is provided with two remote controls differential devices mus...

Page 10: ...b rückwärts und Zug vorwärts Bitte wenden Sie sich bei Zweifeln an der Bedienung an den Moto renverkäufer wenn es das Gas geben oder das schieben oder zie hen für den Gangwechsel betrifft 2 Montage 2 1 Mechanismus Der ferngesteuerte Mechanismus wird standardmäßig als Zug He bel geliefert Dieser Mechanismus kann für den Einsatz eines Schub Hebels an gepasst werden 31 mm 31 mm 38 mm 38 mm Stellen Si...

Page 11: ...it 1 oder 2 Schleifen Ab stand zum Mechanismus gehalten werden so dass der Mechanis mus ohne Einschränkungen arbeiten kann Getriebe Kabel Der Getriebe Zug wird am Mechanismus gesichert und lässt sich am Schott neben dem Mechanismus befestigen Hinweis Um den Schalthebel 12 gegen unbeabsichtigte Blockieren zu sichern muss sich der Knopf 13 am Hebel in der neutralen Po sition befinden solange die Kab...

Page 12: ...eplatte auf der die Armaturen montiert wer den sollten nicht über 12 mm liegen Setzen Sie den Hebel auf den Mechanismus und schieben Sie in die vordere Position Schalten Sie zur neutrale Posi tion zurück und verfahren Sie wie in Abbildung 4 und 5 dar gestellt so dass alle 4 Befesti gungslöcher des Mechanismus vor dem Schott sind N Entfernen Sie den Hebel und ziehen Sie den Mechanismus durch das Lo...

Page 13: ...ch anziehen der Einstellschraube im Uhrzeiger richtung siehe 5 Einstellungen auf Seite 26 erhöht werden 2 7 Neutraler Sicherheitsschalter Ein neutrale Sicherheitsschalter kann optional am Mechanismus montiert werden siehe 6 Neutraler Sicherheitsschalter auf Seite 26 Ein neutraler Sicherheitsschalter verhindert ein Starten des Motors wenn das Getriebe in Betrieben ist 2 8 Mehrere Fernbedienungen We...

Page 14: ...nisseur du moteur si la ma nière de faire fonctionner le moteur n est pas claire concernant l utili sation de la manette des gaz et le changement de vitesse pousser ou relâcher 2 Installation 2 1 Mécanisme Le mécanisme de télécommande est livré en standard en position de pousser les gaz Le mécanisme peut être réglé pour fonctionner en position relâcher les gaz 31 mm 31 mm 38 mm 38 mm Assurez vous ...

Page 15: ... au mécanisme avec 1 ou 2 boucles proches de mécanisme afin de fonctionner sans problème Câble de la boîte de vitesses Le câble de la boîte de vitesses est accroché dans le mécanisme et peut être fixé à une cloison proche du mécanisme Remarque Pour éviter que le levier de vitesse 12 ne soit bloqué par inad vertance la molette 13 sur le levier de commande ne doit jamais être enfoncée si le mécanism...

Page 16: ...uffisant L épaisseur de la cloison ou de la plaque de montage sur laquelle les commandes sont montées ne doit jamais être supérieure à 12 mm Mettez le levier sur le méca nisme et mettez le en position marche avant Revenez au point mort et pro cédez comme indiqué sur les figures 4 et 5 de sorte que les 4 trous de montage du méca nisme soient en face de la cloi son N Enlevez le levier et tirez le mé...

Page 17: ... voir 5 Ajustement en page 26 2 7 Commutateur de sécurité point mort Un commutateur de sécurité point mort peut être monté en option sur le mécanisme voir 6 Commutateur de sécurité point mort en page 26 Un commutateur de sécurité point mort empêche le moteur de démarrer quand la boîte de vitesses est encore engagée 2 8 Télécommandes multiples Si un moteur est fourni avec deux télécommandes des dis...

Page 18: ...a atrás y también para retroceder y avanzar Cuando tenga dudas consulte al suministrador del motor si no está claro cómo hacer funcionar el motor en lo que se refiere a la utiliza ción del acelerador y el cambio de marchas tiro o empuje 2 Instalación 2 1 Mecanismo El mecanismo de control remoto se entrega estándar para acelera ción mediante tiro pull El mecanismo se puede ajustar para el funcionam...

Page 19: ... aceleración Por esta razón se debe alimentar al mecanismo con el cable de ace leración con 1 o 2 vueltas próximas al mecanismo para un funcio namiento sin problemas Cable de la caja de cambios El cable de la caja de cambios se sujeta en el mecanismo y se pue de fijar en un mamparo cerca del mecanismo Nota Para impedir que la palanca de cambios 12 se bloquee involun tariamente nunca se debe presio...

Page 20: ...o o la placa de montaje en la que se monten los controles nunca debe exceder los 12 mm Ponga la palanca del mecanis mo e interruptor en la posición de avance Devuelva el interruptor a la po sición neutral y proceda como se muestra en las figuras 4 y 5 para que los 4 taladros de montaje del mecanismo estén enfrente del mamparo N Retire la palanca y tire del me canismo a través del taladro Utilizand...

Page 21: ...entido de las agujas del reloj vea 5 Ajuste en la página 26 2 7 Interruptor de Seguridad Neutral Se puede montar opcionalmente un interruptor de seguridad neu tral en el mecanismo vea 6 Interruptor de Seguridad Neutral en la página 26 Un interruptor de seguridad neutral impide que el motor arranque cuando la caja de cambios aún está engranada 2 8 Controles remoto múltiples Si se proporciona un mot...

Page 22: ...o al fornitore del motore se non è chiaro come far funzionare il motore per quanto riguarda l uso della manetta e del cambio di marcia push o pull 2 Installazione 2 1 Meccanismo Il meccanismo di controllo remoto viene fornito standard per una manetta pull Il meccanismo può essere regolato per il funzionamento con una ma netta push 31 mm 31 mm 38 mm 38 mm Assicurarsi di usare la lungezza corretta t...

Page 23: ...onfluire nel mecca nismo con 1 o 2 giri vicino al meccanismo per un funzionamento senza problemi Cavo della scatola del cambio Il cavo della scatola del cambio è collegato al meccanismo e può essere fissato in una paratia vicino al meccanismo Nota Per evitare che la leva della scatola del cambio 12 si blocchi in volontariamente la manopola 13 sulla leva di funzionamento non deve mai essere inserit...

Page 24: ...è suf ficiente Lo spessore della paratia o della piastra di montaggio su cui si installano i controlli non deve mai superare i12 mm Posizionare la leva sul mecca nismo e portarla in posizione avanti Tornare in posizione neutra e procedere come mostrato nelle figure 4 e 5 in modo che tutti e 4 i fori di montaggio del mec canismo siano di fronte alla paratia N Rimuovere la leva e tirare il meccanism...

Page 25: ...e a pagina 26 2 7 Interruttore neutro di sicurezza Come opzione è possibile montare un interruttore neutro di sicurez za sul meccanismo vedere 6 Interruttore neutro di sicurezza a pagi na 26 Un interruttore neutro di sicurezza evita l avviamento del motore quando la marcia è ancora ingranata 2 8 Controlli a distanza multipli Se un motore viene fornito con due controlli a distanza è necessario acqu...

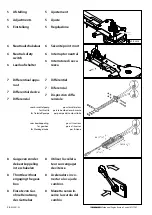
Page 26: ... 7 Différentiel 7 Diferencial 7 Dispositivo diffe renziale 8 Gasgeven zonder de keerkoppeling in te schakelen 8 Throttle without engaging the gear box 8 Einsatz von Gas ohne Benutzung des Getriebes 8 Utiliser l accéléra teur sans engager de vitesse 8 Acelerador sin co nectar a la caja de cambios 8 Manetta senza in serire la scatola del cambio voor brandstofpomp for throttle für Treibstoffpumpe pou...

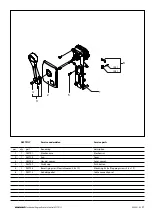
Page 27: ... part benaming description 1 1 AFST01 Mechanisme Mechanism 2 1 AFST10 Kap Cover 3 1 AFST06 Hendel compl Lever compl 4 1 AFST07 Drukknop Push button 5 1 AFST03 Bevestigingsset Plaatschroeven 4 8 x 19 Mounting kit Self tapping screws 4 8 x 19 6 1 AFST13 Kabelnippelset Cable connection set 1 6 2x 2x 3 4 2 5 ...

Page 28: ...s vetus nl INTERNET http www vetus com Printed in the Netherlands 030601 03 2016 05 35 35 1 2 0 1 2 0 N 196 7 11 16 196 7 11 16 110 4 5 16 274 10 13 16 138 5 7 16 133 5 1 4 78 3 1 16 51 2 AFSTZIJY 9 Hoofdafmetingen 9 Overall dimensions 9 Hauptmaße 9 Dimensions pricipales 9 Dimensions generales 9 Misure pricipali ...
Reviews: