background image

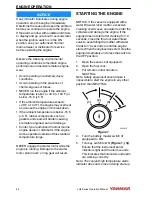
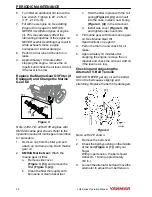
2. NOTICE: NEVER shift the marine gear

at high engine speed. During normal

operation, the marine gear should only

be shifted with the engine at idle.  When

moving the handle between

FORWARD (Figure 2, (1)) and

REVERSE (Figure 2, (3)), bring the

clutch to NEUTRAL (Figure 2, (2)) and

pause before slowly shifting to the

desired position. Do not shift abruptly

from FORWARD to REVERSE or vice

versa.

Switching to Trolling (KMH4A

only)

Use the trolling handle to begin trolling.

When changing from FORWARD or

REVERSE to trolling, the speed of the

propeller revolution will be reduced to a

minimum.

NOTICE: When trolling, do not increase

engine speed above 1000 rpm. This may

cause premature wear and damage to the

clutch.

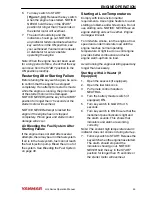
(1)

(2)

(3)

(4)

(5)

(6)

(7)

(8)

0004498

Figure 3

1 – Cable Fitting

2 – Trolling Lever

3 – Low Speed (Trolling)

4 – High Speed

5 – Loosen

6 – Tighten

7 – Normal Operation (High Speed)

8 – Trolling (Low Speed)
1. Operation continues at low engine

speed of 1000 rpm or less.

2. Reduce the speed by moving the

trolling handle from high speed (H)

(Figure 3, (4)) to low speed (L)

(Figure 3, (3)). Adjust the speed to the

desired rate and secure the trolling

handle in place.

3. Before returning to normal operation,

be sure to put the trolling handle in high

speed (H) position.

4. Increase engine speed and continue

normal operation.

ENGINE OPERATION

JH4 Series Operation Manual

47

Summary of Contents for 3JH4E

Page 1: ...JH4 series OPERATION MANUAL 3JH4E 4JH4AE 4JH4 TE 4JH4 HTE P N 0AJH4 G00102 MARINE ENGINES ...

Page 2: ... or exemplify a product service or maintenance improvement We reserve the right to make any change at any time without notice Yanmar and are registered trademarks of Yanmar Co Ltd in Japan the United States and or other countries All Rights Reserved No part of this publication may be reproduced or used in any form by any means graphic electronic or mechanical including photocopying recording tapin...

Page 3: ...3 Component Identification 15 Service Side 3JH4E 15 Non Service Side 3JH4E 15 Service Side 4JH4AE 16 Non Service Side 4JH4AE 16 Service Side 4JH4 TE 17 Non Service Side 4JH4 TE 17 Service Side 4JH4 HTE 18 Non Service Side 4JH4 HTE 18 Location of Nameplates 19 Function of Major Components 20 Control Equipment 21 Instrument Panel Optional 21 Single Lever Remote Control Handle 26 Before You Operate 2...

Page 4: ...ing Diesel Fuel Engine Oil and Engine Coolant Levels 41 Checking and Refilling Marine Gear Oil 41 Checking the Battery Electrolyte Level 41 Checking the Alternator Belt 41 Checking the Remote Control Handle 41 Checking the Alarm Indicators 41 Preparing Fuel Oil and Coolant in Reserve 41 Engine Operation 43 Starting the Engine 44 Restarting After Starting Failure 45 Starting at Low Temperatures 45 ...

Page 5: ...aintenance of EPA Emission Related Parts 60 Periodic Maintenance Procedures 61 After Initial 50 Hours of Operation 61 Every 50 Hours of Operation 65 Every 250 Hours of Operation 67 Every 500 Hours of Operation 73 Every 1000 Hours of Operation 74 Troubleshooting 77 Troubleshooting After Starting 77 Troubleshooting Chart 79 Troubleshooting Information 82 Long Term Storage 83 Prepare Engine for Long ...

Page 6: ...mission Control System Warranty USA Only 129 Your Warranty Rights and Obligations 130 Warranty Period 130 Warranty Coverage 131 Exclusions 131 Owner s Responsibility 131 Customer Assistance 132 Emission System Warranty 133 Non Road Emission System Warranty 133 Yanmar Co Ltd Limited Emission Control System Warranty USA Only 133 TABLE OF CONTENTS vi JH4 Series Operation Manual ...

Page 7: ... operating practices and maintenance procedures Keep this Operation Manual in a convenient place for easy access If this Operation Manual is lost or damaged order a new one from your authorized Yanmar marine dealer or distributor Make sure this manual is transferred to subsequent owners This manual should be considered a permanent part of the engine and remain with it Constant efforts are made to ...

Page 8: ...P Take a few moments to record the information you need when you contact Yanmar for service parts or literature Engine Model Engine Serial No Date Purchased Dealer Dealer Phone INTRODUCTION 2 JH4 Series Operation Manual ...

Page 9: ...and label at the same time This safety alert symbol appears with most safety statements It means attention become alert your safety is involved Please read and abide by the message that follows the safety alert symbol DANGER Indicates a hazardous situation which if not avoided will result in death or serious injury WARNING Indicates a hazardous situation which if not avoided could result in death ...

Page 10: ...ANGER The safety messages that follow have WARNING level hazards NEVER permit anyone to install or operate the engine without proper training Read and understand this Operation Manual before you operate or service the engine to ensure that you follow safe operating practices and maintenance procedures Safety signs and labels are additional reminders for safe operating and maintenance techniques Se...

Page 11: ... Hazard Rotating parts can cause severeinjuryordeath NEVER wear jewelry unbuttoned cuffs ties or loose fitting clothing and ALWAYS tie long hair back when working near moving rotating parts such as the flywheel or PTO shaft Keep hands feet and tools away from all moving parts Alcohol and Drug Hazard NEVER operate the engine while under the influence of alcohol or drugs or feeling ill Exposure Haza...

Page 12: ...ne is operating in an enclosed area All internal combustion engines create carbon monoxide gas during operation and special precautions are required to avoid carbon monoxide poisoning CAUTION The safety messages that follow have CAUTION level hazards Poor Lighting Hazard Avoid personal injury or equipment damage Ensure that the work area is adequately illuminated ALWAYS install wire cages on porta...

Page 13: ...of time If you have an installation with two or three engines and only one engine is operating the water pickup thru hull of the non running engine s should be closed This will prevent water from being forced past the seawater pump and eventually finding its way into the engine The result of water entering the engine could cause seizure or other serious problems If you have an installation with tw...

Page 14: ...d Figure 4 show the location of safety decals on Yanmar JH4 series marine engines 3JH4E Engines 3 1 2 0004550 WARNING 196630 12980 Figure 1 1 Part Number 128377 07350 2 Part Number 128377 07260 3 Part Number 196630 12980 SAFETY 8 JH4 Series Operation Manual ...

Page 15: ...4JH4AE Engines 0004551 4 3 1 WARNING 2 Figure 2 1 Part Number 128377 07350 2 Part Number 128377 07260 3 Part Number 196630 12980 4 Part Number 128377 07150 SAFETY JH4 Series Operation Manual 9 ...

Page 16: ...4JH4 TE Engines 0003632 WARNING 128296 07300 1 2 3 4 Figure 3 1 Part No 128377 07350 2 Part No 128377 07260 3 Part No 196630 12980 4 Part No 128296 07300 SAFETY 10 JH4 Series Operation Manual ...

Page 17: ...4JH4 HTE Engines WARNING 128296 07300 2 1 4 3 0004552 Figure 4 1 Part No 128377 07350 2 Part No 128377 07260 3 Part No 128296 07300 4 Part No 196630 12980 SAFETY JH4 Series Operation Manual 11 ...

Page 18: ...This Page Intentionally Left Blank SAFETY 12 JH4 Series Operation Manual ...

Page 19: ...e and accessible for service To handle the drive equipment propulsion systems including the propeller and other onboard equipment always observe the instructions and cautions given in the operation manuals supplied by the shipyard and equipment manufacturers The JH4 series engines are designed to be operated at maximum throttle 3000 3200 rpm for less than 5 of total engine time 30 minutes out of e...

Page 20: ...crease Low idle speed does not allow break in of sliding parts If operating engine at low speed and light load you must race the engine to clean the carbon from the cylinders and fuel injection valve Perform this procedure in open waters With the clutch in NEUTRAL accelerate from the low speed position to the high speed position briefly Repeat this process five times Once past the initial 10 hours...

Page 21: ...e Gear 4 Oil Cooler 5 Engine Oil Filter 6 Fuel Feed Pump 7 Engine Oil Filler Cap 8 Fuel Injection Pump 9 Fuel Filter 10 Engine Oil Dipstick 11 Intake Manifold Non Service Side 3JH4E 1 2 3 4 5 6 7 8 9 10 0004544 Figure 2 1 Coolant Filler Cap 2 Engine Nameplate on rocker arm cover 3 Fresh Water Pump 4 Belt Cover 5 Seawater Pump 6 Starter Motor 7 Mixing Elbow 8 Exhaust Manifold 9 Alternator 10 Coolan...

Page 22: ... 5 Engine Oil Dipstick 6 Fuel Priming Pump 7 Fuel Filter 8 Fuel Injection Pump 9 Engine Oil Filler Cap 10 Electric Fuel Feed Pump 11 Engine Oil Filter 12 Oil Cooler Non Service Side 4JH4AE 1 5 6 7 8 2 3 9 4 0004546 Figure 4 1 Engine Nameplate on rocker arm cover 2 Fresh Water Pump 3 Belt Cover 4 Seawater Pump 5 Coolant Filler Cap 6 Coolant Tank Heat Exchanger 7 Exhaust Manifold 8 Starter Motor 9 A...

Page 23: ...H4A shown 5 Engine Oil Cooler 6 Engine Oil Filter 7 Fuel Injection Pump 8 Fuel Filter 9 Fuel Priming Pump 10 Engine Oil Dipstick 11 Intake Manifold 12 Engine Oil Filler Cap Non Service Side 4JH4 TE 1 2 3 9 6 8 7 5 4 0004547 Figure 6 1 Engine Nameplate on rocker arm cover 2 Coolant Filler Cap 3 Fresh Water Pump 4 Belt Cover 5 Seawater Pump 6 Alternator 7 Starter Motor 8 Exhaust Water Mixing Elbow 9...

Page 24: ...Engine Oil Cooler 6 Engine Oil Filter 7 Fuel Injection Pump 8 Fuel Filter 9 Fuel Priming Pump 10 Engine Oil Dipstick 11 Intake Manifold 12 Engine Oil Filler Cap Non Service Side 4JH4 HTE 1 2 3 10 6 9 8 7 5 4 0004549 Figure 8 1 Engine Nameplate on rocker arm cover 2 Coolant Filler Cap 3 Fresh Water Pump 4 Belt Cover 5 Seawater Pump 6 Alternator 7 Intercooler 8 Starter Motor 9 Exhaust Mixing Elbow 1...

Page 25: ...N JAPAN Model Figure 9 Gear Model ENG No Model min 1 min 1 min 1 Continuous power kW Speed of prop shaft Fuel stop power kW 0004574 Figure 10 The marine gear nameplate Figure 11 is attached to the marine gear Check the marine gear s model gear ratio oil used oil quantity and serial number MODE L KM GEAR RATIO OIL SAE 20 30HD OIL QTY LTR NO 0004529 Figure 11 The sail drive nameplate Figure 12 is at...

Page 26: ...e coolant temperature rises the pressure inside the fresh water tank increases and opens the pressure valve in the filler cap When the pressure valve in the filler cap is opened hot water and steam pass through a rubber hose to the coolant recovery tank When the engine cools and the pressure inside the coolant recovery tank drops the vacuum valve in the filler cap opens and the coolant in the cool...

Page 27: ...l Optional Equipment and Functions The instrument panel is located in the cockpit The following instruments enable you to start or stop the engine and to monitor its condition during operation B Type 0004486 1 2 3 4 5 6 7 8 9 Figure 13 1 Tachometer 2 Hourmeter 3 Moisture Cap for Key Switch 4 Key Switch 5 Stop Button 6 Battery Low Charge Indicator 7 Water in Sail Drive Seal Indicator 8 Engine Oil L...

Page 28: ...ow Pressure Indicator 4 Engine Oil Pressure Gauge 5 Tachometer 6 Hourmeter 7 Moisture Cap for Key Switch 8 Key Switch 9 Stop Button 10 Battery Low Charge Indicator 11 Water in Sail Drive Seal Indicator 12 Water in Fuel Filter Indicator if equipped 13 Insufficient Seawater Flow Indicator PRODUCT OVERVIEW 22 JH4 Series Operation Manual ...

Page 29: ... key is released the switch will automatically move to the ON position The START position Figure 15 4 allows current to the starting motor When starting the engine move the key to the START position and release The key will automatically move to the ON position When the key is in the OFF position Figure 15 2 the electric current is off The key can be inserted or removed in this position The ON pos...

Page 30: ... normal the oil pressure sensor will send a signal to the indicator causing it to light and the alarm to sound Stop operation immediately to avoid damage to the engine Check the oil level and troubleshoot the lubrication system Figure 19 Water in Sail Drive Seal Indicator and Alarm Figure 19 When water is detected between the seals of the sail drive the indicator will light and the alarm will soun...

Page 31: ...tch OFF ON START ON Engine Before start Running Alarm Sound Stop Indicators Battery Low Charge Indicator ON OFF Coolant High Temperature Indicator OFF OFF Engine Oil Low Pressure Indicator ON OFF Water in Sail Drive Seal Indicator if equipped OFF OFF PRODUCT OVERVIEW JH4 Series Operation Manual 25 ...

Page 32: ...f the boat ahead or astern and also acts as an accelerator by increasing engine speed as the lever is pushed further in FORWARD or REVERSE directions When the handle is pulled out Figure 23 1 the engine speed can be controlled without engaging the clutch The clutch remains in NEUTRAL no load position Turn the knob Figure 23 2 counterclockwise to move the handle or clockwise to lock the handle 2 1 ...

Page 33: ...ded by Yanmar for the best engine performance to prevent engine damage and to comply with EPA warranty requirements Only use clean diesel fuel Diesel fuel should comply with the following specifications The table lists several worldwide specifications for diesel fuels DIESEL FUEL SPECIFICATION LOCATION No 2 D No 1 D ASTM D975 USA EN590 96 European Union ISO 8217 DMX International BS 2869 A1 or A2 ...

Page 34: ...d Total aromatics content should not exceed 35 by volume Less than 30 is preferred PAH polycyclic aromatic hydrocarbons content should be below 10 by volume Do not use Biocide Do not use kerosene or residual fuels Handling of Diesel Fuel 1 Water and dust in the fuel may cause engine failure When fuel is stored be sure that the inside of the storage container is clean and dry and that the fuel is s...

Page 35: ... so that only clean fuel is distributed to the engine Fuel System 3JH4E 4JH4 TE and 4JH4 HTE 0004489 1 2 3 4 5 6 7 8 Figure 3 1 Fuel Filter 2 To Fuel Injection Pump 3 Less than 500 mm 20 0 in 4 Fuel Cock 5 20 30 mm 0 75 1 125 in approximate 6 Drain Cock 7 Fuel Tank 8 Fuel Return Line Install the fuel line from the fuel tank to the fuel injection pump as shown in Figure 3 The recommended fuel water...

Page 36: ...n explosion 1 Clean the area around the fuel cap 2 Remove the fuel cap from the fuel tank 3 Fill the tank with clean fuel free of oil and dirt NOTICE Hold the hose nozzle firmly against the filler port while filling This prevents static electricity buildup which could cause sparks and ignite fuel vapors 4 Stop fueling when the gauge shows the fueltankisfull NOTICE NEVERoverfill the fuel tank 5 Rep...

Page 37: ...ten the air bleed screw Note After engine start up the automatic air bleeding device works to purge the air in the fuel system Bleeding the Fuel System 4JH4AE 1 2 3 4 5 6 0004555 Figure 6 1 Fuel Injector 2 Fuel Filter 3 Priming Pump 4 Air Bleed Screw 5 Fuel Feed Pump 6 Fuel Injection Pump 1 Check the fuel level in the fuel tank Refill if necessary 2 Open the fuel cock of the fuel tank 3 Loosen the...

Page 38: ...API Service Categories CD or higher 4JH4AE API Service Category CH 4 only SAE Viscosity 10W30 15W40 Engine oil 10W30 and 15W40 can be used throughout the year Note 1 Be sure the engine oil engine oil storage containers and engine oil filling equipment are free of sediment or water 2 Change the engine oil after the first 50 hours of operation and then at every 250 hours thereafter 3 Select the oil ...

Page 39: ...her models are similar 1 It is recommended that the engine be aslevelaspossiblebeforecheckingthe oil 2 Remove dipstick Figure 9 3 and wipe with clean cloth 3 Fully reinsert dipstick 4 Remove dipstick The oil level should be between upper Figure 9 4 and lower Figure 9 5 lines on the dipstick 5 Add oil if necessary See Adding Engine Oil on page 33 6 Fully reinsert dipstick Adding Engine Oil 1 NOTICE...

Page 40: ...ssifications KM4A2 KMH4A API Service Categories CD or higher SAE Viscosity 20 or 30 ZF30M ZF25A ATF Automatic Transmission Fluid Sail Drive Oil Specifications SD50 Refer to the operation manual of the sail drive for the procedure to fill or replace the sail drive oil 3JH4E 4JH4AE SAE Viscosity 90 or 80W90 QuickSilver 1 High Performance Gear Lube 4JH4 TE Only use QuickSilver High Performance Gear L...

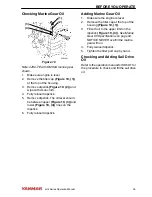
Page 41: ...s on the dipstick 6 Fully reinsert dipstick Adding Marine Gear Oil 1 Make sure the engine is level 2 Remove the filler cap at the top of the housing Figure 10 1 3 Fill with oil to the upper limit on the dipstick Figure 10 3 See Marine Gear Oil Specifications on page 34 NOTICE NEVER overfill the marine gear with oil 4 Fully reinsert dipstick 5 Tighten the filler port cap by hand Checking and Adding...

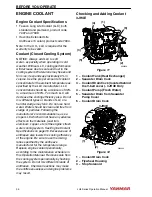
Page 42: ...ng the manufacturer s recommendations use a proper LLC which will not have any adverse effects on the materials cast iron aluminum copper etc oftheengine sfresh water cooling system See Engine Coolant Specifications on page 36 Excessive use of antifreeze also lowers the cooling efficiency of the engine Be sure to use the mixing ratios specified by the antifreeze manufacturer for the temperature ra...

Page 43: ...ock 6 Flywheel Housing 4JH4AE 1 0004558 Figure 14 1 Coolant Drain Cock 4JH4 TE 4 3 2 1 0004514 Figure 15 1 Coolant Tank Heat Exchanger 2 Coolant Pump Fresh Water 3 Seawater Drain from Seawater Pump Cover 4 Coolant Drain Cock 2 used 4JH4 TE 1 0004559 2 3 Figure 16 1 Coolant Drain Cock 2 Seawater Drain Cock 3 Marine Gear Cooler BEFORE YOU OPERATE JH4 Series Operation Manual 37 ...

Page 44: ... Loosen the filler cap of the coolant tank to relieve the pressure then remove the filler cap 2 1 4 3 0004492 Figure 19 1 Coolant Filler Cap 2 Filler Cap Tabs 3 Filler Port Notches 4 Coolant Tank 3 Pour coolant slowly into the coolant tank Figure 19 4 to avoid air bubbles Fill until coolant overflows from the filler port 4 Align filler cap tabs Figure 19 2 with filler port notches Figure 19 3 and ...

Page 45: ...nmar dealer or distributor CRANKING THE ENGINE When performing engine break in or if the engine has not been used for a long period of time engine oil will not be distributed to all of the operating parts Using the engine in this condition will lead to seizure After a long period of non use distribute engine oil to each part by cranking the engine Perform the following procedure before beginning o...

Page 46: ...ion Manual Periodic maintenance prevents unexpected downtime reduces the number of accidents due to poor engine performance and helps extend the life of the engine Make sure you check the following items Visual Checks 1 Check for engine oil leaks 2 Check for fuel leaks 3 Check for engine coolant leaks 4 Check for damaged or missing parts 5 Check for loose missing or damaged fasteners 6 Check the e...

Page 47: ...n before use See Checking and Adjusting the Alternator V Belt Tension on page 62 Checking the Remote Control Handle Check the operation of the remote control handle and ensure it moves smoothly If it is hard to operate grease the joints of the remote control cable and lever bearings If the lever is too loose adjust the remote control cable See Checking and Adjusting Remote Control Cables on page 6...

Page 48: ...This Page Intentionally Left Blank BEFORE YOU OPERATE 42 JH4 Series Operation Manual ...

Page 49: ...d unexpected equipment movement Shift the marine gear into the NEUTRAL position any time the engine is at idle To prevent accidental equipment movement NEVER start the engine in gear Sever Hazard Keep children and pets away while the engine is operating Exhaust Hazard Avoid serious injury or death NEVER block windows vents or other means of ventilation if the engine is operating in an enclosed are...

Page 50: ...ributor if the engine will be operated outside of this standard temperature range NEVER engage the starter motor while the engine is running Damage to the starter motor pinion and or ring gear will result STARTING THE ENGINE NOTICE If the vessel is equipped with a water lift water lock muffler excessive cranking could cause sea water to enter the cylinders and damage the engine If the engine does ...

Page 51: ...ir is in the fuel system fuel cannot reach the fuel injection pump Bleed the air out of the system See Bleeding the Fuel System on page 30 Starting at Low Temperatures Comply with local environmental requirements Use engine heaters to avoid starting problems and white smoke Do not use starting aids NOTICE NEVER use an engine starting aid such as ether Engine damage will result To limit white smoke...

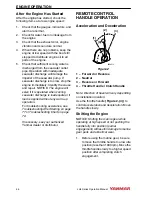
Page 52: ...without any warm up operation For troubleshooting assistance see Troubleshooting After Starting on page 77 or Troubleshooting Chart on page 79 If necessary see your authorized Yanmar dealer or distributor REMOTE CONTROL HANDLE OPERATION Acceleration and Deceleration 0004513 1 2 4 3 Figure 2 1 Forward or Reverse 2 Neutral 3 Reverse or Forward 4 Throttle Handle Clutch Handle Note Direction of travel...

Page 53: ...ced to a minimum NOTICE When trolling do not increase engine speed above 1000 rpm This may cause premature wear and damage to the clutch 1 2 3 4 5 6 7 8 0004498 Figure 3 1 Cable Fitting 2 Trolling Lever 3 Low Speed Trolling 4 High Speed 5 Loosen 6 Tighten 7 Normal Operation High Speed 8 Trolling Low Speed 1 Operation continues at low engine speed of 1000 rpm or less 2 Reduce the speed by moving th...

Page 54: ...he key switch to OFF Note Continue to hold the stop button in until the engine is completely stopped If the button is released before the engine has completely stopped it may restart If the engine does not shut down see Emergency Shutdown on page 48 5 Remove the key and cover the key switch with the moisture cap 6 Turn off the battery master switch if equipped 7 Close the fuel cock 8 Close the sea...

Page 55: ... master switch if equipped is turned to OFF Fill the fuel tank See Filling the Fuel Tank on page 30 Close seawater cock s If there is a risk of freezing check that the cooling system contains enough coolant See Engine Coolant Specifications on page 36 If there is a risk of freezing drain the seawater system See Drain Seawater Cooling System on page 84 At temperatures below 0 C 32 F drain seawater ...

Page 56: ...This Page Intentionally Left Blank ENGINE OPERATION 50 JH4 Series Operation Manual ...

Page 57: ... it to a hoist and load it on a truck Avoid personal injury or equipment damage The engine lifting eyes are engineered to lift the weight of the marine engine only ALWAYS use the engine lifting eyes when lifting the engine Avoid serious personal injury Additional equipment is necessary to lift the marine engine and marine gear together ALWAYS use lifting equipment with sufficient capacity to lift ...

Page 58: ...haust system All internal combustion engines create carbon monoxide gas during operation and special precautions are required to avoid carbon monoxide poisoning Shock Hazard Avoid serious personal injury or equipment damage ALWAYS turn off the battery switch if equipped or disconnect the negative battery cable before servicing the equipment Avoid personal injury or equipment damage ALWAYS keep the...

Page 59: ...he engine The Importance of Daily Checks The Periodic Maintenance Schedule assume that the daily checks are performed on a regular basis Make it a habit of performing daily checks before the start of each operating day See Daily Checks on page 40 Keep a Log of Engine Hours and Daily Checks Keep a log of the number of hours the engine is run each day and a log of the daily checks performed Also not...

Page 60: ...ed only to the bolts with a 7 head JIS strength classification 7T Apply 60 torque to bolts that are not listed Apply 80 torque when tightened to aluminum alloy Bolt diameter x pitch mm M6 x 1 0 M8 x 1 25 M10 x 1 5 M12 x 1 75 M14 x 1 5 M16 x 1 5 Tightening Torque N m 11 0 1 0 26 0 3 0 50 0 5 0 90 0 10 0 140 0 10 0 230 0 10 0 kgf m 1 1 0 1 2 7 0 3 5 1 0 5 9 2 1 0 14 3 1 0 23 5 1 0 lb ft 19 0 2 1 37 ...

Page 61: ...followingaretheconditionsthatmustbe met in order to ensure that the emissions during operation meet the EPA standards The operating conditions should be as follows Ambient temperature 20 to 40 C 4 to 104 F Relative humidity 80 or lower 3JH4E and 4JH4AE Permissible value for intake negative pressure 4 0 kPa 400 mmAq or lower 4JH4 TE and 4JH4 HTE Permissible value for intake negative pressure 2 0 kP...

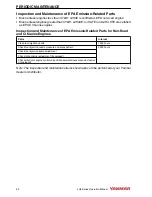
Page 62: ...spection and Maintenance of EPA Emission Related Parts section are covered in Periodic Maintenance Schedule on page 57 This maintenance must be performed to keep the emission values of your engine in the standard values during the warranty period The warranty period is determined by the age of the engine or the number of hours of operation PERIODIC MAINTENANCE 56 JH4 Series Operation Manual ...

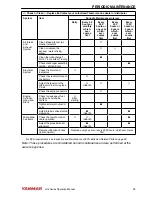
Page 63: ...following should be treated only as a general guideline CAUTION Establish a periodic maintenance plan according to the engine application and make sure you perform the required periodic maintenance at intervals indicated Failure to follow these guidelines will impair the engine s safety and performance characteristics shorten the engine s life and may affect the warranty coverage on your engine Se...

Page 64: ...ial 50 Drain the fuel water separator Replace the fuel filter element Check the fuel injection timing Check the fuel injector spray pattern Lubricating System Check the lube oil level Engine Marine Gear Replace the lube oil Engine Initial 50 Marine Gear Initial 50 Replace the oil filter element Engine Initial 50 Marine Gear if equipped Initial 50 Cooling System Seawater outlet During Oper ation Ch...

Page 65: ...Check the electrolyte level in the battery Adjust the tension of the alternator V belt or replace V belt Initial 50 Check the wiring connectors Engine Cylinder Head and Block Check for leakage of fuel engine oil and engine coolant After starting Tighten all major nuts and bolts Adjust intake exhaust valve clearance Initial 50 Miscellane ous Items Check the remote control cable operation Initial 50...

Page 66: ...ated Parts for Non Road and CI Marine Engines Parts Interval Clean fuel injection nozzle 1500 hours Check fuel injection nozzle pressure and spray pattern 3000 hours Check fuel injection pump adjustment Check turbocharger adjustment if equipped Check electronic engine control unit and its associated sensors and actuators if equipped Note The inspection and maintenance items shown above to be perfo...

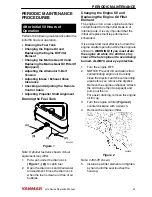
Page 67: ...ter Element The engine oil on a new engine becomes contaminated from the initial break in of internal parts It is very important that the initial oil replacement is performed as scheduled It is easiest and most effective to drain the engine oil after operation while the engine is still warm WARNING If you must drain the engine oil while it is still hot stay clear of the hot engine oil to avoid bei...

Page 68: ...ter a Remove side cover Figure 3 5 and remove the filter Figure 3 2 b Clean the filter thoroughly with kerosene or clean diesel fuel c Hold the filter in place with the coil spring Figure 3 3 and insert into the case Install a new O ring Figure 3 4 in the side cover d Install side cover Figure 3 5 and tighten side cover bolts 3 Fill marine gear with clean marine gear oil See Marine Gear Oil Specif...

Page 69: ...stop bolt on the governor This will void the engine warranty Adjusting Engine Speed Remote Control Cable Ensure the control lever on the engine side moves to the high speed stop position and low speed stop position when the remote control lever is moved to HIGH and then to LOW 3JH4E 4JH4AE 0003625 3 5 6 1 2 4 Figure 5 1 Cable 2 Fuel Injection Pump 3 Adjustment Screw 4 Low Speed Stop 5 Control Leve...

Page 70: ...d retighten the cable fitting Figure 7 1 Figure 8 1 Adjusting Trolling Remote Control Handle If Equipped 1 2 3 4 5 6 7 8 0004498 Figure 9 1 Cable Fitting 2 Trolling Lever 3 Low Speed Trolling 4 High Speed 5 Loosen 6 Tighten 7 Normal Operation High Speed 8 Trolling Low Speed Note KMH4A marine gear shown 1 Ensure that the trolling lever Figure 9 2 is in the high speed Figure 9 4 position when the tr...

Page 71: ...arine dealer or distributor Every 50 Hours of Operation After you complete the initial 50 hour maintenance procedures perform the following procedures every 50 hours thereafter or monthly whichever comes first Draining Fuel Filter Water Separator Checking Battery Electrolyte Level Draining Fuel Filter Water Separator 3JH4E and 4JH4AE Attach to Hull 0004564 1 2 Figure 10 1 Close the fuel cock of th...

Page 72: ...sistant cover and tighten the hose clamp 8 Bleed air from the fuel system See Bleeding the Fuel System on page 30 Checking the Battery Electrolyte Level Serviceable Batteries Only WARNING Batteries contain sulfuric acid NEVER allow battery fluid to come in contact with clothing skin or eyes Severe burns could result ALWAYS wear safety goggles and protective clothing when servicing the battery If b...

Page 73: ...ter Element Changing the Engine Oil and Replacing the Engine Oil Filter Element Changing the Marine Gear Oil and Replacing Marine Gear Oil Filter Element If Equipped Checking or Replacing the Seawater Impeller Changing the Coolant Cleaning Intake Silencer Air Cleaner Element Cleaning the Exhaust Water Mixing Elbow Cleaning the Turbocharger If Equipped Adjusting the Tension of the Alternator V Belt...

Page 74: ...oosen the hose clamp and remove the fire resistant cover which is installed to the lower part of the fuel filter water separator to protect the water alarm switch 3 Attach a tube to the drain plug 4 Loosen the drain plug and drain the fuel from the drain plug 5 Disconnect the electrical connectors and remove the alarm switch with a spanner wrench 6 Remove the filter housing Figure 14 1 with a filt...

Page 75: ...enance are required Impeller blades are cracked or nicked Edges or surfaces of the blades are marred or scratched Wear plate is damaged 3 If no damage is found when inspecting the inside of the pump install the O ring and side cover 4 If a large amount of water leaks continuously from the water drain line below the seawater pump during operation replace the mechanical seal See your authorized Yanm...

Page 76: ...install Figure 18 Puller B Option Part No 129671 92100 0004502 A B Figure 19 A B 110 mm 140 mm Replacing Coolant Replace coolant every year Note If Long Life coolant is used replace coolant every 2 years 3JH4E 0004556 2 5 3 4 1 6 Figure 20 1 Coolant Tank Heat Exchanger 2 Seawater Drain Cock 3 Coolant Drain Cock 3JH4E Only Located behind the V belt cover 4 Coolant Pump Fresh Water 5 Seawater Drain ...

Page 77: ...ank Heat Exchanger 4 Coolant Drain Cock 5 Seawater Drain from Seawater Pump Cover 6 Flywheel Housing 4JH4AE 2 1 0004570 Figure 23 1 Coolant Drain Cock 2 Stop Solenoid 4JH4 TE 4 3 0004571 1 2 Figure 24 1 Coolant Tank Heat Exchanger 2 Coolant Pump Fresh Water 3 Seawater Drain from Seawater Pump Cover 4 Coolant Drain Cock 2 used PERIODIC MAINTENANCE JH4 Series Operation Manual 71 ...

Page 78: ... drain cocks are opened before shipping from the factory Marine gear ZF25A does not have a drain cock on the clutch cooler 1 Open all coolant drain cocks 2 Allow to drain completely Dispose of waste properly 3 Close all the drain cocks 4 Fill coolant tank and coolant recovery tank with appropriate coolant See Engine Coolant Specifications on page 36 and See Checking and Adding Coolant on page 36 C...

Page 79: ...usting the Alternator V Belt Tension See Checking and Adjusting the Alternator V Belt Tension on page 62 Checking the Wiring Connectors See your authorized Yanmar marine dealer or distributor Tightening All Major Nuts and Bolts See Tightening Fasteners on page 54 or see your authorized Yanmar marine dealer or distributor Every 500 Hours of Operation Perform the following maintenance every 500 hour...

Page 80: ... replaced every 1000 hours even if it is not damaged See Checking or Replacing Seawater Pump Impeller on page 69 Clean and Check the Seawater Passages After prolonged use clean the seawater passages to remove trash scale rust and other contaminants that collect in the cooling water passages This can cause declining cooling performance The following items need to be inspected Heat Exchanger Pressur...

Page 81: ...ust Valve Clearance See your authorized Yanmar marine dealer or distributor Checking the Remote Control Cable Operation See your authorized Yanmar marine dealer or distributor Adjusting the Propeller Shaft Alignment See your authorized Yanmar marine dealer or distributor PERIODIC MAINTENANCE JH4 Series Operation Manual 75 ...

Page 82: ...This Page Intentionally Left Blank PERIODIC MAINTENANCE 76 JH4 Series Operation Manual ...

Page 83: ...ssion of black exhaust smoke indicates engine overloading This shortens the engine s life and should be avoided Are there abnormal vibrations or noise Depending on the hull structure engine and hull resonance may suddenly increase at certain engine speed ranges causingheavyvibrations Avoidoperation in this speed range If any abnormal sounds are heard stop the engine and inspect for cause Alarm sou...

Page 84: ...lutch in NEUTRAL accelerate from the low speed position to the high speed position and repeat this process about five times This is done to clean out carbon from the cylinders and the fuel injection valves NOTICE Neglecting the race the engine will result in poor exhaust color and reduce engine performance Periodically operate the engine near maximum speed while underway This will generate higher ...

Page 85: ...broken See your authorized Yanmar marine dealer or distributor Coolant high temperature alarm comes on Coolant fresh water in coolant tank is low Check coolant level and refill See Checking and Adding Coolant on page 36 Insufficient seawater causing temperature to rise Check seawater system Contamination inside cooling system See your authorized Yanmar marine dealer or distributor Faulty Warning D...

Page 86: ... See Diesel Fuel Specifications on page 27 Problem with fuel injection See your authorized Yanmar marine dealer or distributor Compression leakage from intake exhaust valve See your authorized Yanmar marine dealer or distributor Starter doesnotturnor turns slowly engine can be turned manually Faulty clutch position Shift to NEUTRAL and start Insufficient battery charge Check fluid level Recharge R...

Page 87: ...ions on page 27 Faulty spraying of fuel injector See your authorized Yanmar marine dealer or distributor Incorrect intake exhaust valve clearance See your authorized Yanmar marine dealer or distributor White smoke Improper fuel Replace with recommended fuel See Diesel Fuel Specifications on page 27 Faulty spraying of fuel injector See your authorized Yanmar marine dealer or distributor Fuel inject...

Page 88: ...t model hull material size tons Use type of boating number of hours run Total number of operation hours refer to hourmeter age of boat The operating conditions when the problem occurs Engine rpm Color of exhaust smoke Type of diesel fuel Type of engine oil Any abnormal noises or vibration Operating environment such as high altitude or extreme ambient temperatures etc Engine maintenance history and...

Page 89: ...e Note If the engine is close to a periodic maintenance interval perform those maintenance procedures before putting the engine into long term storage 1 Wipe off any dust or oil from the outside of engine 2 Drain water from fuel filters 3 Drain fuel tank completely or fill the tank to prevent condensation 4 Grease the exposed areas and joints of the remote control cables and the bearings of the re...

Page 90: ...Exchanger 2 Seawater Drain Cock 3 Coolant Drain Cock 3JH4E only 4 Coolant Pump Fresh Water 5 Seawater Drain from Seawater Pump Cover 6 Coolant Drain Cock 3JH4E 3 1 2 0004557 Figure 2 1 Coolant Drain Cock 2 Flywheel Housing 3 Stop Solenoid LONG TERM STORAGE 84 JH4 Series Operation Manual ...

Page 91: ...eel Housing 4JH4AE 2 1 0004570 Figure 4 1 Coolant Drain Cock 2 Stop Solenoid 4JH4 TE 4 3 0004571 1 2 Figure 5 1 Coolant Tank Heat Exchanger 2 Coolant Pump Fresh Water 3 Seawater Drain from Seawater Pump Cover 4 Coolant Drain Cock 2 used 4JH4 TE 1 0004559 2 3 Figure 6 1 Coolant Drain Cock 2 Seawater Drain Cock 3 Marine Gear Cooler LONG TERM STORAGE JH4 Series Operation Manual 85 ...

Page 92: ...k on the clutch cooler NOTICE If seawater is left inside it may freeze and damage parts of the cooling system fresh water cooler seawater pump etc when ambient temperature is below 32 F 0 C 1 Open the seawater drain cock on the clutch cooler if equipped Allow to drain Open the seawater drain cock on the intercooler 4JH4 HTE only and drain If no water drains use a stiff brush to remove any debris 2...

Page 93: ...kshaft Engine speed 29 4 kW 40 0 hp metric 3000 rpm 28 7 kW 39 0 hp metric 3000 rpm Output at propeller Engine speed 28 0 kW 38 1 hp metric 3000 rpm 27 4 kW 37 3 hp metric 3000 rpm Installation Flexible mounting Fuel injection timing FIC 13 1 BTDC FID 12 1 BTDC Fuel injection opening pressure 21 6 0 5 MPa Main power take off At flywheel end Direction of rotation Crankshaft Counterclockwise viewed ...

Page 94: ... in Overall height 623 mm 24 5 in Flywheel major dimension D300 x 66 mm 11 8 x 2 6 in Engine dry mass include marine gear 185 kg 408 lb 186 kg 410 lb 213 kg engine 173 kg 470 lb engine 381 lb 173 kg 467 lb Rating Condition Temperature of fuel 25 C at fuel pump inlet ISO 3046 1 Rating Condition Temperature of fuel 40 C at fuel pump inlet ISO 8665 The total oil quantity includes oil in oil pan chann...

Page 95: ...brication system Splash Oil bath Lubricating oil capacity Total 0 5 L 0 5 qt 0 65 L 0 69 qt SD40 Old type 1 8 L 1 9 qt SD50 2 2 L 2 3 qt Long Reach 58 2 35 L 2 48 qt Long Reach 100 2 45 L 2 59 qt Lubricating oil capacity Effective 0 05 L 0 05 qt 0 15 L 0 16 qt Cooling system Air cooling by fan on flywheel Weight 12 kg 26 5 lb 13 kg 28 7 lb 39 kg 86 0 lb At continuous power engine speed 2907 rpm SP...

Page 96: ...unterclockwise viewed from stern Propeller shaft ahead Clockwise viewed from stern Cooling system Fresh water cooling with heat exchanger Lubrication system Complete enclosed forced lubrication system Cooling water capacity fresh Engine 6 0 L 6 3 qt Coolant recovery tank 0 8 L 0 8 qt Lubricating oil capacity engine Rake angle at rake angle 8 at rake angle 0 Total 5 0 0 3 L 5 3 0 3 qt 5 5 0 3 L 5 8...

Page 97: ...il in oil pan channels coolers and filter The effective amount of oil shows the difference in maximum scale of the dipstick and minimum scale Note Density of fuel 0 842g cm3 at 15 C Fuel temperature at the inlet of the fuel injection pump 1 hp metric 0 7355 kW SPECIFICATIONS JH4 Series Operation Manual 91 ...

Page 98: ...n power take off At flywheel end Direction of rotation Crankshaft Counterclockwise viewed from stern Propeller shaft Ahead Clockwise viewed from stern Cooling system Fresh water cooling with heat exchanger Lubrication system Closed forced lubrication system Cooling water capacity fresh Engine 6 0 L 6 3 qt Coolant recovery tank 0 8 L 0 8 qt Lubricating oil capacity engine Rake angle at rake angle 0...

Page 99: ...65 The total oil quantity includes oil in oil pan channels coolers and filter The effective amount of oil shows the difference in maximum scale of the dipstick and minimum scale Note Density of fuel 0 842g cm3 at 15 C Fuel temperature at the inlet of the fuel injection pump 1 hp metric 0 7355 kW SPECIFICATIONS JH4 Series Operation Manual 93 ...

Page 100: ...eed 2907 rpm ZF30M Lubricating oil ATF Model KM35A2 KM4A1 SD50 coupled at boat builder Type Mechanical cone clutch Reduction ratio Forward Reverse 2 33 3 06 2 64 3 06 1 47 1 47 2 14 2 14 2 63 2 63 3 30 3 30 2 32 Propeller speed Forward Reverse 1246 955 rpm 1103 955 rpm 1983 1993 rpm 1360 1360 rpm 1106 1106 rpm 882 882 rpm 1253 rpm Lubrication system Splash Oil bath Lubricating oil capacity Total 0...

Page 101: ...This Page Intentionally Left Blank SPECIFICATIONS JH4 Series Operation Manual 95 ...

Page 102: ...TDC 1 26 0 01 mm when W CSD is released Fuel injection opening pressure 21 6 0 5 MPa Main power take off At flywheel end Direction of rotation Crankshaft Counterclockwise viewed from stern Propeller shaft Ahead Clockwise from stern Clockwise or counterclockwise Bi rotation Cooling system Fresh water cooling with heat exchanger Lubrication system Complete enclosed forced lubrication system Cooling ...

Page 103: ...r 235 kg 518 lb 237 kg 523 lb 238 kg 525 lb 237 kg engine 173 kg 523 lb engine 381 lb 249 kg engine 207 kg 549 lb engine 456 lb 207 kg 456 lb Rating Condition Temperature of fuel 40 C at fuel pump inlet ISO 8665 The total oil quantity includes oil in oil pan channels coolers and filter The effective amount of oil shows the difference in maximum scale of the dipstick and minimum scale Note Density ...

Page 104: ...1 26 0 01 mm when W CSD is released Fuel injection opening pressure 21 6 0 5 MPa Main power take off At flywheel end Direction of rotation Crankshaft Counterclockwise viewed from stern Propeller shaft Ahead Clockwise from stern Clockwise or counterclockwise Bi rotation Cooling system Fresh water cooling with heat exchanger Lubrication system Complete enclosed forced lubrication system Cooling wate...

Page 105: ...ass including marine gear 245 kg 540 lb 247 kg 545 lb 248 kg 547 lb 247 kg 545 lb 217 kg 478 lb Rating Condition Temperature of fuel 40 C at fuel pump inlet ISO 8665 The total oil quantity includes oil in oil pan channels coolers and filter The effective amount of oil shows the difference in maximum scale of the dipstick and minimum scale Note Density of fuel 0 842g cm3 at 15 C Fuel temperature at...

Page 106: ...d Forward Reverse rpm 1444 1176 1150 1176 2115 2113 1451 1450 1180 1179 1520 1520 1263 1263 1607 1607 1250 1250 1337 Lubrication system Splash Centrifugal pump Trochoid pump Trochoid pump Oil bath Lubrication oil ATF API CD or higher SAE 20 or 30 ATF Quick Silver only Lubricating oil capacity Total 1 1 L 1 2 qt 2 0 L 2 1 qt 2 0 L 2 1 qt 1 8 L 1 9 qt 2 2 L 2 3 qt Lubricating oil capacity Effective ...

Page 107: ...AGRAMS PIPING DIAGRAMS Notation Screw Joint Union Flange Joint Eye Joint Insertion Joint Drilled Hole Coolant Piping Cooling Seawater Piping Lubricating Oil Piping Fuel Oil Piping JH4 Series Operation Manual 101 ...

Page 108: ...3JH4E with KM35P KM35A Marine Gear 0004175 Figure 1 SYSTEM DIAGRAMS 102 JH4 Series Operation Manual ...

Page 109: ...3JH4E with SD50 SD40 Sail Drive 0004176 Figure 2 SYSTEM DIAGRAMS JH4 Series Operation Manual 103 ...

Page 110: ...4JH4AE with KM35P KM35A2 Marine Gear 0004177 cylinder Figure 3 SYSTEM DIAGRAMS 104 JH4 Series Operation Manual ...

Page 111: ...4JH4AE with KM35P KM35A2 Marine Gear marked satisfy EN ISO7840 0004587 Figure 4 SYSTEM DIAGRAMS JH4 Series Operation Manual 105 ...

Page 112: ...4JH4AE with KM4A1 Marine Gear marked satisfy EN ISO7840 0004588 Figure 5 SYSTEM DIAGRAMS 106 JH4 Series Operation Manual ...

Page 113: ...4JH4AE with ZF30M Marine Gear marked satisfy EN ISO7840 0004589 Figure 6 SYSTEM DIAGRAMS JH4 Series Operation Manual 107 ...

Page 114: ...4JH4AE with SD50 Sail Drive marked satisfy EN ISO7840 0004590 Figure 7 SYSTEM DIAGRAMS 108 JH4 Series Operation Manual ...

Page 115: ...4JH4 TE with ZF30M marked satisfy EN ISO7840 0004181 Figure 8 SYSTEM DIAGRAMS JH4 Series Operation Manual 109 ...

Page 116: ...4JH4 TE with KM4A2 0004182 marked satisfy EN ISO7840 Figure 9 SYSTEM DIAGRAMS 110 JH4 Series Operation Manual ...

Page 117: ...4JH4 TE with KM4A ZF25A marked satisfy EN ISO7840 0004183 Figure 10 SYSTEM DIAGRAMS JH4 Series Operation Manual 111 ...

Page 118: ...4JH4 TE with SD50 SD40 marked satisfy EN ISO7840 0004184 Figure 11 SYSTEM DIAGRAMS 112 JH4 Series Operation Manual ...

Page 119: ...4JH4 HTE with KM4A2 marked satisfy EN ISO7840 0004591 Figure 12 SYSTEM DIAGRAMS JH4 Series Operation Manual 113 ...

Page 120: ...4JH4 HTE with KMH4A ZF25A marked satisfy EN ISO7840 0004592 Figure 13 SYSTEM DIAGRAMS 114 JH4 Series Operation Manual ...

Page 121: ...4JH4 HTE with ZF30 0004593 marked satisfy EN ISO7840 Figure 14 SYSTEM DIAGRAMS JH4 Series Operation Manual 115 ...

Page 122: ...arness Wire harness for sub panel only for sail drive 3R 3W YW WL WG B RB LB O YG WB YR Y WR YB GB G GR Key switch GLOW OFF ON START 30 AC G1 G2 17 3L A A 31 L B O P Instrument panel Main station Option 17 AC 30 G1 G2 LB B L YG RB 12V Battery switch 2R 2B 2B 5R 3L Relay Option Option WBr WL YW B W Y 2R 2W S B 3R 10B 10R Y O B B E B E R L RB LB RB LB RB YG LB R L 5R 12V 33 32 22 21 26 27 28 29 30 2...

Page 123: ...lay for 2 station Optional 10 Fuse 3A 11 Starter Switch 12 Stop Switch 13 Tachometer Hourmeter 14 Buzzer 15 Lubricating Oil Low Pressure Alarm 16 Coolant High Temperature Alarm 17 Water in Sail Drive Seal Alarm 18 Battery Low Charge Alarm 19 20 21 Air Heater Optional 22 Engine Stop Solenoid 23 Stop Relay 24 Starter Relay 25 Starter 26 Coolant High Temperature Switch 27 Lubricating Oil Low Pressure...

Page 124: ... B 2B 2R WBr 2B 5R B L E LB RB R LB RB Option Relay W Y B 5R B Y 12V 1 3 2 R WBr P Wire harness 3R Alarm lamps Fuse 3A Alarm lamps B A A L YG RB only for sail drive only for sail drive 2W 2R diodes Instrument panel main station Option G1 P G2 30 WBr diodes L L R O B YW WL YG LB R L L R O B YW WL YG LB G1 G2 30 17 AC W 17 AC W R P B 4JH4AE only 4 5 6 7 8 10 2 1 3 9 14 15 16 17 18 12 11 13 31 33 32 ...

Page 125: ...station Optional 10 Fuse 3A 11 Starter Switch 12 Stop Switch 13 Tachometer Hourmeter 14 Buzzer 15 Lubricating Oil Low Pressure Alarm 16 Coolant High Temperature Alarm 17 Water in Sail Drive Seal Alarm 18 Battery Low Charge Alarm 19 20 21 Air Heater 22 Engine Stop Solenoid 23 Stop Relay 24 Starter Relay 25 Starter 26 Coolant High Temperature Switch 27 Lubricating Oil Low Pressure Switch 28 Alternat...

Page 126: ... sub panel only for sail drive 3R 3W YW WL WG B RB LB O YG WB YR Y WR YB GB G GR Key switch GLOW OFF ON START 30 AC G1 G2 17 3L A A 31 L B O P Instrument panel Main station Option 17 AC 30 G1 G2 LB 20 WB WL 19 YB YW B L YG RB 12V Battery switch 2R 2B 2B 5R 3L Relay Option Option WBr WL YW B W Y 2R 2W S B 3R 10B 10R Y O B B E B E R L RB LB RB LB RB YG LB R L Earth bolt 5R 12V 33 32 22 21 26 27 YB W...

Page 127: ...11 Starter Switch 12 Stop Switch 13 Tachometer Hourmeter 14 Buzzer 15 Seawater 16 Fuel Filter 17 Water in Sail Drive Seal Alarm 18 Battery Low Charge Alarm 19 Oil Pressure Meter Alarm 20 Coolant Temperature Meter Alarm 21 Air Heater Optional 22 Engine Stop Solenoid 23 Stop Relay 24 Starter Relay 25 Starter 26 Coolant High Temperature Switch 27 Lubricating Oil Low Pressure Switch 28 Alternator Opti...

Page 128: ...Wire harness 3R Alarm lamps B A A L YG RB only for sail drive only for sail drive 2W 2R diodes Instrument panel main station Option P WBr Fuse 3A Alarm lamps diodes L L R W O B YW WL YG LB R L L R O WG G YG LB YB WB G1 G2 30 B WL YW 17 AC W 4JH4AE Only P B R 4 5 6 7 8 10 2 1 3 9 14 15 16 17 18 12 11 13 20 19 31 33 32 22 21 26 27 28 29 30 36 34 35 23 24 25 3W 3L 3R YW RB WL LB O WG B YG WB YB GB G ...

Page 129: ... Switch 12 Stop Switch 13 Tachometer Hourmeter 14 Buzzer 15 Seawater 16 Fuel Filter 17 Water in Sail Drive Seal Alarm 18 Battery Low Charge Alarm 19 Oil Pressure Meter Alarm 20 Coolant Temperature Meter Alarm 21 Air Heater 22 Engine Stop Solenoid 23 Stop Relay 24 Starter Relay 25 Starter 26 Coolant High Temperature Switch 27 Lubricating Oil Low Pressure Switch 28 Alternator Optional 29 Alternator ...

Page 130: ...20 mm 2 1 3 m 2 3 m 30 mm 2 40 mm 2 2 8 m 3 5 m 50 mm 2 2W 2R 60 mm 2 4 1 m G1 P G2 30 L L R O B YW WL YG LB R L L R O B YW WL YG LB G1 G2 30 17 AC W 17 AC W P 3W 3L 3R YW RB WL LB O WG B YG WB YB GB YR GR WR G Y G2 17 GLOW OFF ON START Key switch 30 AC G1 WBr WBr W Y 3R B 1 2 3 10 11 12 15 15 17 18 16 19 20 20 21 22 23 24 25 26 28 29 24 30 30 31 32 33 27 16 13 4 5 6 7 8 9 2 3 10 11 12 14 4 5 6 7 ...

Page 131: ...p 1 Option 2 Alarm Lamps 3 Buzzer 4 Oil Pressure 5 Coolant Temperature 6 Sail Drive Seal 7 Battery Low Charge Alarm 8 Fuse 3A 9 Stop Switch 10 Diodes 11 Key Switch 12 Tachometer Hourmeter 13 Instrument panel sub station Option 14 Instrument panel main station Option 15 Wire Harness 16 Relay 17 Wire Harness for Sub Panel 18 Amplifier Sail Drive Only 19 Procured by Customer 20 Battery 21 Battery Swi...

Page 132: ...30 mm 2 40 mm 2 2 8 m 3 5 m 50 mm 2 2W 2R 60 mm 2 4 1 m L L R O B YW WL YG LB G1 G2 30 17 AC W P 3W 3L 3R YW RB WL LB O WG B YG WB YB GB YR GR WR G Y G2 17 GLOW OFF ON START Key switch 30 AC G1 WBr W Y 3R B P WBr R L L R O WG G YG LB YB WB G1 G2 30 B WL YW 17 AC W WB YB GR B 1 2 3 10 11 12 15 15 17 18 38 16 19 20 20 21 22 23 24 25 26 28 29 24 30 30 31 32 33 39 40 27 16 13 4 5 6 7 8 9 2 3 10 11 12 ...

Page 133: ...e Seal 7 Battery Low Charge Alarm 8 Fuse 3A 9 Stop Switch 10 Diodes 11 Key Switch 12 Tachometer Hourmeter 13 Instrument panel sub station Option 14 Instrument panel main station Option 15 Wire Harness 16 Relay 17 Wire Harness for Sub Panel 18 Amplifier Sail Drive Only 19 Procured by Customer 20 Battery 21 Battery Switch 22 Engine Stop Solenoid with VE Pump 23 Air Heater 24 Option 25 Stop Relay 26 ...

Page 134: ...This Page Intentionally Left Blank SYSTEM DIAGRAMS 128 JH4 Series Operation Manual ...

Page 135: ...CE SPECIFICATIONS AND ADJUSTMENTS ENGINE FAMILY 7YDXM2 19D4N APPLICATION COMMERCIAL THIS ENGINE COMPLIES TO U S EPA REGULATIONS 40 CFR PART 94 WHICH APPLY TO MARINE ENGINES DISPLACEMENT PER CYLINDER 0 547 LITERS STANDARDS THC NOx 7 5g kWh CO 5 0g kWh PM 0 40g kWh MODEL YEAR 2007 ENGINE MODEL 4JH4AE YANMAR CO LTD 0004577 Figure 2 4JH4 TE EPA Nameplate 0004152 Figure 3 4JH4 HTE EPA Nameplate MARINE ...

Page 136: ... labor Warranty service or repair will be provided at authorized Yanmar marine dealers or distributors It is recommended that any replacement parts used for maintenance repair or replacement of emission control systems are Yanmar parts The owner may elect to have maintenance replacement or repair of the emission control components and systems performed by any repair establishment or individual and...

Page 137: ...ident caused damage and replacement of expendable and or consumable items made in connection with scheduled maintenance Yanmar disclaims any responsibility for incidental or consequential damages such as loss of time inconvenience loss of use of marine vessel engine or commercial loss Owner s Responsibility As the Yanmar marine engine owner you are responsible for the performance of the required m...

Page 138: ...d like information on the nearest authorized Yanmar dealer or distributor you should contactYanmarMarineUSACorporationfor assistance Yanmar Marine USA Corporation 101 International Parkway Adairsville GA 30103 USA Telephone 770 877 9894 Fax 770 877 7567 EPA WARRANTY USA ONLY 132 JH4 Series Operation Manual ...

Page 139: ...ntable condition exists Yanmar will repair your non road compression ignition engine at no charge to you including diagnosis parts and labor Manufacturer s Warranty Period The model year 1998 or later certified and labeled non road compression ignition engines are warranted for the periods listed below If any emission related part on your engine is found to be defective during the applicable warra...

Page 140: ...sing from defects in material and or workmanship are not covered by this warranty The warranty does not extend to the following malfunctions caused by abuse misuse improper adjustment modification alteration tampering disconnection improper or inadequate maintenance or use of non recommended fuels and lubricating oils accident caused damage and replacement of expendable items made in connection wi...

Page 141: ...like information on the nearest authorized Yanmar dealer or distributor you should contactYanmarMarineUSACorporationfor assistance Yanmar Marine USA Corporation 101 International Parkway Adairsville GA 30103 USA Telephone 770 877 9894 Fax 770 877 7567 EMISSION SYSTEM WARRANTY JH4 Series Operation Manual 135 ...

Page 142: ...136 JH4 Series Operation Manual ...

Reviews: